ENGLISH-NEW MIDWIFERY GNM TY UNIT 5 NORMAL LABOR AND ITS MANAGEMENT
NORMAL LABOR AND ITS MANAGEMENT :
Definition of Labor
Labor:
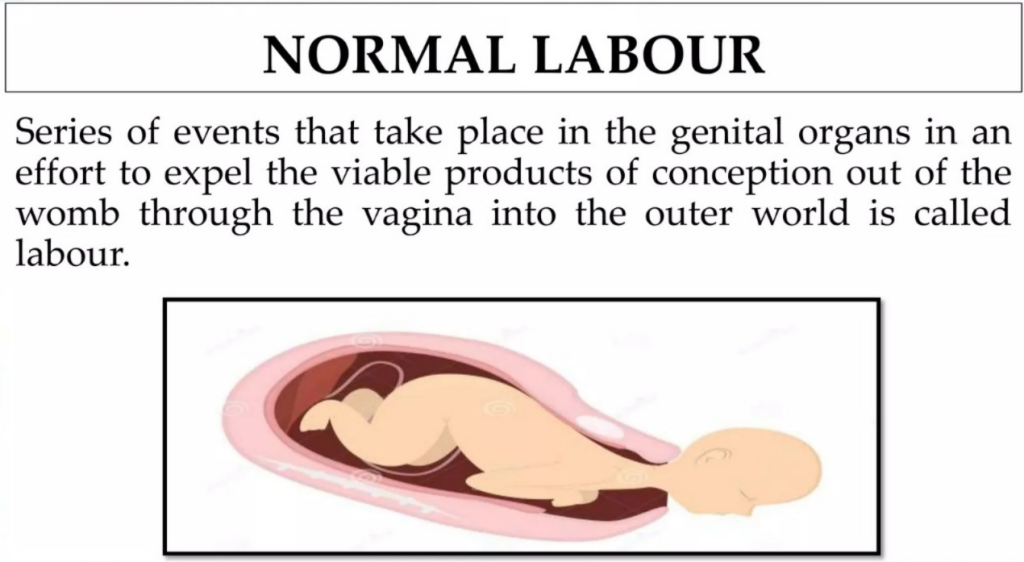
- The process of expelling the viable product of conception from the uterus (womb) into the genital organs to the outside world The series of events that are created is called “Labor”.
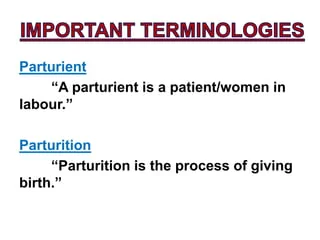
- A woman in labor is called a “parturient” .
And the process of giving birth is called “parturition” . - Normal labor is also called Eutocia.
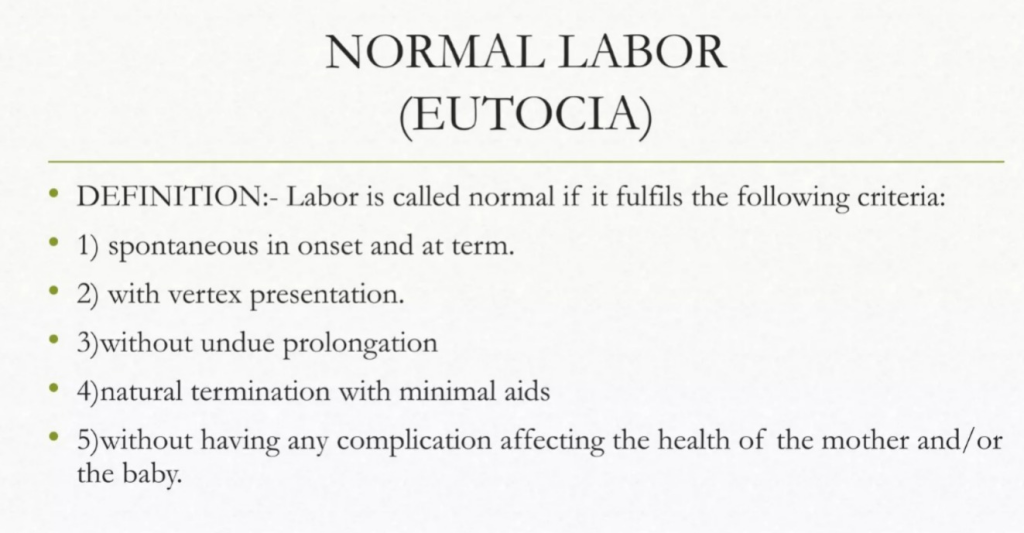
- Normal labor is called when the following The criteria can be fulfilled.
- 1) The onset of labor should be spontaneous and at term (37 to 42 weeks).
- 2) The fetus should be in vertex presentation (the occiput of the fetus’s head should be in the lower part of the uterine cavity and the fetus’s chin should be tucked against its chest).
- 3) The duration of labor should not be too long (i.e. if the mother is a primary gravida, the average duration of labor should be 12 hours and if If the mother is multipara, the average duration of labor should be 6 hours.
- 4) Natural birth should be done with minimal assistance.
- 5) There should be no complications that affect the health of the mother and baby.
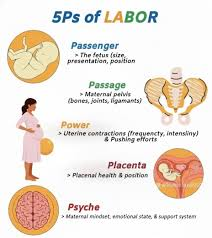
5 “P” factors that affect the duration of labor:

- 1) Passenger (Fits)
- 2) Passage (Birth Canal)
- 3) Power (Contractions)
- 4) Placenta
- 5) Psychological State of Woman
•>
1) Passenger (fetus):
- It involves the presentation of the fetus (breech, transverse), the position of the fetus, and the size of the fetus.
2) Passage (birth canal):
- It involves the maternal pelvis, the resistance and fetopelvic diameter of the birth canal, and the parity of the woman.
3) Power (contractions):
- Frequency, intensity, and duration of contractions.
4) Placenta:
- Site of implantation
5) Psychological state of woman:
- Maternal psychological response, maternal anxiety, emotional factors and amount of sedation.
Stages of Labor:
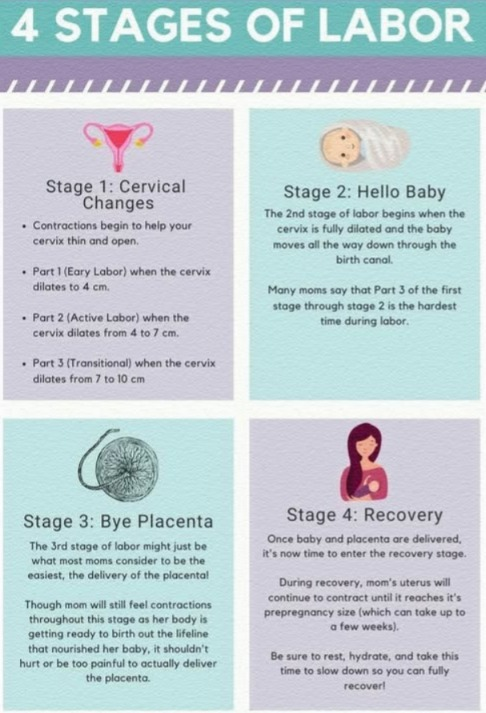
The stages of labor are divided into four stages.
1) First Stage of Labor,
2) Second Stage of Labor,
3) Third Stage of Labor,
4) Fourth Stage of Labor
1) First Stage of Labor (Cervical Stage):
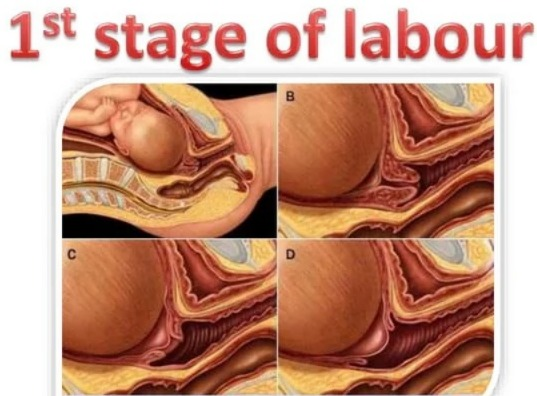
- The first stage of labor is the initial phase of childbirth. In which the cervix gradually opens (dilates) and thins (effaces). This allows the baby to pass from the uterine cavity into the birth canal (vagina). In which regular and rhythmic uterine contractions are observed and the frequency, intensity and duration of uterine contractions gradually increase.
- The first stage of labor starts with true labor pain and lasts up to full dilation of the cervix (10 cm). This stage is also called the “cervical stage”.
- The first stage of labor is further divided into 3 stages:
- Time period of the first stage :
- Primigravida:=12-16 hours, and
- Multigravida:=6-8 hours, are not.
The first stage of labor is divided into three phases.
1) Latent phase,
2) Active Phase,
3) Transitional Phase
1) Latent Phase,
- The latent phase is also known as “prodromal labor” or “pre-labor”.
- In this stage, there is cervical dilation of 1-4 cm.
- In this stage, there is cervical dilation of 1-4 cm.
- In this phase, contractions are repeated every 15-30 minutes and last for 15-30 seconds.
- In this phase, the mother is talkative (able to communicate).
2) Active Phase,
- The active phase is also known as the dilation phase.
- In this second phase, The cervix dilates to 5 – 7 centimeters. And the contractions are repeated every 3-5 minutes and
- They last for 45 – 60 seconds.
- In this stage, the mother feels restless.
3) Transitional Phase
- In the transitional phase, the dilation of the cervix is 8-10 cm. is.
- Contractions are repeated every 2-3 minutes and last for 60 to 90 seconds.
- Overall, the first stage of labor is a critical period in which the cervix opens, providing the proper position of the baby in the uterine cavity and preparing the uterus for delivery. Continuous monitoring by health care providers is important during this stage to improve the condition and well-being of the mother and fetus.
2) Second Stage of Labor (Expulsion of Fetus):
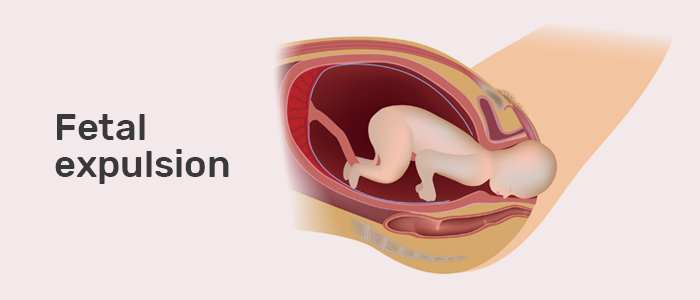
- The period from full dilation of the cervix to the birth of the baby through the birth canal is called the second stage of labor.
- Its duration,
- Primigravida: 1-2 hours and
- Multigravida: 20-30 minutes.
- The second stage of labor is further divided into two phases:
- 1) Propulsive phase,
- 2) Expulsive phase.
1) Propulsive Phase:
- The propulsive phase starts from full dilation of the cervix until the presenting part of the fetus descends to the pelvic floor (+4, +5 stations).
2) Expulsive Phase:
- Bearing of the mother This expulsive phase lasts until the baby is completely expelled from the uterine cavity with downward forceps. There are.
3) Third stage of labor (expulsion of placenta):
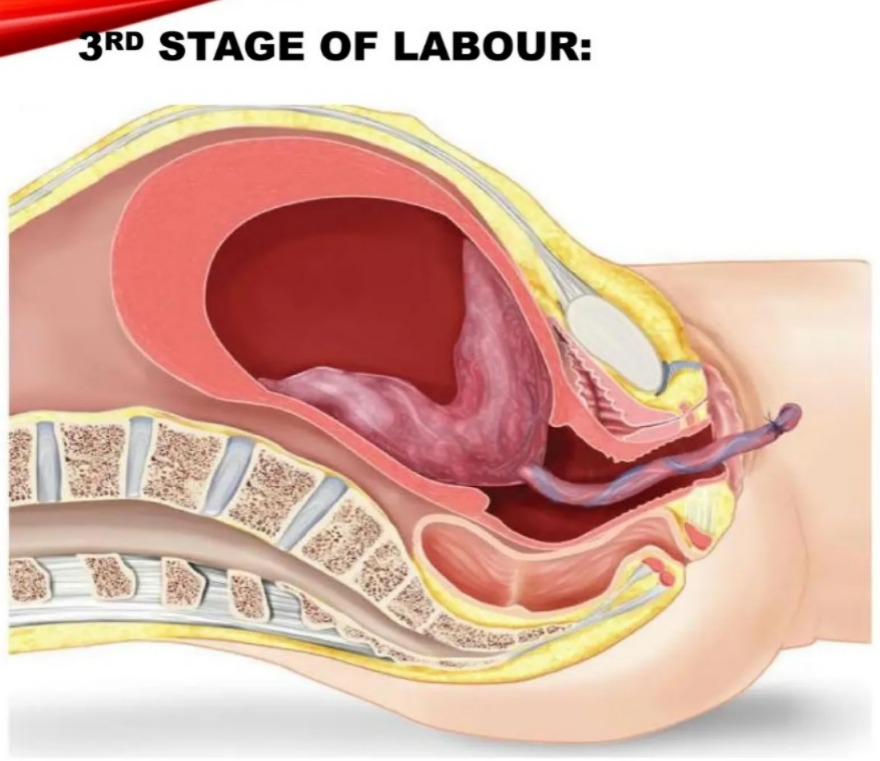
- This stage is a The period from the expulsion of the baby to the expulsion of the placenta and membranes is called the third stage.
- Its duration is 15 minutes in primigravida and multigravida
4) Fourth stage of labor (Observation stage):

- The observation stage after the birth of the baby is called the 4th stage of labor. During this stage The general condition of the mother, the condition of the newborn and the behavior of the uterus are carefully monitored.
- Its time duration is 1 It is of hours.
- Thus, the time duration of all four stages of total labor (1st stage + 2nd stage + 3rd stage + 4th stage) is 12-16 hours in primigravida and 6-8 hours in multigravida.
Causes of Onset of labor:
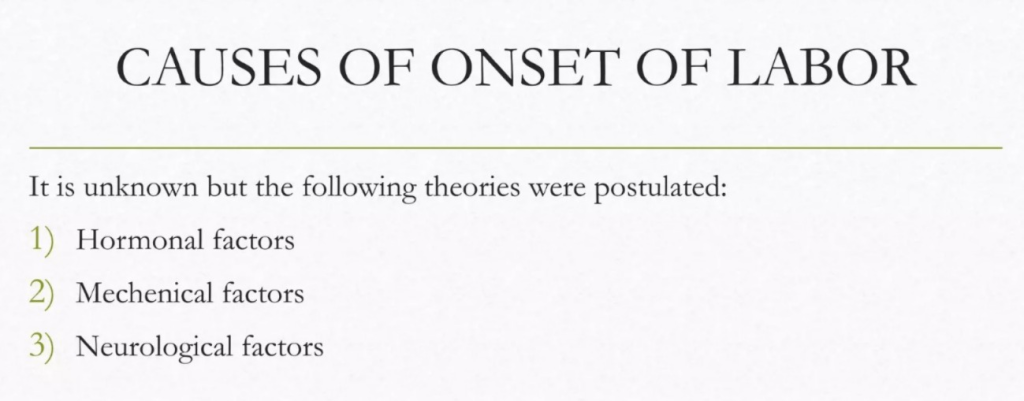
No specific cause for labor is known but it is said that many factors are responsible for the onset of labor such as That is,
1) Mechanical causes,
2) Hormonal causes,
3) Neurological causes
1) Mechanical causes,
- Among these,
- Heightened reflex irritability of the uterus,
- Uterine distension,
- Menstrual period suppression,
- Prolonged pressure of fits.
2) Hormonal causes:
- 1) Feto-placental Contribution
- The fetal hypothalamus is triggered to produce releasing factors.
- These releasing factors stimulate the anterior pituitary gland to produce Adrenocorticotropic Hormone ( ACTH).
- Adrenocorticotropic Hormone ( ACTH) stimulates the fetal adrenal gland to secrete cortisol. Stimulates.
- Cortisol causes changes in placental hormones. Ex:= Estrogen level increases, progesterone level decreases.
2) Estrogen hormone:
- Oestrogen increases the possibilities of the following mechanisms:
- 1) Oxytocin release from the maternal pituitary increases.
- 2) Oxytocin stimulates myometrial receptors to synthesize prostaglandins.
- 3) Prostaglandin synthesis is increased by decidual and amnion cells.
- 4) Myometrial contraction stimulates the synthesis of the protein actomyosin.
3) Progesterone:
- Progesterone has a relaxant effect on the uterus.
- Progesterone is produced first by the corpus luteum and then by the placenta.
- It inhibits uterine contractility.
- Fetal production of dehydroepiandrosterone sulfate (DHEA-S) and cortisol increases in the fetus. The conversion of pregnenolone to progesterone stops.
- Therefore, progesterone levels fall down before labor while estrogen levels rise.
- Then progesterone levels fall down which is associated with the synthesis of prostaglandins.
4) Oxytocin:
- The hormone oxytocin is released from the mother’s posterior pituitary gland.
- The increase in estrogen levels helps increase oxytocin levels.
- Oxytocin receptors increase in the decidua vera at the end of pregnancy. Oxytocin acts directly on the myometrium and causes contraction of the uterus.
- It also acts on the endometrial tissue to release prostaglandins.
5) Prostaglandins
- The major sites of prostaglandin production are the placenta, fetal membrane, decidual cells, and Myometrium.
- It is said that due to the release of estrogen, the decidua releases prostaglandins, which act on the uterine muscles, causing the uterine muscles to contract.
3) Neurological causes
- Labor can be initiated through a nerve pathway.
- Both ‘α’ and ‘β’ adrenergic receptors are present in the myometrium.
- Estrogen acts on the ‘α’ receptor and progesterone on the ‘β’ receptor.
- 1)’α’:=’α’ adrenergic receptor stimulates ‘α’ Receptor.
- 2)’β’:=’β’ adrenergic receptor stimulates ‘β’ receptor.
- The contractile response from the ‘α’ receptors of prostaglandinic nerve fibers located in and around the cervix and in the lower part of the uterus starts when progesterone is reduced.
- So, the reasons for starting this labor are as follows.
Sign of Onset of Labor :
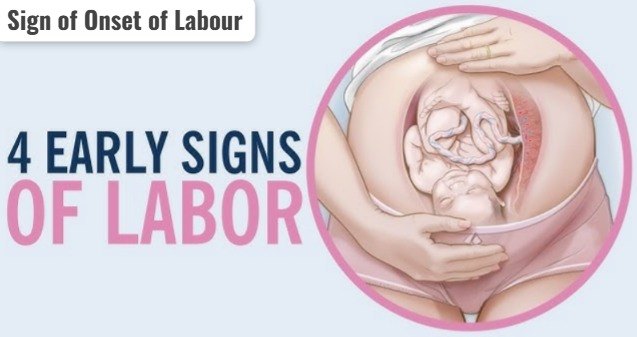
- 1) Painful uterine contractions (labor pain)
- 2) Show
- 3) Progressive dilatation and effacement of cervix
- 4) Formation of “bag of Water”
1) Painful uterine contractions (labor pain):
- Throughout pregnancy, painless Braxton Hicks contractions occur with simultaneous hardening of the uterus. These contractions change in character, becoming more powerful, intermittent, and associated with more pain.
- The pain is usually felt in the front of the abdomen and radiates to the back. Contractions are the first sign of labor pain. Initially, a woman experiences one or two contractions per hour that increase in frequency (initially these are tolerable).
- Contractions may become more intense over a period of 6-8 hours. After that, the active phase of labor begins. In this, the contractions become more severe and occur every 2-3 minutes and last for 45 to 60 seconds. During this period, it is very difficult for the woman to relax because the intense nature of the pain is accompanied by rapid dilation of the cervix.
- Furthermore, the contractions do not occur very often but are more intense. Finally, the woman experiences intense contractions between 60-90 seconds. And more regularly, they occur every 2-3 minutes. This is the stage of labor called hard labor where the cervix dilates to 10 cm. It dilates up to .
2) Show:
- In pregnancy, the operculum (cervical mucus plug) forms and comes out as a bloodstained mucoid discharge a few hours before or with labor, which is called “show”.
- The capillary vessels of the cervix rupture and the lower uteri Stretching of the segment causes bleeding from the raw decidual surface.
3) Progressive dilatation and effacement of cervix:
- The effective force of the first stage is painful uterine contractions. These painful uterine contractions cause progressive dilatation and effacement of the cervix.
- The cervix dilates by about 10 cm.
- The muscle fibers surrounding the internal os are pulled upwards by the retracted upper segment, causing the cervix to shorten and then merge with the lower uterine segment and become part of it, gradually leading to effacement of the cervix.
4) Formation of “bag of water”:
- Due to dilatation of the lower uterine segment, the chorion detaches. The loose part of this fluid bulges into the dilating internal os. The amniotic fluid in front of the head is fixed in the cervix, which is called forewater. Forewater is the effacement of the cervix and early dilatation of the os. Helps in Hydnate water maintains a uniform pressure in the uterus during uterine contractions, thus providing some protection to the fetus and placenta. In this way, the pressure during contractions does not come on the forewater, which is called general fluid pressure.
- Example: When the membranes are intact, the pressure of uterine contractions comes on the fluid and remains uniform throughout the uterus.
True Labor and False Labor:

1) Uterine Contractions:
True Labor:
- Contractions are always present.
- Contractions are regular and increase in frequency, intensity, and duration.
- Their duration is up to 60 seconds. It is.
- It causes abdominal tightening (hardening of the uterus) discomfort or pain.
- The discomfort starts from the back and comes to the abdomen.
- Walking increases the intensity of the contractions.
- The pain is not relieved by enemas or sedatives.
False Labor:
- In false labor, uterine contractions are not always present.
- It involves irregular and inefficient uterine contractions.
- Its time duration is for three to four minutes.
- In Contractions are not painful every day and the uterus does not harden.
- The discomfort is primarily in the abdomen.
- The contractions may be relieved by walking.
- The pain is relieved by giving an enema and sedatives.
2) Cervix
True Labor:
- Effacement and dilation of the cervix occur.
- Effacement and dilation of the cervix occur.
False Labor:
- Cervical changes are not seen in it.
3) Membrane:
True Labor:
- During contractions, tension is felt and a ‘bag of water’ is formed.
False Labor:
- Tense does not feel and ‘bag of water’ does not form.
4) Show (Show):
True Labor:
- True The show is mostly present in labor.
False Labor:
- The show is not to be missed in false labor.
5) Fetus (fits):
True Labor:
- It is progressively descending in fits.
False Labor:
- It is progressively descending in fits. Does not descend progressively.
Physiologic Events of the First Stage of Labor :
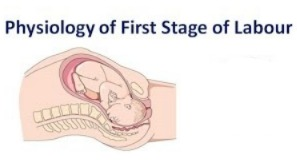
- The first stage of labor starts with the preparation of the birth canal and provides a place for the expulsion of the fetus.
First Stage of Labor (Cervical Stage):
- The first stage of labor is the initial phase of childbirth. In which the cervix gradually opens (dilates) and thins (effaces). This allows the baby to pass from the uterine cavity into the birth canal (vagina). In which regular and rhythmic uterine contractions are observed and the frequency, intensity and duration of uterine contractions gradually increase.
- The first stage of labor starts with true labor pains and is considered to be up to full dilation of the cervix (10 cm). This stage is also called the “cervical stage”.
- The first stage of labor is further Divided into 3 stages:
First stage no time period :
Primigravida:=12-16 hours, and
Multigravida:=6-8 hours, is no.
The first stage of labor is divided into three phases.
1) Latent phase,
2) Active phase,
3) Transitional phase
1) Latent phase ,
- The latent phase is also known as “prodromal labor” or “pre-labor”.
- In this stage, cervical dilation of 1-4 cm occurs.
- In this phase, contractions occur every 15-30 minutes and last for 15-30 seconds.
- In this phase, The mother is talkative.
2) Active phase,
- The active phase is also known as the dilation phase. In this second phase, the cervix dilates by 5-7 centimeters and contractions are repeated every 3-5 minutes and last for 45-60 seconds.
- In this stage, the mother feels restless.
3) Transitional phase
- Dilatation of the cervix in the transitional phase is 8-10 cm.
- Contractions are repeated every 2-3 minutes and last for 60 to 90 seconds.
- Overall, the first stage of labor is a critical period in which the cervix opens, providing the proper position of the baby in the uterine cavity and preparing the uterus for delivery. During this stage, it is important to continuously monitor the condition and well-being of the mother and fetus to improve their condition.
••> There are mainly three phases in the events of the first stage of labor:
1) Dilation of the cervix
2) Effacement of the cervix
3) Formation of the lower uterine segment
1) Dilation of the cervix:
a) Uterine Contraction and Retraction:
- Uterine contractions are involuntary, regular and rhythmic, which gradually increase in intensity. The interval of these contractions is 15 minutes at the beginning of the first stage and it becomes 2 to 3 minutes by the end of the second stage.
- The contractions in the uterine muscles are not complete. Instead of completely relaxing after the contractions, some contractility remains in the muscle fibers, hence The upper segment of the uterus becomes short and thick and its cavity becomes smaller, thus helping in the progressive expulsion of the fetus.
- Contractions start from the pacemaker (tubal ostia) in the cornua of the uterus. All contractions originate from one of these pacemakers and pass through the uterus, which is similar in concept to the pacemaker of the heart. Each contraction passes inwards and downwards into the uterus, causing the entire uterus to contract.
- In normal action, the intensity is near the pacemaker, i.e. the upper uterine There is more in the segment and less in the lower uterine segment. The upper segment contracts and retracts powerfully while the lower segment contracts and dilates slightly and the uterus remains relaxed between the two contractions.
- The upper segment of the uterus is made up of longitudinal muscle fibers while the lower segment of the uterus is made up of circular muscle fibers. Thus, a bucket-holding fashion like structure is formed between the upper and lower parts of the uterus. There is some degree of coordination between fundal contractions and cervical dilation, called the polarity of the uterus, which is usually controlled by the local nervous system. Polarity is a type of neuromuscular harmony between the two segments of the uterus that persists throughout labor. The upper segment of the uterus contracts strongly and retracts to expel the fetus, while the lower segment contracts slightly and dilates to expel the fetus.
b) Fetal axis pressure:
- Every uterine contraction occurs when the baby is in a longitudinal and flexed attitude. Due to these contractions, the fetus descends towards the lower pole of the uterus. Thus, the cervix dilates to a greater extent due to the pressure of the presenting part of the fetus.
c) Bag of Membrane (Formation of Upper and Lower Uterine Segment):
- Usually at the end of pregnancy, the uterus is divided into two segments, namely the upper uterine segment and the lower uterine segment. The lower segment extends from the isthmus of the uterus to the cervix. It is thin and distensible and its length is about 7.5 to 10 centimeters.
- A amniotic fluid is located around the fetus. Due to the continuous contraction of the uterus, the amniotic fluid is normally divided into two parts.
- 1)Forewater
- 2)Hindwater
- When the presenting part of the fetus enters the pelvic bream, the amniotic fluid passes through the space of its presenting part but remains within the membrane. This passed amniotic fluid bulges in front of the presenting part of the fetus and is called forewater. And the amniotic fluid that is present in the upper segment of the uterus is called hindwater.
- As the contractions start, the hydrostatic pressure on the forewater also helps in the dilation of the cervix.
2) Effacement of the cervix
- It is the process of thinning of the cervix which is completed during or before the 1st stage of labor in primigravidas.
- In primigravidas, the cervix Effacement occurs before dilation of the cervix, whereas in multipara, both dilation and effacement of the cervix occur. It happens simultaneously. The expulsion and compression effect of mucus also helps in thinning the cervix.
- This thinning and shortening of the cervical canal is due to the lengthening of the muscular fibers around the internal orifice.
- In primigravida, this occurs before the onset of labor while in multigravida it occurs with cervical dilation.
3) Formation of Lower Uterine Segment:
- There is no anatomical or functional division of the uterus before the labor process starts. But after the onset of labor, the upper segment of the uterus progressively thickens while the lower segment of the uterus progressively thins and this process is maximally observed during the second stage of labor.
- At the junction of the uterus, i.e. between the upper segment and the lower segment of the uterine cavity, a distinct ridge develops, which is called the physiological retraction ring.
Event of second stage of labor :

Second Stage of Labor (Expulsion of Fetuses):
- The second stage of labor starts with the full dilation of the cervix (10 cm) and ends with the full expulsion of the fetus.
- The period from the full dilation of the cervix to the birth of the baby through the birth canal is called the second stage of labor.
- Its duration,
- In primigravida:1-2 hours and
- In multigravida: Lasts up to 20-30 minutes.
- The second stage of labor is further divided into two phases:
- 1) Propulsive phase,
- 2) Expulsive phase.
1) Propulsive Phase:
- The propulsive phase starts from full dilation of the cervix until the presenting part of the fetus descends to the pelvic floor (+4, +5 stations).
2) Expulsive Phase:
- This is the expulsive phase until the baby is completely expelled from the uterine cavity with the mother’s bearing down efforts.
Description
- The second stage of labor begins with the complete dilation of the cervix and the contractions of the uterus. It ends with complete expulsion.
- This stage is associated with the continuous descent of the fetus down and delivery of the fetus through the birth canal.
- Full uterine contractions cause the membranes to rupture, causing the amniotic fluid (like amniotic fluid) to be expelled through the birth canal. Due to the expulsion of this amniotic fluid, the volume of the uterine cavity decreases and uterine contractions also become stronger.
- Due to uterine contractions, the uterus stretches while the anterior-posterior and transverse diameters of the uterus are reduced. Stretching of the uterine cavity is usually seen partially due to stretching of the fissura and partially due to stretching of the lower segment of the uterine cavity.
- Continuous uterine contractions are The fetus is placed on top and the fetus continuously descends down.
- Due to uterine contractions and retraction, the upper segment of the uterine cavity thickens while the lower segment of the uterine cavity thins.
- Due to continuous uterine contractions and the mother’s bearing down efforts, downward force is applied to the uterine cavity while upward force is applied to the pelvic floor. Thus, due to the downward and upward force, the fetus is subjected to a forward force,
- Thus, the continuous force on the fetus causes expulsion from the uterine cavity.
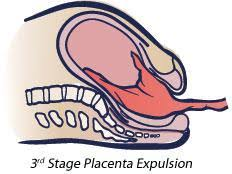
Events of the Third Stage of Labor:

Third Stage of Labor (Expulsion of Placenta):
- This stage starts with the expulsion of the fetus and the period until the expulsion of the placenta and membranes is called the third stage. Its duration is 15 minutes in primigravida and multigravida.
- The third stage of labor usually involves three phases.
- 1) Separation of the placenta from the uterine wall.
- 2) Descent down of the placenta.
- 3) Expulsion of the placenta.
1) Separation of the placenta from the uterine wall:
In this stage, the placenta starts to separate from the deep spongy layer of the decidua, the decidua basalis.
Condition of the uterus before separation of the placenta:
- The uterus is discoid in shape is.
- The uterus is firm
- The uterus is below the umbilicus.
- It is non-ballotable.
- The fundal height is slightly below the umbilicus.
- Usually, two methods of placenta separation are involved.
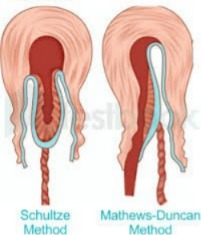
1) Central separation (Schultz Method)
2)Marginal Separation (Matthews Duncan Method)
1) Central Separation (Schultz Method):
- Usually the main factor for the separation of the placenta is uterine contraction and retraction, mainly due to the ability of the muscle fibers of the uterine cavity to retract. The separation of the placenta starts This happens. Because the uterine cavity retracts with the expulsion of the fetus, the discoid-shaped placenta does not remain attached normally in this retracted uterine cavity and due to this, the placenta bends and its separation starts.
- Thus, in central separation, the placenta separates from the central part and due to each uterine contraction and retraction, this separation increases, and the placenta bends and as the placenta separates from the central part, the collection of blood starts in the placenta and the site of implantation. Which is called retroplacental hematoma. Because the accumulation of blood occurs at the back of the placenta and the blood is not visible in it.
2) Marginal separation (Matthews Duncan method):
- Usually the placenta is thin at its margin site while it is thick at its central part. Due to the contraction and retraction ability of the muscle fibers, the margin of the placenta can be easily separated, so in marginal separation, with each contraction and retraction, the placenta starts to separate from the margin site and as the placenta starts to separate, blood becomes visible.
- Thus, there are generally two methods of placenta separation.
2) Descent down of placenta:
- After the separation of the placenta, due to uterine contractions, the placenta moves into the lower uterine segment or upper vaginal part and due to this, clinical signs of separation are seen:
Signs of placental separation:
- Dark blood flows from one of the antrums.
- The umbilical cord protrudes 3 inches or more downward from the vaginal area and increases in length.
- The shape of the uterus changes from discoid to globular and contracts.
3) Expulsion of placenta:
- Uterine After the placenta has descended into the lower part of the cavity, the placenta is expelled either by voluntary bearing down efforts of the mother’s abdominal muscles or by manipulative procedures.
Events Fourth Stage of Labor (Observation Stage):

- The observation stage after the birth of the baby is called the 4th stage of labor. During this stage The general condition of the mother, the condition of the newborn and the condition of the uterus are carefully monitored.
- The fourth stage is 1 hour after the birth of the placenta. This is an important period in which the mother needs close observation and the mother should be kept under continuous close monitoring for 1 hour after delivery.
- Assess whether the mother is bleeding in the fourth stage of labor so that the mother can prevent the condition of postpartum hemorrhage (PPH) arising in the mother. Measure the mother’s blood pressure and count her pulse properly. Assess the mother’s well-being by palpating the uterus from the mother’s abdomen to check whether the uterus is firm and filled with blood. Proper assessment should be made.
- If the uterus is soft and boggy, it indicates a condition of a hypotonic uterus that is not contracting properly. If the uterus is firm, it indicates a condition of effective hemostasis.
- After delivery of the placenta, properly inspect the placenta membrane and umbilical cord and properly assess whether any retained bits of placenta are in the uterine cavity. Due to which the condition of postpartum hemorrhage can be prevented. Then assess whether there are proper vessels in the umbilical cord and properly check whether there are any abnormalities. To properly check the vital signs of the mother. After that, the newborn baby should be properly examined and its breathing pattern should be properly assessed. After providing proper rest to the mother, the mother should be advised to breastfeed the baby. And to create a properly comfortable environment for the mother.
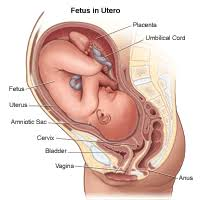
Fetus in utero (Fetus in utero):
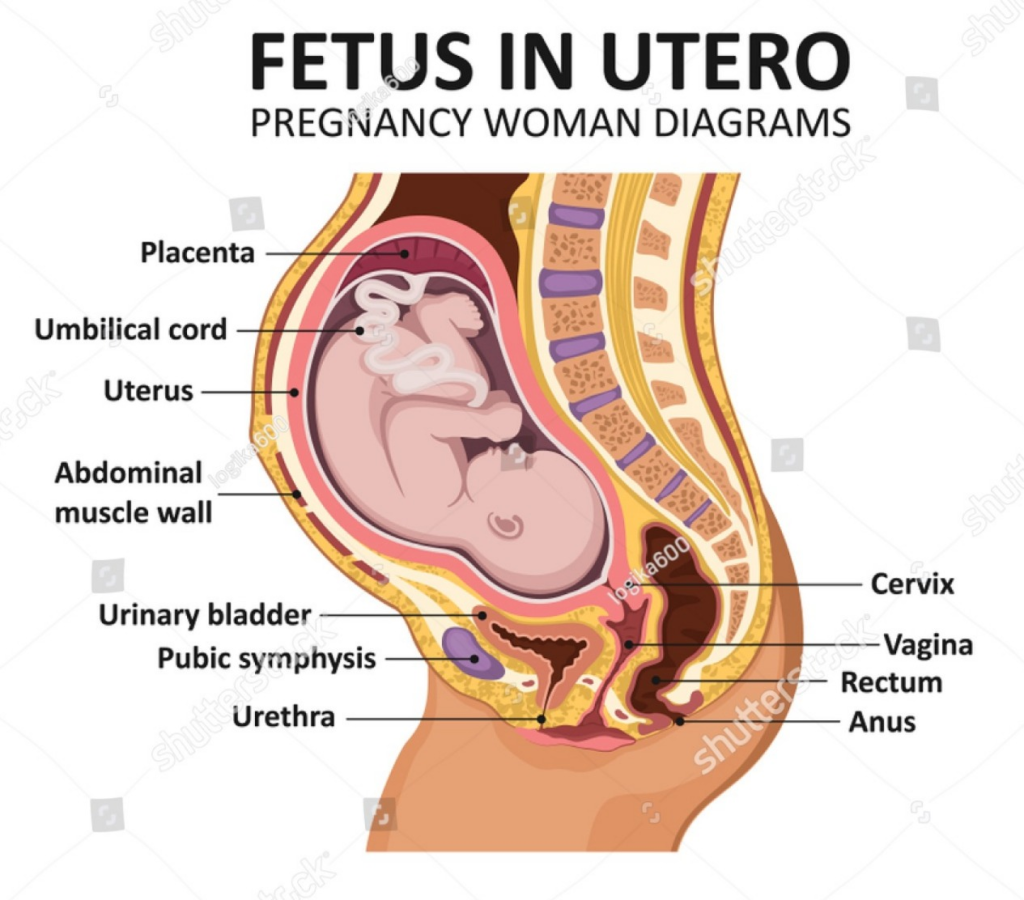
The relationship of the fetus with the uterus and pelvis is described in certain terms. By understanding these terms, it is possible to identify which part of the fetus enters the pelvic girdle first.
It mainly involves 6 parts.
1) Lie,
2) Presentation,
3) Presenting part,
4) Attitude,
5) Denominator,
6) Position
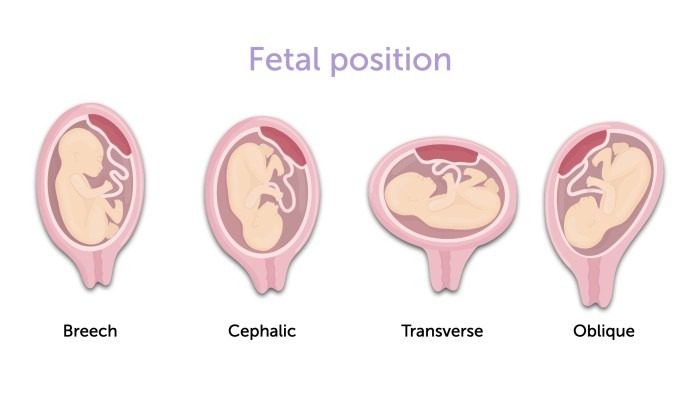
1) Lie:
- The relationship of the long axis of the fetus to the long axis of the maternal spine is called “Lie”.
- Lie is usually longitudinal but can sometimes be transverse and oblique.
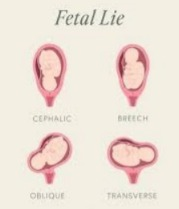
1) Longitudinal:
- In which the long axis of the fetus is parallel to the long axis of the maternal spine. This means that the fetus is in either a head-down (cephalic) or feet-down (breech) position. This is the most optimal fetal position for delivery
2) Transverse:
- In obstetrics, transverse lie involves the position of the fetus where the fetus is in a horizontal position around the mother’s uterus instead of being parallel to the mother’s spine. In this position, the fetus’s head is on one side of the uterus and its buttocks or legs are on the opposite side. This position is not conducive to delivery through the vaginal canal and often requires a cesarean section.
3) Oblique:
- In obstetrics, an oblique lie occurs when the fetus is positioned at an angle in the uterine cavity, with both the head and buttocks of the fetus tilted towards one side of the mother. This position is neither longitudinal nor transverse but instead is at a diagonal angle. This type of lie is not ideal for vaginal delivery.
2) Presentation:
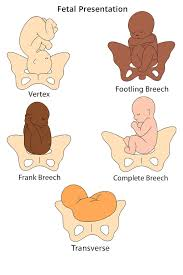
- The part of the fetus that occupies the lower pole (pelvic breech) of the uterus is called the presentation of the fetus.
- Usually three presentations are involved, such as,
- 1) Cephalic presentation (96.5 %) which includes,
- Vertex presentation,
- Brow presentation,
- Face presentation.
- 2) Podelic/Breach presentation ( 3%),
- 3) Solder and other such as compound presentation ( 0.5%)
1) Cephalic presentation (96.5 %):
- Cephalic presentation involves the position of the fetus during childbirth where the fetus’s head is downward toward the birth canal. It is the most common and ideal presentation for vaginal delivery.
2) Podelec/ Breech Presentation (3%):
- Podecleic presentation is a type of breech presentation in which the fetus’s first leg or buttocks are at the lower pole of the uterus, with the buttocks or buttocks presenting as the presenting part in the birth canal. In this presentation, the buttocks or legs of the fetus are towards the cervix, and the head is usually in the upper part of the uterus.
3) Solder and other such as compound presentation (0.5%):
Solder presentation:
- When the fetus is in the urinary cavity And if the presenting part is a solder in the lower pole of the uterus, it is called a solder presentation.
Compound Presentation:
- When more than one body part is present in the lower pole of the uterus, it is called a compound presentation.
3) Presenting Part:
- In obstetrics, the “presenting part” involves the part of the fetus that is closest to the cervix and is entering or has entered the birth canal.
- The presenting part is the part of the fetus that is closest to the cervix and is entering or has entered the birth canal.
- The presenting part is the part of the fetus that is visible through the cervical opening through the finger. If the internal OS fills during the examination, it is called the presenting part.
1)Head (vertex presentation):
- Most common and ideal for delivery through the vaginal canal, or Where the top of the head is the presenting part.
2)Buttocks (breech presentation):
- In breech presentation, the buttocks are the presenting part.
3)Feet (Footling Breech):
- In this, the foot is the presenting part, it is a type of breech presentation.
4) Shoulder (Shoulder Presentation):
- If the shoulder is the presenting part, it usually means that Fits are in transverse lie.
4)Attitude:

- The relationship of the different body parts of the fetus to each other is called “attitude”. The universal attitude of the fetus is well flexed.
- Attitude is the relationship of the fetus’s trunk, limbs and head to its trunk. Its attitude should be well flexed. The fetus’s back is arched, the head is well bent and touches the chest. The arms are well bent, crossed over the chest, the thighs are on the abdomen and the legs are bent over the thighs. The fetus is an ovoid mass that fits comfortably in the uterine cavity. This attitude helps in easy expulsion of the fetus during the labor process.
- A deviation from the normal attitude of flexion is called deflection, extension or hyperextension, especially in vertex presentation. The well-flexed head (vertex) will have the smallest presenting diameter and efficient uterine axis. Labor will be most effective when, abnormal attitude creates difficulties in labor.
5) Denominator:
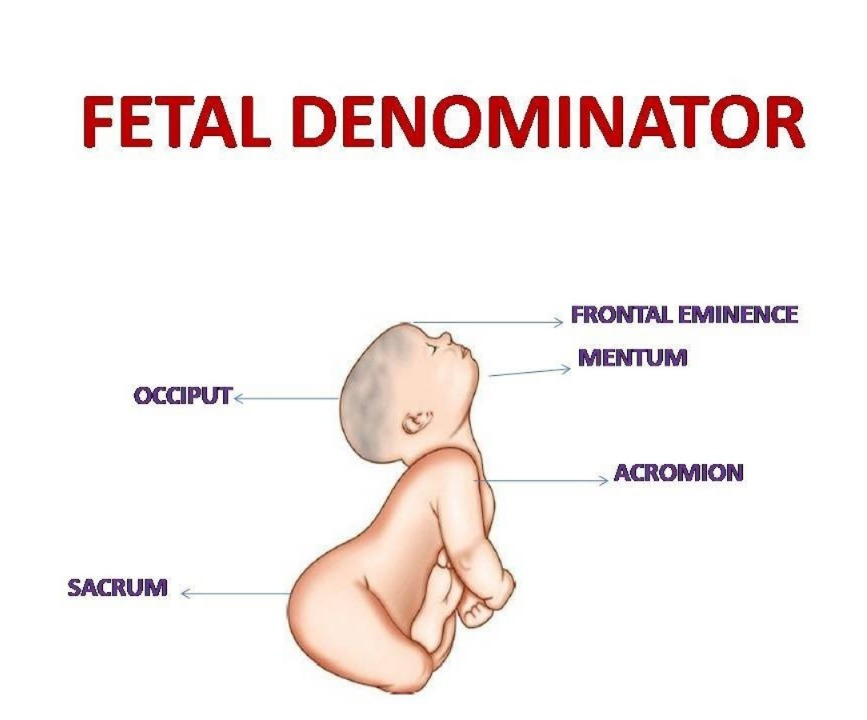
- Usually the denominator is the bony part of the fetus that is the presenting part in relation to the various quadrants of the maternal pelvis.
- Such as,
- Vertex/cephalic presentation has the occiput as the denominator.
- Face presentation has the mentum (chin) as the denominator.
- Brow presentation has the frontal eminence as the denominator.
- Breech presentation has the sacrum as the denominator.
- Solder presentation has the denominator The acromion process of the scapula of the shoulder is is.
6) Position:
- The relationship of the denominator in different quadrants of the maternal pelvis is called position.
- Theoretically, there are eight positions divided into equal parts of 45° for placing the denominator in each segment.
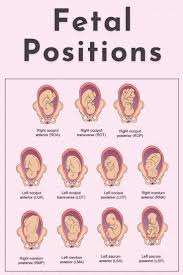
1) L.O.A.( Left Occipito Anterior)
- The most common and called the 1st vertex position. The occiput is pointed towards the left iliopectineal eminence, the sagittal suture is in the right oblique diameter of the pelvis.
2)R.O.A (Right Occipito Anterior):
- The 2nd vertex position is where the occiput is towards the right iliopectineal eminence and the sinistra is pointed towards the left sacroiliac joint while the sagittal suture is in the left oblique diameter of the pelvis.
3) R.O. P.(Right Occipito Posterior) :
- 3rd vertex position. In this, the occiput is pointed towards the right sacro-iliac joint while the sinciput is towards the left iliopectineal eminence and the sagittal suture It is located in the right oblique diameter of the pelvis.
4)l.O.P.(Left Occipito Posterior):
- The 4th vertex is the position. In it, the occiput is pointed towards the left sacroiliac joint and the sagittal sutures are in the left oblique diameter of the pelvis.
5)R.O.T (Right Occipito Transverse):
- The occiput is pointing towards the right iliopectineal line between the iliopectineal eminence and the sacro-iliac joint, the sagittal sutures are The transverse diameter of the pelvis is .
6)L.O.T (Left Occipito Transverse):
- The occiput points to the left iliopectineal line between the iliopectineal eminence and the sacro-iliac joint, the sagittal sutures in the transverse diameter of the pelvis
7) O.A.(Occipito Anterior):
- The occiput points towards the symphysis pubis, the sinistra points towards the sacrum, the sagittal sutures are in the anterior-posterior diameter of the pelvis.
8)O.P.( Occipito Posterior):
- The occiput points towards the sacrum, the sinistra points towards the symphysis pubis, the sagittal suture is in the anterior posterior diameter of the pelvis.
- Mechanism of Labor (Cardinal Movements of Normal Labor):
- Passive movement of the fetus through the birth canal The series of movements is called the mechanism of labor. The principal movements in this are of the head. The changes in the position of the fetal head as it passes through the birth canal are called cardinal movements. And this cardinal movement is usually seen during the second stage of labor.
The Fetus in Utero :
- Lie: Longitudinal,
- Presentation: Cephalic,
- Presenting Part: Vertex,
- Attitude: Flexion,
- Denominator: Occiput,
- Position: Right Occipito Anterior ( R.O.A ) or Left Occipito Anterior ( L.O.A ).
- Diameter of Engagement of Pelvis:
- Inlet : Transverse Diameter (13 Cm).
- Diameters of Engagement of Skull:
- Sub-Occipito Bregmatic Diameter: 9.5 cm.
- Sub-occipitofrontal:10 cm.
Mechanisam :

- In normal labor, the head enters in the most common available transverse diameter. The left occipito anterior position (L.O. A.) is more common than the right occipito posterior (R.O.P.) position. The anterior-posterior diameter of the head is suboccipito-bregmatic 9.5 cm or slightly deflected suboccipito frontal diameter of 10 cm. Occipito anterior position is common in it,
- The following mechanisms are seen:
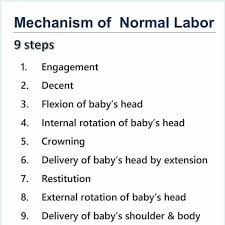
1) Engagement,
2) Descent down,
3) Flexion,
4) Internal rotation,
5) Crowning,
6) Extension,
7) Restitution,
8) External rotation of head with internal rotation of shoulder,
9) Birth of shoulder and trunk by lateral flexion.
1) Engagement:
- In L.O.A, when the head of the fetus enters the pelvic brim, the occiput is left It occurs on the iliopectineal eminence, and the right sacroiliac joint is sinistral to the right sacroiliac joint and the sagittal suture is on the right oblique diameter of the mother’s pelvis. The engaging antero-posterior diameter of the head is either suboccipito-bregmatic 9.5 cm or suboccipito-frontal 10 cm. The engaging transverse diameter is 9.5 cm.
2) Descent down:
- Descent down is a continuous process that is slow in the first stage but more pronounced in the second stage. It ends with the explosion of the fetus. Factors such as continuous contraction and retraction of the uterine cavity and maternal bearing down effects help in the descent of the fetus.
- In primigravida, there is already head engagement, but practically no descent occurs in the first stage, while in multigravida, with the onset of labor, the descent of the head occurs with the engagement of the fetus’s head. When the cervix is fully dilated, the fetal head reaches the pelvic floor.
- Factors that help in descent include,
- 1) Uterine contractions and retraction,
- 2) Bearing down of the fetus,
- 3) Straightening of the fetal spine, especially after rupture of the membranes.
3) Flexion:
- Flexion is continuous during the labor process due to which the diameter of the presenting part of the fetus becomes small due to which the presenting part can pass easily through the maternal pelvis. If the maternal pelvis is adequate, flexion occurs due to the resistance of the unfolding cervix, pelvic wall or pelvic floor. If the pelvis is adequate, the resistance of the maternal soft tissues is sufficient to support the head. Fully promotes flexibility.
4) Internal Rotation:
- As the head continues to descend, the front of the fetal head is pushed down on the pelvic floor. When the contractions subside, the pelvic floor rebounds, causing the occiput to slide forward. The occiput rotates 1/8 of a circle (45 degrees) and comes under the pubic arch. During this internal rotation, the neck of the fetus is twisted.
5) Crowning:
- After internal rotation of the head, the subocciput descends until it comes below the pubic arch. At this stage, the maximum diameter of the head, i.e. the biparietal diameter, stretches the valvular outlet and after the contraction is complete, the head does not continue to move back, which is called “crowning of” Head” is called.
6) Extension:
- The delivery of the head is done through extension i.e. “couple of forces”. The driving force is applied to the head in the downward direction while the pelvic floor provides resistance in the upward and forward directions. Thus, the downward force and upward force are neutralized and the remaining forward force helps in extending the head of the fetus. The fetal head is born from the vulval outlet, as are the vertex, brow, and face. After the chin is released, the head drops down and the chin comes close to the maternal anal opening.
7) Restitution:
- After extension of the head, a visible movement is seen in which the twisting of the neck in the internal rotation of the head is untwisted in the restoration. In the restoration, the occiput moves 1/8 circle in the opposite direction of the internal rotation or 45 ° rotation of the head occurs. This leads to the maternal side.
8) External rotation of head with internal rotation of the pelvis:
- In this phase, internal rotation of the pelvis occurs and external rotation of the head towards the outside occurs and the pelvis is now located in the widest diameter of the pelvic outlet, i.e. antero-posterior. The anterior solder reaches the levator ani muscles first and rotates anteriorly to lie below the symphysis pubis. This is a movement that is clearly visible, at the same time, the head also External rotation occurs in the same direction as the 1/8 circle restoration
9) Birth of shoulder and trunk by lateral flexion:
- After the shoulder enters the anterior-posterior diameter of the outlet, the forward descent continues until the anterior solder a is extracted from below the symphysis pubis. The movement of lateral flexion of the spine sweeps the posterior solder over the perineum and then the remaining trunk is delivered by lateral flexion.
Management of the first stage of labor:

- Nursing management of the first stage of labor involves comprehensive care. Its aim is to support the mother physically, emotionally and educationally and to closely monitor the progress of labor.
- Assessment
- Properly monitor the progress of labor, the condition of the mother and the condition of the fetus.
- Inquire about when labor pains started.
- Inquire about any kind of leakage or leakage.
- Conduct a proper examination of the mother.
- Conduct a proper obstetric examination.
- Conduct a vaginal examination of the mother.
- Properly check the mother’s antenatal records.
- Maternal Assessment
- Regularly monitor the mother’s vital signs, such as
- temperature,
- pulse,
- respiration,
- and properly assess blood pressure.
- Properly assess the intensity, frequency, duration, and resting tone of the pregnant woman’s uterine contractions by palpation method.
- Properly assess cervical dilation and effacement by vaginal examination.
- Properly and accurately document and chart cervical dilation and effacement.
Fetal Assessment
- Monitoring the fetal heart rate continuously with electronic fetal monitoring (EFM).
- The pattern of the fetal heart rate Properly assess.
- Properly document the fetal heart rate and any abnormalities, if any.
Support and comfort measures
- Provide the mother with a properly comfortable position, which can also increase the mother’s comfort level and facilitate the labor process. But progress can be made such as walking, standing, sitting, etc.
- Advise the mother on relaxation techniques such as deep breathing exercises, and mind diversionary therapy, etc.
- Provide emotional support, reassurance, and psychological support to the mother to reduce her anxiety.
Hydration and Nutrition
- Advise the mother to take small amounts of fluid.
- Continuously monitor the mother’s intake output chart to properly maintain the mother’s hydration status.
- Advise the mother to take light food and plain food in adequate amounts to maintain the mother’s nutritional status.
- Such as, Plain water,
- Salty lemon water,
- Soup, and fruit juice etc.
- Antiseptic and aseptic
- Apply a proper antiseptic dressing on the genital area to maintain cleanliness.
Education and Communication
- Provide education to the mother and her supporters about the mother’s condition and progress of labor.
Care of Bowel
- Mother’s Bowel Provide proper enema to clear the bladder and increase uterine contractions.
Bladder Care
- Advise pregnant women to empty their bladder frequently because a full bladder inhibits contractions.
Relief of Pain:
- Provide proper analgesic medication to the mother to relieve the pain condition. For example, Inj. Pethidine 100 mg IM should be provided when the cervix is dilated to the size of 2 fingers and if necessary, repeat after four hours.
Noting the Progress of Labor:
- To assess the process of labor, proper recording of the partograph can be done so that labor progress can be assessed.
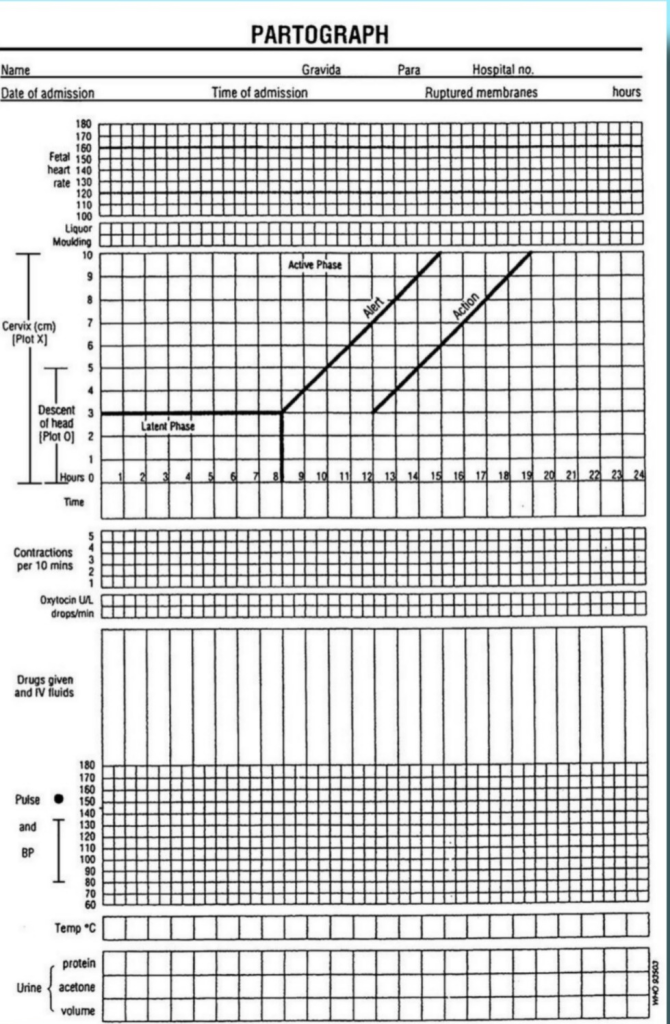
Partograph:
Definition:
- A partograph is a graphic recording and tool for cervical dilation, fetal head descent, and labor progress, and the condition of the mother and fetus. Partograph provides immediate and relevant information about the condition of the mother and fetus.
- It recognizes the need for action at the appropriate time and timely referral. Partograph can also improve the morbidity and mortality rates of the mother and fetus.
Objectives or Advantages:
- 1) To observe and record properly during labor.
- 2) To understand the latent and active phases of labor.
- 3) Interpret the partograph and identify any deviation from normal and take appropriate action.
- 4) To know the progress of labor and take action at the right time and refer.
- 5) To see the record at a glance in a single sitting and to hand over it easily.
- 6) To avoid having to record labor events repeatedly.
- 7) To reduce the rate of prolonged labor and education For.
Observations Charted on Partograph:
1) Pregnant Woman Information:
- A) Name,
- B) GTPAL Score
- G: Gravida,
- T:=Tamma birth,
- P:=Mercury,
- A:= Abortion,
- L:= Living children.
- C) Name of the hospital,
- D) Hospital registration number,
- E) Date and time of admission,
- F) Time of rupture of membranes,
- G) Period of gestation,
- H) Labor Date and time of onset.
2) Fetal condition:
- A) Fetal heart rate,
- B) Amniotic fluid,
- C) Molding.
3) Progress of Labor
- A) Cervical dilation,
- B) Descending of head,
- C) Uterine contraction.
4) Maternal condition
- A) Oxytocin, drugs and I.v. fluid administration
- B) Pulse,
- C) Blood pressure,
- D) Temperature,
- E) Urine volume, acetone and protein.
- All this information is filled in the partograph.
Points to keep in mind while taking partograph:
- 1) When the woman reaches the active phase of labor, partograph maintenance should be started and the pregnant woman should not be left alone.
- 2) Fetal heart rate should be counted and recorded every half hour,
- Fetal heart The sound should be counted for a full 1 minute and should be counted immediately after the uterine contraction has ended.
- 3) When the cervix is dilated to 4 cm or more, monitor the frequency, intensity, duration, pulse, and fetal heart rate of uterine contractions every 30 minutes.
- 4) Monitor blood pressure and cervical dilation (in cm) every two hours.
- 5) Monitor descent of head and temperature every four hours.
Partograph
1) Patient Identification Data
- In this, the woman’s name, age, GTPAL score, date and time of admission, registration number, time of membrane rupture and time and date of onset of labor are marked.
2) Fetal condition
- Count the fetal heart rate and record it every half hour.
- Account the fetal heart rate for a full 1 minute.
- Count the fetal heart rate immediately after the uterine contractions stop.
- If the fetal heart sound ( FHS ) is < 120/Minutes or if
- ( FHS ) is >160/ Minutes, it indicates fetal distress. If there is a condition of fetal distress, immediate action should be taken.
- The vertical column in each small box shows that half-hour interval.
3) Condition of Membrane
- Along with the fetal condition, the condition of the amniotic membrane and the color of the amniotic fluid should also be recorded every 30 minutes.
- A) Amniotic membrane is intact if := I ( Intact),
- B) Liker is clear if := C( Clear),
- C) Liker is absent if := A( Absent) ,
- D) Amniotic membrane is ruptured if := R ( Rupture),
- E) Meconium stained liker if := M( meconium),
- F) If blood is present in the urine: B(Blood)
- Thus, the condition of the amniotic membrane and amniotic fluid in the partograph should be marked as follows.
4) Molding
- (The bones of the fetal head are separated by sutures and fontanelles, but while it is passing through the birth canal, the bones of the fetal head overlap each other and the shape of the head changes for a while, due to which the fetal head can pass through the birth canal easily. This condition is called molding.)
- Molding is recorded by a grade to record it.
- A) 0 -> If the bones are separated and the sutures are easily felt.
- B) + -> When the bones just touch each other.
- C) ++ -> When the bones are overlapping but easily separated.
- D) +++ -> When the bones are severely fixed and overlapping.
5) Progress of Labor
- Start plotting labor progression on the partograph only after the woman is in active labor.
- Active labor is when the cervical dilation is 4 cm or more and at least two good contractions occur every 10 minutes. Start plotting on the partograph only when contractions occur.
- Record cervical dilation in cm every four hours.
- Start recording the onset of cervical dilation from the left alert line (when the mother is in active labor). Normally the graph line remains continuously above the left alert line, indicating the proper time each time.
- If the alert line is crossed, i.e. if the graph moves to the right of the alert line, it indicates prolonged labor. Hence, the midwife should be alerted immediately that there is something abnormal in labor. Note the time the alert line is crossed and immediately start taking measures for immediate treatment or referral.
- When the graph crosses the action line i.e. if it goes to the right side of the action line, immediately start treatment or refer the mother to the appropriate medical service.
- The difference between the alert and action lines is 4 hours.
6) Uterine contractions:
- Record uterine contractions every half hour. Contractions occurring twice in ten minutes indicate good uterine contractions.
- Mark the partograph box as follows.
- Mild uterine contractions < 20 seconds,
- Moderate uterine contractions 20 – 40 seconds,
- Strong uterine contractions > 40 seconds.
7) Cervical dilation and descent of fetal head
- The descent of the fetal head occurs simultaneously with cervical dilation during the through-out labor process.
- Until the cervix is 7 centimeters dilated, the assessment of the fetal head descent is done by abdominal palpation, which assesses the fifth (5) digit of the fetal head above the pelvic brim.
- In the partograph, cervical dilation is plotted by (x) while the descent of the fetal head is plotted by (O).
8) Maternal condition
- The maternal pulse is recorded every half hour
- on the partograph and is plotted on the partograph by a dot (•).
- Maternal blood pressure is recorded every 4 hours, including both systolic blood pressure and Diastolic blood pressure is represented by a vertical arrow (↕) with the upper end of the arrow representing systolic BP. While the lower end of the arrow indicates diastolic blood pressure.
- Record maternal temperature on the partograph every four hours.
- Properly record maternal urine volume, urine acetone and protein levels on the partograph.
- If the mother has been given any drug or oxytocin medication during the labor process, then properly record its dose, route and time of administration.
- Thus, early, quick and relevant information about the progress of labor and the condition of the mother and fetus can be obtained through the partograph.
Documentation
- Assess the condition of the mother and fetus and then properly document it and properly maintain the partograph.
- All types Assessment, interventions, observations, and proper documentation in the mother’s medical record.
- Properly record maternal vital signs, uterine contraction patterns, cervical dilation and effacement, fetal heart sounds, and labor progress.
Collaboration and Advocacy
- Mother’s labor Collaborate with other health care personnel such as obstetricians, Proper communication with midwife and nurse etc. to take proper decisions about the mother’s condition
- Thus, by properly managing the first stage of labor, complications in the mother and fetus can be prevented and the first stage of labor can be properly maintained.
Management of Second Stage of Labor:

- The transition from the first stage of labor to the second stage occurs due to the following features.
- Due to the increase in the intensity and frequency of uterine contractions.
- Due to the increase in the bearing down efforts of the mother.
- The descent of the presenting part of the fetus is accompanied by the urge to defecate.
- Complete dilation of the cervix occurs.
- Principles of Second Stage of Labor
- Slow and To facilitate natural expulsion.
- Prevent perineal injury.
General measures:
- Advise the patient to lie down properly on the bed.
- Constantly ask the patient about the following signs To observe, such as, continuously monitoring the fetal heart rate (FHR) at every five minute interval.
- The mother’s vital signs, mainly pulse and blood pressure, should be noted properly at 15 minute intervals.
- Provide proper reassurance to the mother so that her moral support can be properly maintained.
- Proper examination of the vaginal area at the beginning of the second stage to confirm the onset of labor and to prevent accidental cord prolapse. Can be.
- Properly access the position and station of the fetal head.
Preparation for delivery:
- When “OS” shows signs of dilatation, prepare the patient for delivery, such as,
- Uterine contractions become strong and frequent,
- Vulval gaping,
- Anus pouting,
- Perineum becomes thin and bulging.
- When the presenting part of the fetus in primigravida is about 4 to 5 cm into the vulva, wait until it reaches 4 to 5 cm.
- Then provide the woman with a proper position.
- Wear gloves, gown and mask to maintain proper aseptic technique and then stand on the right side of the patient.
- Now paint the external genital organs properly with a cotton swab and Dettol. Then place a sterile sheet under the patient’s buttocks and one sheet on the abdomen.
- Then to maintain aseptic technique, the three “c” principles should be followed, such as,
- Clean hands,
- Clean surface,
- Clean cutting and ligature of cord.
- If the bladder is swollen Then catheterize it and empty it properly.
- Then check whether the membrane has ruptured or not, if not, then perform artificial rupture of membranes (ARM).
Then conduct proper delivery, in which the main delivery is conducted in three phases:
1) Delivery of the head,
2) Delivery of the Shoulder,
3) Delivery of the Trunk
1) Delivery of the Head:
- When delivering the head, the following principles should be followed, such as,
- Maintain proper flexion of the head.
- Prevent early extension of the head.
- The head should slowly escape out of the valvular outlet.
- If the mother’s uterine contractions are poor, then properly fit a venous line and then infuse 5% dextrose Add 5 units of oxytocin to the vagina and start its drips.
- Then advise the woman to apply bearing down forces with each contraction and provide her with small amounts of water intake in between.
- Allow the fetal head to descend slowly before crowning.
- Perineal infiltration and episiotomy
- When the perineum is broad, tough and To prevent perineal tearing during stretching, place an episiotomy properly.
- When uterine contractions occur, administer 5 to 10 ml of 1% xylocaine to the perineum.
- Before the crowning stage, an episiotomy is performed with scissors. Starting from the midpoint of the forechest, a mediolateral episiotomy is performed at 7:30 clock (on the right side) or 4:30 clock (on the left side).
- Preventing sudden escape of the head after episiotomy.
- Proper monitoring of slow delivery of the head between contractions is usually done by properly pushing the chin of the fetus with the right hand covered by a sterile gauze piece and placing the right hand on the anococcygeal region and applying pressure on the occiput with the left hand.
- Then the fore head, nose, mouth and chin are born from the stretched perineum.
Care after delivery of the head:
- Immediately after delivery of the head, clean the head, mouth and fairings of the fetus with a liter finger covered with sterile gauze.
- Then clean the eyelids properly using a sterile and dry cotton swab, starting from the medial canthus and cleaning to the lateral canthus to prevent contamination of the conjunctival sac.
- Then palpate the neck of the fetus and assess whether any cord loops are present. Check if it is present. Then if the loop is present and it is loose then slip it off the shoulder and if it is tight then apply two couture forceps and then cut it in the middle.
Delivery of shoulder:
- Do not rush while delivering the shoulder.
- Uterine contractions and restitution and external rotation occur Wait till then.
- Now, the anterior shoulder is seen below the pubis, then the head of the fetus is properly placed between the two pairs and lifted towards the mother’s abdomen, which first delivers the posterior shoulder and then the anterior shoulder.
- If the anterior shoulder is not free below the pubis, the head is depressed to bring the anterior shoulder below the pubis.
Delivery of Trunk:
- After delivery of the shoulder, insert the four fingers of both hands inside the axilla and then deliver the trunk by lateral flexion.
- Immediate Care of Newborn After Delivery
- In immediate newborn care, the newborn has to be properly assessed and stabilized.
- Immediate Newborn Care is the transition of a fetus from intrauterine life to extrauterine life It is crucial for stabilization.
Goal of Immediate Newborn Care

- 1) To establish, maintain and provide support to the newborn’s respiration.
- 2) To prevent the newborn from fever and hypothermia.
- 3) To prevent the newborn from getting infections.
- 4) To provide safety to the newborn and protect him from injury. To prevent.
- 5) To provide immediate treatment for any actual or potential problems in the newborn by early identification.
- Immediate newborn care is provided.
- Immediate newborn care
1) Establishment of Respiration
- When the newborn is received, immediately patent the newborn’s airway and clear the airway properly. Due to which the newborn can breathe effectively.
- As soon as the newborn’s head is bent, wipe the mouth and nose and suction the mouth and nose so that the newborn can breathe properly. Suction should be done first through the mouth and then through the nose to prevent aspiration of secretions.
2) Initiation of Cry
- Normally 99% of newborns cry immediately and spontaneously after delivery, this cry is known as a good sign for the newborn’s breathing.
- If the newborn does not cry properly, then follow the following steps:
- a) If If the baby does not cry spontaneously or if the cry is weak, then lightly simulate the baby to cry.
- b) To stimulate the baby’s cry, lightly rub the soles of their feet instead of slapping their bottom. After removing the secretions of the newborn, stimulate the baby to start crying.
- C) The cry of the newborn is usually loud and husky and if there is any abnormal cry as follows, then the newborn should be properly monitored such as,
- High pitch cry:= Due to hypoglycemia and increased intracranial pressure,
- Weak cry:= Prematurity,
- Hosacri:= Laryngeal Strider
3)Care of Cord
- Cord care is an important immediate care of the newborn.
- The cord of the newborn should be clamped within 30 seconds of birth and then cut properly. To do.
- After the newborn is delivered, place the newborn on the mother’s abdomen.
- Then clamp the cord properly from two opposite sites using a cord clamp.
- Apply the first clamp 5 cm away from the umbilicus, then apply the second clamp 2.5 centimeters from the first clamp.
- Then cut the cord properly between both the clamps.
- Do not apply anything to the cord, let it dry and fall naturally.
- The cord naturally falls down within seven to ten days after birth.
- Prevent the cord from getting wet with water and urine.
- If any discharge or bleeding is present in the cord, immediately access the cord clamp and loosen it properly.
- If the cord is below If you see the following signs and symptoms,
- immediately report them,
- such as: foul odor coming from the cord,
- no discharge,
- redness around the cord,
- wetness of the cord,
- The cord should not fall down in 7-10 days,
- Inflammation,
- Fever etc.
4)Maintain position of the newborn
- Mucus is commonly present in newborns during the first 12-18 hours after birth, causing choking, coughing, and gagging. Therefore, the newborn should be provided with a proper position.
- In which the fitters should be provided with a proper side lining position so that mucus can be removed and drained.
5) Identification and Banding
- After the baby is born, a proper identification band should be applied to the baby Due to which the baby can be properly identified.
6) Eye Care
- Clean the newborn’s eyes properly from the inner canthus to the outer canthus with sterile gauze.
- If necessary, apply erythromycin or tetracycline ointment to the lower lid of the eye. To do.
7) Attachment and warmth (bonding)
- After the birth of the baby, place the baby on the mother’s abdomen so that bonding with the mother occurs and proper skin-to-skin contact can occur, which causes attachment between the mother and the baby and prevents the baby from hypothermia.
8)APGAR Score
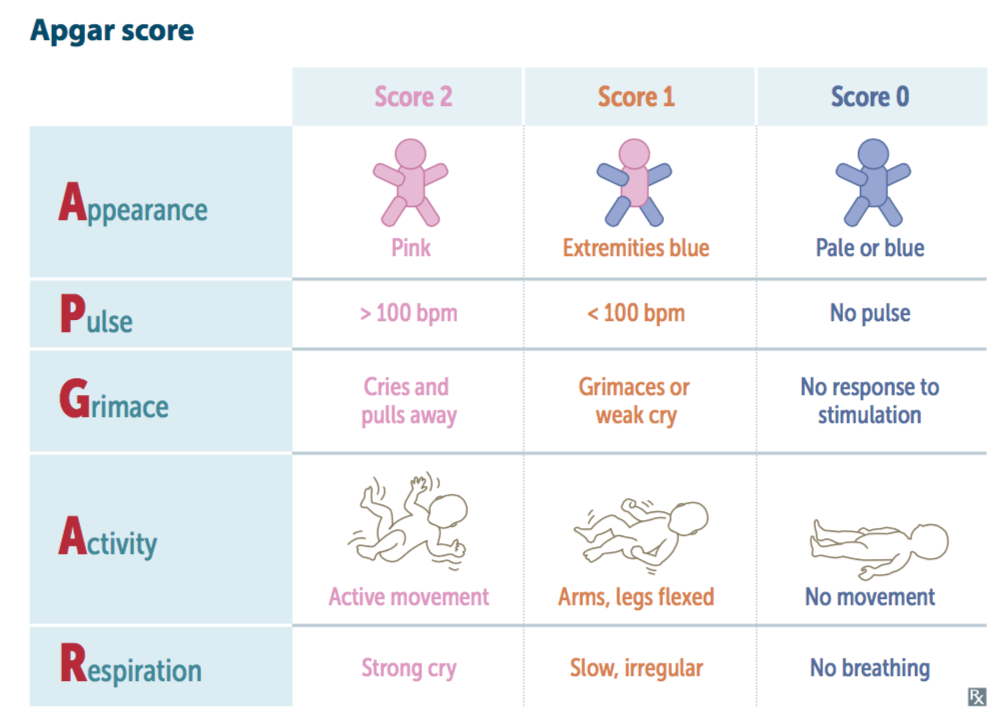
- The APGAR score is the most important part of immediate newborn care.
- The APGAR score is assessed at 1 minute and then at 5 minutes after birth.
- In the APGAR score,
- A:= Appearance (skin color),
- A:= Appearance (skin color),
- P:=Pulse (Heart Rate),
- G:=Grime (Reflux Irritability),
- A:=Activity (Muscle Tone),
- R:=Respiration (Respiratory Efforts)
- are assessed.
The total score of the APGAR score is 0-10.
The APGAR score at 1 minute after birth:
- If the Apgar score is 7-10, it is considered normal, meaning there is no depression, in which the baby is provided with normal post-delivery routine care.
- If the APGAR score is between 4-6, it indicates mild depression, in which the child needs assistance for breathing. is required.
- If the APGAR score is between 0-3, it indicates severe depression in which the child needs resuscitation.
APGAR score at 5 minutes after birth:
- If the APGAR score is between 7-10, it is considered normal, but if the Apgar score is below 7, the baby needs to be monitored for another half an hour.
9) Vitamin K:
- The intestines of a newborn are sterile for a short time after birth, meaning their intestines There are no bacteria present in the body that are responsible for manufacturing vitamin K, due to which the newborn cannot manufacture vitamin K, i.e. vitamin K is responsible for a clotting factor. If this vitamin K is not present in the body of the newborn, then there is a possibility of its formation in the newborn. Therefore, as a prophylactic measure, artificial injection of vitamin K is provided to the newborn baby.
- Dose:=
- In pre-term:=0.5 mg,
- Full term:= 1 mg.
- Intra muscularly ( IM ) is provided on the vastus lateralis (lateral anterior).
- Postpartum Immediate newborn care is provided as follows.
- Then cover the baby with a proper cloth to prevent hypothermia and apply a proper identification band, then transfer the baby to the nursery for further care and observation.
2) Delivery of the shoulder,
3) Delivery of the trunk
Management of the third stage of labor :
- The management of the third stage is most crucial because it involves separation and expulsion of the placenta from the uterine cavity, and the third stage is aimed at preventing complications of postpartum hemorrhage.
- The management of the third stage requires strict vigilance of the placenta, due to which complications of postpartum hemorrhage can be prevented. Can be.
Step of Management
Currently, two methods are used in the management of the third stage.
1) Expectant (watchful) management
2) Active management
1) Expectant (watchful) management
- In this management, the separation of the placenta and its descent into the vagina are allowed to occur spontaneously.
- In this management, minimal assistance is given for placental expulsion.
- In this stage, the mother is constantly watched, i.e. the mother is not left alone even for a short time.
- If the mother is in a lateral position, then she should be given a dorsal position, due to which signs of placental separation and the extent of blood loss have occurred Can be properly observed.
- In this management, only the separation, descent and expulsion of the placenta are properly observed.
- One hand is placed on the fundus so that,
- a) The separation of the placenta can be observed.
- b) The state of uterine activity i.e. contraction and relaxation can be observed.
- Separation of Placenta
- The placenta starts separating from the uterine wall within a few minutes after the birth of the baby, so wait for 15 to 20 minutes for the placenta to separate on its own.
- No touch technique is used in this.
- In this, there is a “no touch policy” i.e. the placenta is expelled within 15-20 minutes due to gravity i.e. no massaging of the fundus.
- Do not use any type of uterotonics and do not use any manual method for expulsion of the placenta.
Expulsion of placenta
- Follow the following points when the placenta is expelled:
- Advise the patient to bear down when the uterus becomes hard Apply forceps.
- The raised intra-abdominal pressure is important for the expulsion of the placenta and the placenta can be expelled on its own.
2) Active management

1) Use of Uterotonic
- Oxytocin is the drug of choice in the management of the third stage of labor.
- In the management of the third stage, 10 units of oxytocin should be provided IM (intramuscularly).
- Oxytocin enhances uterine contractions and helps expel the placenta.
2) CCT (Control Cord Traction)
- Control cord traction uses a manual method in which the umbilical cord is tracked and gently pulled downward and backward, due to which the placenta separates from the uterine wall and can then be expelled. However, control cord traction is performed when uterine contractions are present, by placing the hand on the suprapubic area.
3) Fundal pressure:
- Push the fundus downwards and backwards by placing four fingers behind the fundus and thumb in front of it. Apply pressure when the uterus is hard. If it is not hard, rub gently to make it hard. When the placenta passes through the introitus, stop the pressure immediately. When the baby is macerated or premature This method is more useful when the tensile strength of the cord is low. If any clots are left inside, massaging the uterus helps in its expulsion.
4) Delayed cord cutting
- Wait for one to three minutes after delivery of the fetus and then cut the umbilical cord. This technique is more useful in term newborns. Because the newborn receives an adequate amount from the placenta The mother can receive blood, which can prevent the condition of anemia.
- But in a preterm baby, the liver is immature and there is a high rate of breakdown of red blood cells and if the cord cutting is done late, then due to this, the condition of hyperbilirubinemia (jaundice) can arise in the newborn.
5) Postpartum vigilance
- After delivery of the placenta, inspect the placenta properly, including assessing the cotyledons, lobes, maternal and fetal sites, and membranes. Then, perform fundal massage after delivery of the placenta, which can maintain continuity of uterine contractions and, if there are retained bits of placenta, can be expelled properly. And the condition of postpartum hemorrhage (PPH) in the mother can be prevented.
Management of the Fourth Stage of Labor :

Immediate Post Natal Care
- The period up to one hour after the expulsion of the placenta is called the fourth stage of labor, in which the general condition of the patient and the uterus The behavior of the mother is monitored.
Observation of Women
- It includes the mother’s vital signs such as,
- Temperature,
- Pulse,
- Respiration and blood pressure are properly monitored. If they are slightly elevated, it is usually due to fatigue and dehydration. Check vital signs every 15 minutes for the next 1 to 2 hours until the patient is stable.
- Then assess the condition of the uterus, which should be firm and in midline.
- Properly assess the condition of the bladder and bowel.
- Then check the condition of the lochia. In which the color and amount of lochia should be assessed every fifteen minutes for 1 to 2 hours.
- Then the perineum should be assessed every 15 minutes for the first one to two hours, including (REEDA) redness, ecchymosis, discharge and approximation of the vagina.
Care of Women (Care of Women):
Prevention of hemorrhage:
- The fundus of the uterus should be palpated frequently every fifteen minutes, massaged if not firm, checked for proper pad placement, and monitored for hematoma in the vagina, perineum and blood loss, and maternal fluid levels.
Provide Care of the Perineum:
- If there is a fourth degree tear in episiotomy or manual manipulation of the perineum during labor, apply an ice pack to the perineum to reduce swelling and provide a clean perineal pad.
Prevention of Bladder Distension:
- Palpat for bladder distension, encourage the woman to void naturally, provide a bedpan, or apply water to the perineum, or Encourage her to void naturally.
Maintenance of Safety:
- After observing the mother for blood pressure, pulse, blood loss, analgesic or anesthetic medication, assist with ambulation and observe for orthostatic hypotension.
Maintenance of Comfort:
- Due to contractions, a woman experiences discomfort, which is called after pain, so she should empty her bladder. Provide a blanket and provide analgesic drugs as prescribed and encourage the woman to do relaxation and breathing exercises.
Maintenance of Cleanliness:
- After properly cleaning the perineum of the mother, dry the buttocks properly and provide a sterile pad.
Maintenance of Fluid Balance and Nutrition:
- Advise women to drink fluids sparingly and provide intravenous fluids if bleeding is severe.
Psychosocial Needs:
- Properly reassure the mother.
- Encourage the newborn to hold properly.
- Encourage the newborn to provide skin contact to the mother to promote mother-baby bonding.
- Encourage the mother to give the baby early best feeding.
- Newborn baby Perform a complete physical and neurological assessment.
- Then, when the patient’s general condition is fully satisfied, the woman’s pulse and blood pressure are properly within the normal range, the uterus is well contracted, and there is no abnormal vaginal bleeding, transfer the patient to the ward.