ENGLISH-micro unit -6
AS PER INC SYLLABUS
Practical Microbiology
a) Microscope – handling & care of Parts, uses, handling
microscopes Identify and care of microscope
common microbes b) Observation of staining procedure, Specimens Slides
under the microscope preparation and examination of
slides and smears
c) Identification of common
microbes under the microscope for
morphology of different microbes
INTRODUCTION TO LABORATORY TECHNIQUES
- MICRSCOPE is a tool for studying Microbe’s.
- In which magnification is possible due to the precise structure of the microscope, and since powerful lenses are arranged in it, the shape, type, movement and group of micro-organisms can be known.
- Micro = Small,
- Scope = View
- Antony van leeuwen hock invented it in 1975, after which it was later improved and expanded to become the current modern microscope. In Simple Microscope, the object can be magnified 4 to 40 times.
- 1,00,000 times magnification is possible in Electron Microscope.
- 100 to 430 times magnification can be achieved in Compound Microscope which is the most widely used Microscope (used in solution)
Part of Microscope – Parts of Microscope
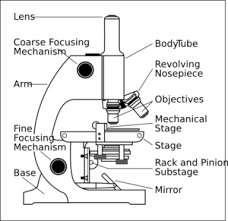
There are three main parts,
- (1) stand
- (2) body and
- (3) optical system.
- (1) Stand :-It is a part made of solid iron like a horseshoe. It is a supporting part and is made in such a way that the alignment of the optical system is supported.
- (2) Body :- The “C“ shaped part is called the body. Through which the microscope can be lifted. In its structure
- (a) Stage :- It provides a platform for the specimen. It is used by the central operator to mount the specimen. It makes it possible for light rays to pass through the slide. A clip is placed on the stage to hold the slide in position. Screws are provided for the movement of the slide in the horizontal and vertical planes.
- (b) Sub stage :- It is located below the stage. And it works by moving up and down through the screw,
- (c) Mirror :- It reflects light on the specimen and can be turned in any direction. It has two surfaces.
- (i) Plain – Used for Sunlight,
- (ii) Concave Used for Artificial light.
(3) Optical System
- :- Eye piece, object glass forms a condenser optical system.
- (a) Body tube :- Wide tube connects objective lens ocular piece. It is up-down by two different arrangements. It is connected to the “C” shaped top of the body
- (b) Coarse adjustment :- Sliding the body tube downwards to focus the specimen.
- (c) Fine adjustment :- For delicate focusing movement. It helps to slide the draw tube to make the picture clear and distinct.
- (d) Nose piece :- Located at the lower end of the draw tube. Object lenses of different magnifying powers can be fitted in its sockets.
- (e) Objective lenses :- Located immediately above the object. It gives a magnified image. There are 3 of them in number. Which are of increasing magnifying power. (10× 45×, 100×)
- (f) Eye pieces :- Located at the top end of the draw tube, through which the examiner can see the picture (magnified) of the slide.
- (g) Limb or Arm :- Consists of illuminating apparatus, stage and observation tube.
- (h) Draw tube :- Located inside the body tube, which can be slid up and down.
Mechanical stage:- “c“ shape is attached to the lower end of the body, on which the slide can be adjusted. The slide can be moved left and right by the slide adjustment screw.
Glass slide:-
It is arranged on the mechanical stage.
Condenser:-
It is formed below the mechanical stage. Which helps in magnifying microbes with the help of lenses.
- Diaphragm :-Located at the bottom of the condenser. Through which light rays pass through the slide.
- Mirror :- Reflects the light and throws it on the object through the condenser.
Care of Micro Scope-Microscope care
- –>
How to use a Microscope
- → Place the microscope towards the edge of the table in such a way that the “C” shape of its body comes towards our chest. And the mirror should come in the opposite direction. The sunlight or lamp light should come from the side opposite us in such a way that it falls directly on the lens.
- → Adjust the condenser in such a way that the rays of light entering it enter the mechanical stage and illuminate the required part of the slide.
- → More powerful lenses are required to examine stained slides.
- → First, focus the less powerful lenses on the slide, while doing so, bring the body tube down with the help of coarse adjustment. Be careful not to touch the slide. Then adjust the lenses to the required magnification. Look at the slide through the eye pieces and adjust the tube up and down as needed.
- → Then make fine adjustments.
Staining of micro-organisms – Staining of micro-organisms
- The procedure (staining of slide) for the biological study of microbes is done by air drying, chemical fixation and staining with aniline dye.
- Bacteria are made to look different from their surroundings so that the examiner can see them easily and the slide can be kept for long periods of study.
Smear
- A thin film of microorganisms from growth culture media is spread on a slide through an inoculating loop.
- A loop of nichrome wire with an insulated handle is used. The loop is sterilized by heating or flaming before use.
- Then the loop is used when it cools down. After the smear is taken, the loop is sterilized again.
- After spreading the bacterial suspension on a clean slide and making a smear, it is kept for air / drying.
- The dry smear is then passed through a Bunsen burner flare several times, which is called Heat Fix. Heat Fixing changes the properties of the enzymes of the bacteria. And prevents cell destruction. Heat causes bacteria to adhere to the slide.
Simple stain
- Most commonly used dyes are synthetic dyes (aniline) made from coaltar derivatives derived from benzene. Dyes are usually salts. Sometimes they contain ions of acids or bases.
- A stain dye containing a positive ion is called a basic stain and a dye containing a negative ion is called an acidic stain.
- Most bacteria stain in basic stains. The staining procedure in which only one stain is used is called simple stain.
- A simple stain that stains bacteria is called a direct stain.
- While a simple stain that stains the background and not the bacteria is called a negative stain.
- . Simple stains are used to study the morphology and arrangement of bacteria.
Gram stain technique
- This stain was developed by Hans Christian Gram in 1884 to identify and classify bacteria. This stain can be used to separate bacteria into a gram positive and gram negative group. can be done.
- Staining technique
- Apply primary stain (crystal violet) all bacteria will be purple stained.
- Apply mordent (grains iodine) this will intensify the bonding of bacteria and primary.
- Apply decolorizing (ethyl alcohol, or ethyl alcohol acetone) this will wash out the primary stain of bacteria. While some will be unaffected.
- Apply secondary stain or counter stain (sofranin) – This will not cause bacteria to become red in colour. After this procedure, the bacteria are easily decolorized on slide examination. They are gram negative and the bacteria that retain the primary stain. are considered positive
Acid fast staining
-
- Ziehl – Ncolson procedure is a commonly used technique everywhere. This is smeared.
-
- Carbolfuchsin is flooded (immersed) with a chemical compound that binds to the bacteria.
-
- Ziehl introduced 5% phenol-containing carbolfuchsin as a dry stain instead of aniline.
-
- The slide is heated with the smear for penetration of the dry stain into the bacteria. After that, the smear is washed with an acid-alcohol mixture, most of the bacteria lose the color of the stain. But acid fast organisms do not lose that color.
Hanging drop method
- → Take a hanging drop slide. If you do not have a hanging drop slide, then take a plain slide and make a depression in the middle of the slide with the help of plasticine. Take a small amount of petroleum jelly, the size of a 50 paisa coin, in your palm, spread it on the slide to make a smear of the same size.
- ->Hold the cover slip by its edge and scrub the petroleum jelly on the cover slip. Carefully scrub the remaining three slides on the petroleum jelly. Make sure to apply the petroleum jelly to the same side of the cover slip each time.
- → Place the cover slip on a paper towel, making sure the petroleum jelly side is on top.
- Place a drop of organic infusion or suspension on the slide