ENGLISH GNM-FY-PRACTICLE-ARTICLES/EQUIPMENT
♥ Thermometer:
Thermometer is used to measure body temperature during physical examination.
There are 2 types of temperature.
Surface temperature
Core body temperature
1.Surface temperature:
In this temperature can be taken in skin, subcutaneous tissue and fat.
Eg. Axillary temperature
2.Core body temperature:
In this temperature is taken from deep tissue like abdominal cavity, pelvic cavity.
Eg. Temporal
Tympanic
Oral
Oedophagal
Urinary bladder
Rectal
pulmonary
Normal value of temperature (normal body temperature):-
Oral temperature: 37°C / 98.6°F
Rectal temperature:
37.5°C/ 99.5°F (oral temperature greater than 0.5°C)
Axillary temperature:
36.5°C/ 97.7°F (less than oral temperature)
Conversion Formula for temperature:-
°F=(°C× 9/5) + 32
°C=(°F- 32) ×5/9
♦There are many types of thermometer which are as follows.
Clinical thermometer or glass thermometer or mercury thermometer
electronic thermometer
digital thermometer
tympanic thermometer
Non contact digital infrared thermometer or forehead thermometer
Disposable thermometer strip
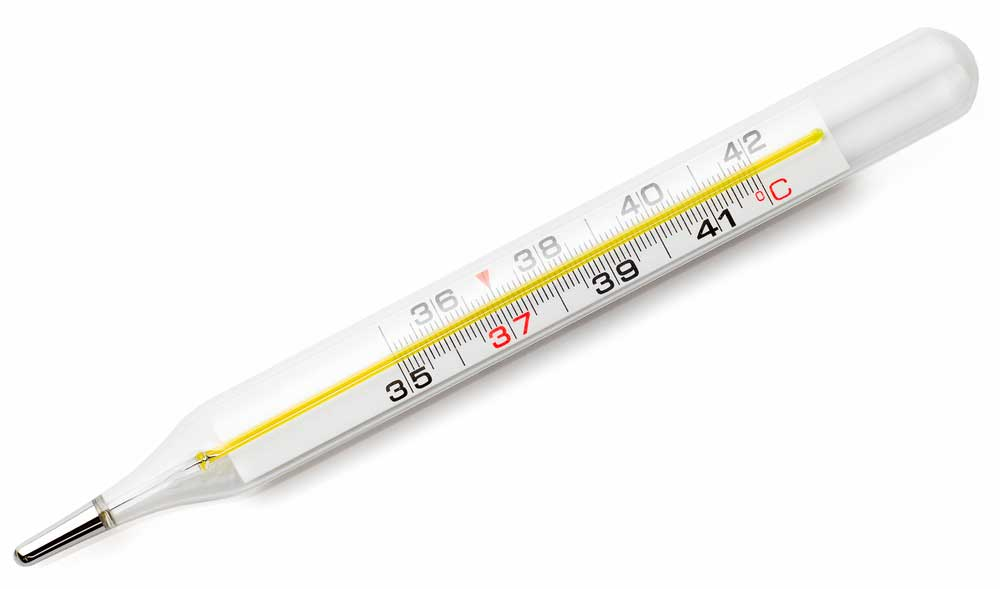
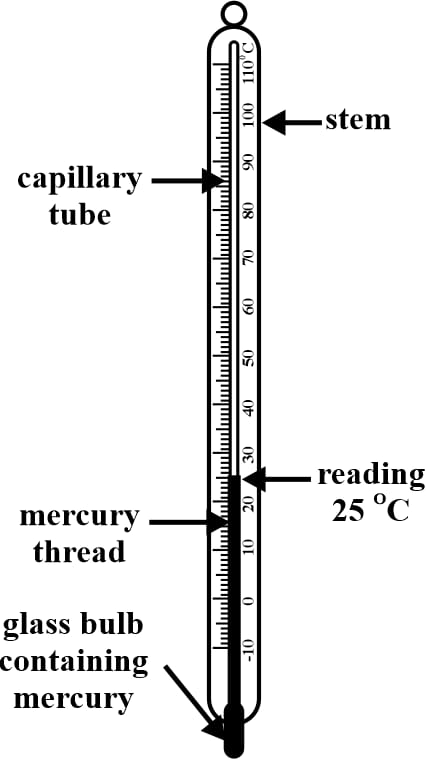
1.Clinical thermometer:
Clinical thermometer is used to take body temperature. Clinical thermometer is made of a glass tube shape which is filled with mercury through which body temperature can be measured.
Oral, axillary etc. temperature can be taken from this thermometer.
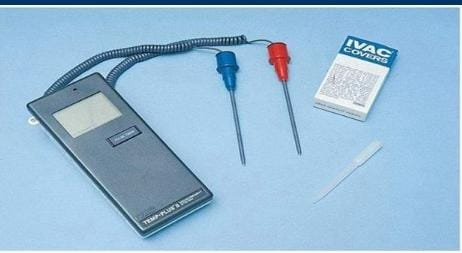
Electronic thermometer:
This thermometer is used to take oral and rectal temperature.
which for blue tipp Oral temperature and
Red tip is used for rectal temperature.
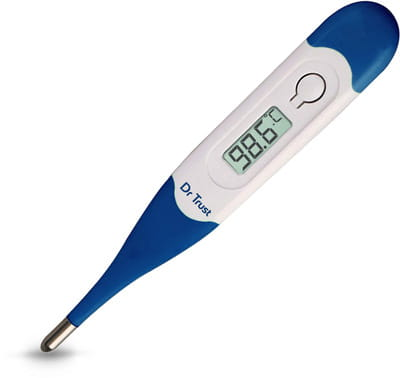
Digital thermometer:
Digital thermometer is used to take body temperature during physical examination.
Digital thermometer can take oral, axillary, rectal, etc. body temperature.
Tympanic thermometer:
This thermometer is used to take temperature from the ear during physical examination.
If there is ceruman (ear wax) in the ear, there may be a change in temperature
This thermometer is kept in the ear up to the tympanic membrane and the temperature is measured.
The temperature is measured by infrared rays in this thermometer.
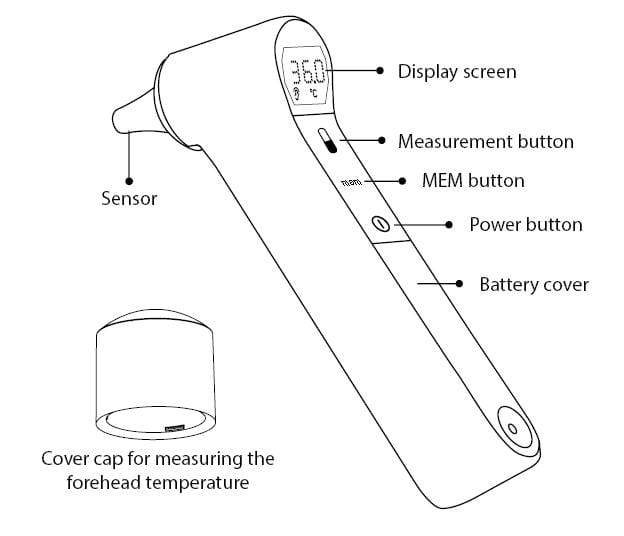
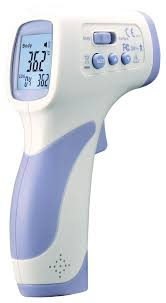
.Non-contact digital infrared thermometer:
This thermometer is measured on the upper part of the person’s head and the body temperature without touching the head.
Body temperature is taken by this thermometer without touching the person’s body.
This thermometer was used excessively during the corona period.
Disposable thermometer strips:
In this, this strip is placed in the person’s mouth under the tongue and after 60 seconds, it is removed from the mouth and the temperature is observed.

How to clean the thermometer..?
The thermometer is cleaned with cotton swab through normal saline or spirit.
In it digital and clinical thermometer…
Bulb to stem is cleaned before using the thermometer.
And after use, stem to bulb is cleaned.
NOTE:
During the procedure, the thermometer is kept with savlon solution and cotton swab.
The main goal of keeping a cotton swab in it is that if there is a cotton swab, when the thermometer is kept in a bowl with savlon during the procedure, the tip (bulb) of the thermometer does not break and the mercury does not fall.
(More usage explained in PROCEDURE)
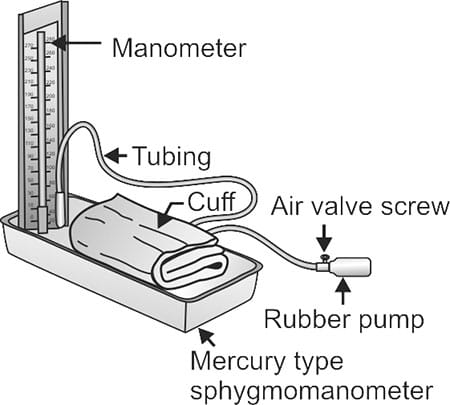
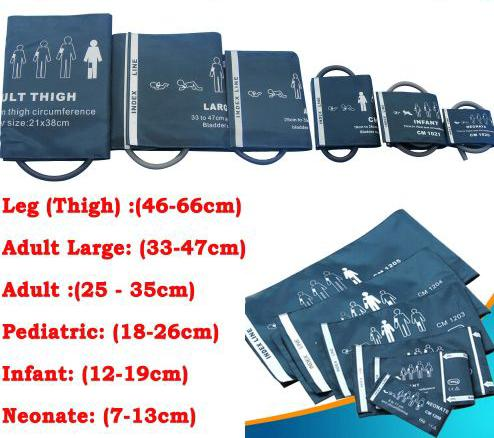
♥ 2. BP INSTRUMENTS
Introduction
Another name of BP mercury instrument is sphagmomanometer.
It is called the gold standard.
Where sphingomanometer is the Greek word ‘sphagmus’ meaning heartbeat, and ‘manometer’ means an instrument for measuring pressure using dimensional analysis.
It was invented in 1881 by Samuel Seyfried curl fighter von Besch.
A sphygmomanometer is a type of instrument that can be used to measure blood pressure.
Mercury sphagmomanometer is the most commonly used sphagmomanometer.
It consists of a graduated tube containing mercury which measures the pressure applied by an inflatable rubber on the upper arm.
For proper measurement the instrument is placed on a flat surface.
They measure BP directly by observing the height of the column of mercury so there can be no measurement errors.
There are three types of sphygmomanometers
1.Mercury Sphagmomanometer
2.Aneroids sphagmomanometer
- Digital sphygmomanometer
Use
- To measure people’s blood pressure
- To detect any abnormality in blood pressure which may indicate any disease.
- To monitor the effectiveness of drugs that alter blood pressure in people.
- Different techniques can be used to help the suffering patient depending on the blood pressure as first aid in the ambulance.
The steps for measuring blood pressure by sphygmomanometer are as follows
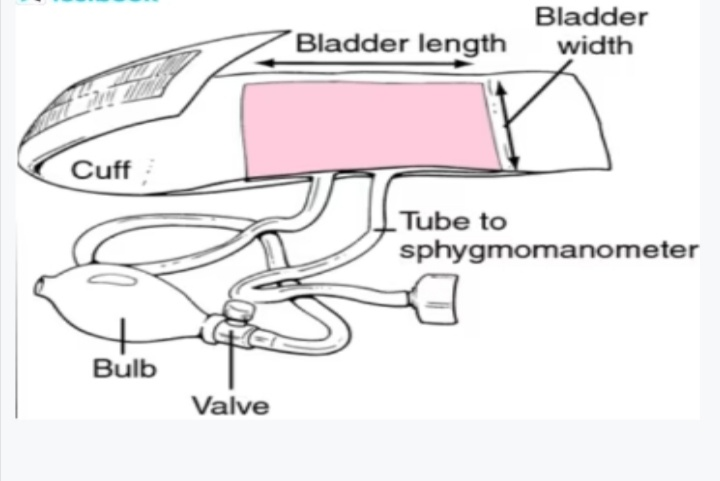
- When the upper arm is tied with an inflatable cuff, keep in mind that at least 80% of the upper arm area is covered and the bottom of the cuff should be two centimeters above the antecubital fossa or elbow.
- If the valve of the BP instrument bulb is loose, tighten it medium tight, do not over tighten.
- Air is pumped into the phlegm bladder to a pressure greater than the systolic and diastolic pressures.
- The stethoscope is then placed over the brachial artery of the arm.
5.Then the air is slowly released by loosening the bulb valve little by little and due to this the pressure through the cuff also decreases until the pressure drops to 180 mmHg.
6.A stethoscope is used to listen for the sound that is heard when the cuff deflates the pressure is also monitored in the manometer and this sound is the systolic pressure.
Normal systolic pressure is 120 mmHg.
- The pressor inside the cuff is further reduced by releasing the air until no sound is heard through the stethoscope.
The pressure at which the sound of flow in the blood is not heard is the diastolic pressure, it is also seen in the manometer when the sound stops.
Normal diastolic pressure is 90 mmHg.
Principles of Sphagmomanometer
Its main principle is that the pressure in the cuff bladder should be equal to the arterial pressure.
Blood pressure is usually measured from the brachial artery as it is the main blood vessel of the upper arm.
The brachial artery is inflated until it is compressed (narrowed) and blood flow is stopped.
Points to consider for accurate BP measurement
Remove tight clothing.
Do not eat or drink anything and do not exercise for 30 minutes before BP measurement otherwise the BP will be high (increased).
Remove excess air from the cuff before measuring BP otherwise the BP will be inaccurate.
Keeping both feet flat on the ground and not crossing the legs.
Do not talk to the patient while measuring the patient’s BP.
Place the patient in a chair and sit straight back.
Place the patient’s hand on the table at the level of the patient’s heart.
Ask the patient to rest for 5 minutes before measuring BP.
Tie the cuff on the upper arm two centimeters from the elbow.
The cuff should not be too tight on the upper arm, it should easily fit two fingers.
Determining the appropriate cuff age wise for measuring BP.
After care
Use a soft dry cloth or a soft cloth moistened with a mild detergent to clean the cuff of the manometer and wipe with a dry cloth.
Do not wash the cuff and other parts of the BP instrument in water and also do not use gasoline or other components.
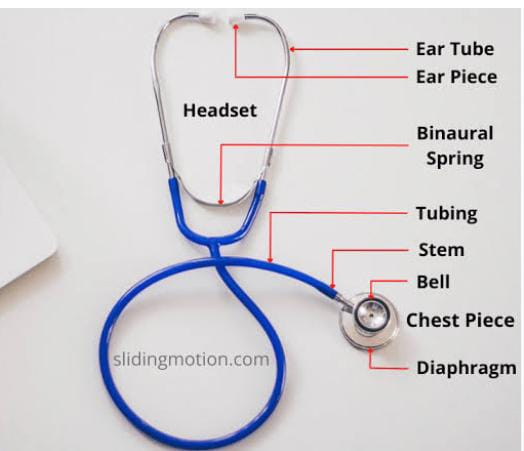
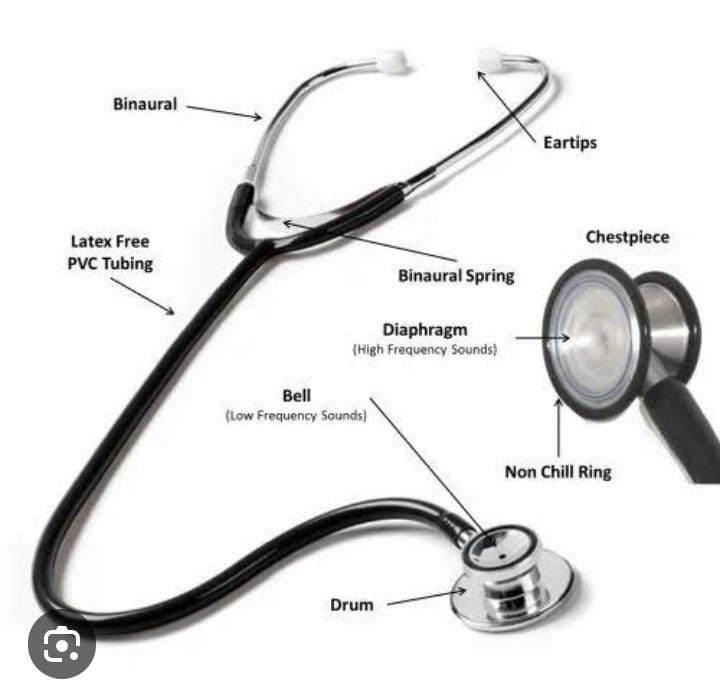
♥ STETHOSCOPE – Stethoscope:
Usage:
A stethoscope is used to measure blood pressure.
Heart, lung, intestinal track (intestinal movement called peristalsis movement) is done to hear the sound.
After care
Keep away from excessive heat and oil.
Clean with 70% isopropyl alcohol. To remove organic material while cleaning
Stethoscope is a medical instrument that is used to listen to the sounds inside the human body.
Mainly lung, heart, intestine sound is heard through stethoscope.
Apart from this, it is also used to listen to the fetal na heart sound.
Stethoscope is also used to manually check blood pressure.
♥ Kidney Tray:-
A kidney tray is a kidney-shaped basin. It is mostly used in surgical procedures. In which dressing bandage is done in a small instrument and another medical vest.
Another name for kidney tray is kidney dish or emesis basin.
Use
Wet waste has to be collected. Dressing is done in surgery etc.
It has many functions like holding or transporting drug cotton dressing syringe needle etc.
Collecting medical waste involves collecting human tissue and blood etc. in dental procedures.
Sharp instruments have to be transferred safely.
After care
First clean it with a soft brush or soft cloth.
Clean only a small amount. Do not use metal brushes.
Then sterilize it by autoclave.
♥ Syringe:-
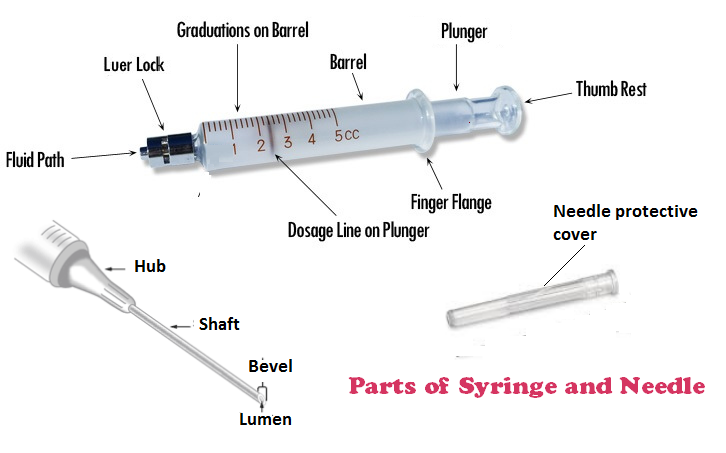
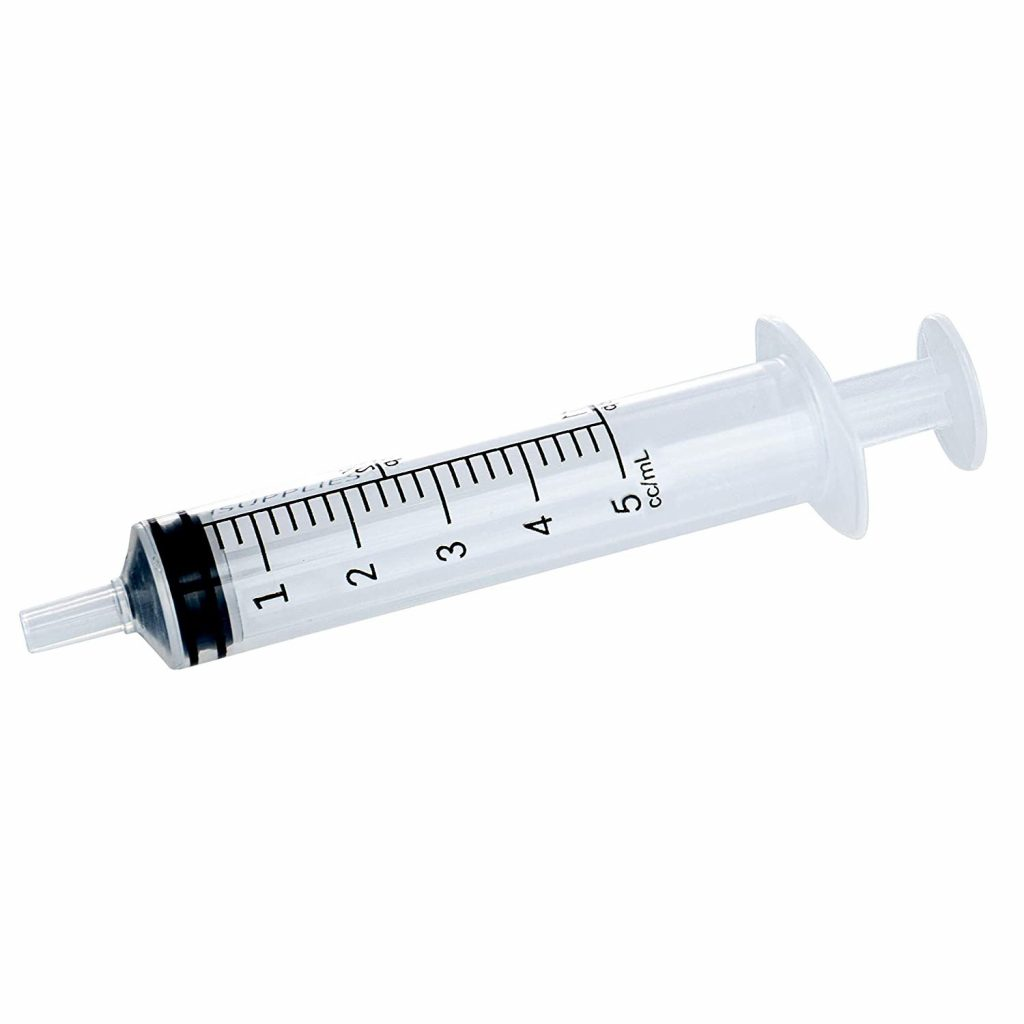
This is a device used to inject medication into the body and withdraw body fluids.
Type of Syringes
Insulin Syringe, Tuberculin Syringe, Oral Syringe, Dental Syringe
Disposable syringe, injection pen
Size: 1, 2, 3, 5, 10, 20, 50, 60 ml
Biggest size: 500 ml
After Care:
Cut the hub in the disposable syringe, remove the plunger, cut. Discard in red bin..
♥ Neddle:
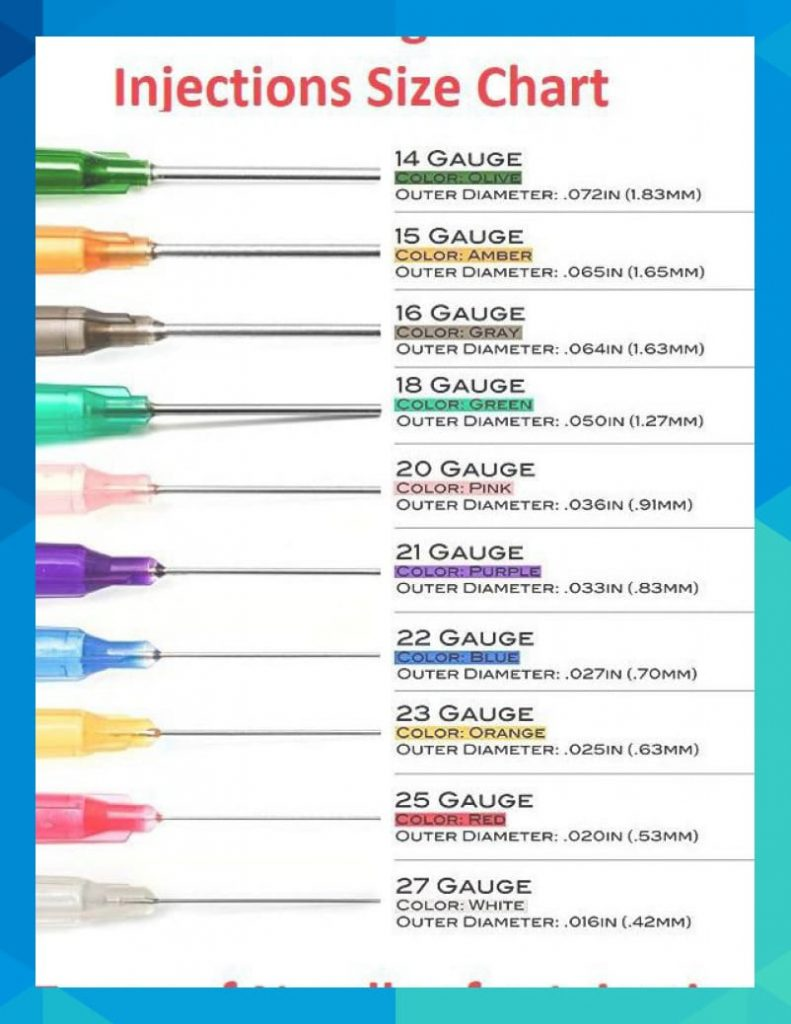

This is a single-use needle.
It has been designed in such a way that we can use it once.
Neddle is used to withdraw medication from ampule and vial, to collect blood sample, apart from that, to do one time medication administration, for vaccination,
Used to give im, iv, sc injection.
If the needle is reused, there is a chance of infection.
♥ IV CANNULA:

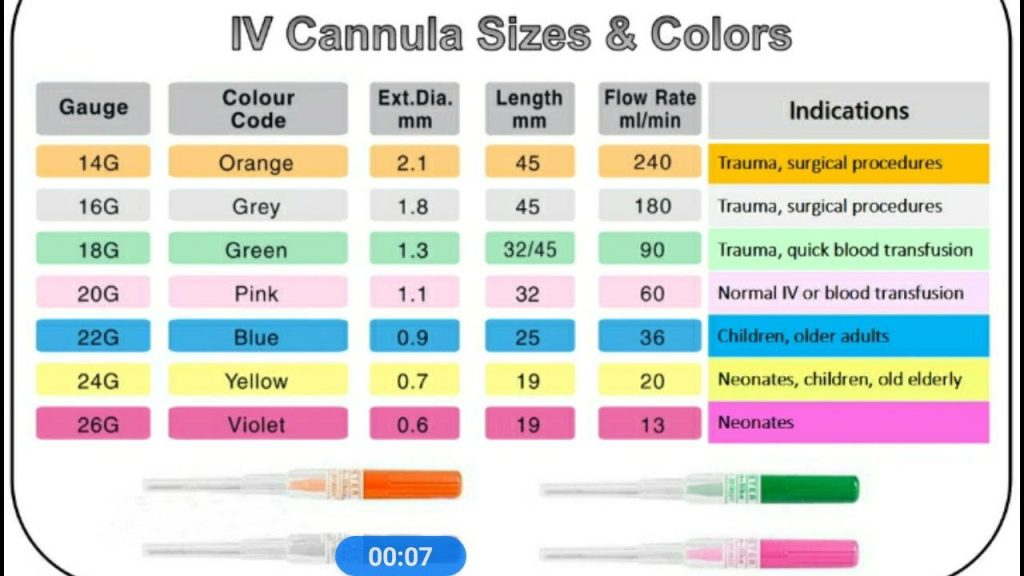
IV cannulation is a technique in which a cannula is placed inside a vein to provide venous access.
Blood sample is taken through venous access.
Apart from that, fluid, medication, parenteral nutrition, chemo therapy and blood transfusion are done.
IV cannula is cannulated in forearm, back of hand and antecubital fossa.
🙂 Glucometer:
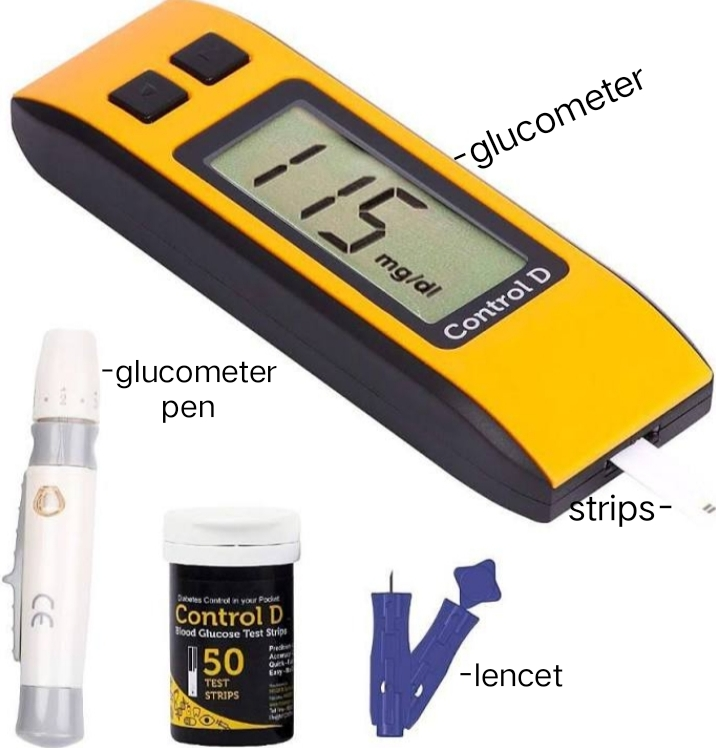
Glucometer is used to check the level of sugar in the blood.
Glucometer measures blood sugar level in 3 ways.
invasive method
Non-invasive method (manually)
CGM (continuous glucose monitoring)
Mainly at present invasive method is used to check blood sugar level.
In it, a blood sample is taken from the finger tip through a lancet and then blood sugar level is checked through a lancing device and test strips.
regular blood sugar level check karta People use pen-like glucometers which are painless and can be done by oneself.
Normal blood sugar level: 70-130 mg/DL
HYPERGLYSEMIA if blood sugar level is more than 130 mg/DL
is called
Blood sugar level less than 70 mg/dl is called HYPOGLYCEMIA.
🙂 Opthalmoscope:
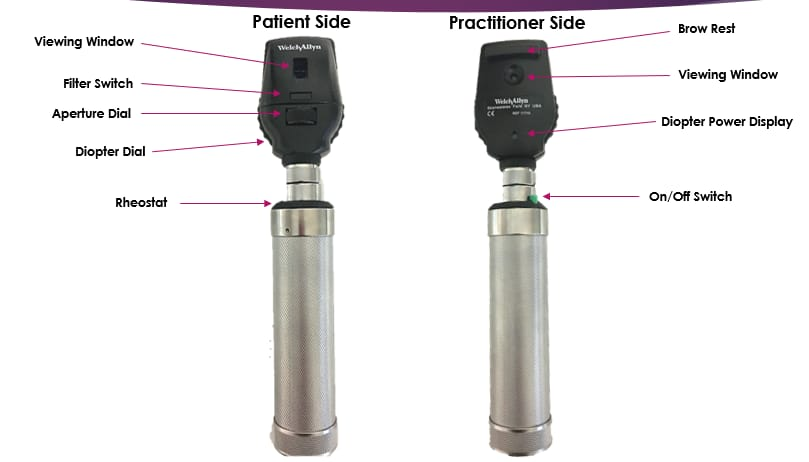
Opthalmoscopy is a clinical examination of the eye in which the examination of the interior eye is done through an opthalmoscope.
The status of the fundus and the opacities of the ocular media can be known through the Opthalmoscope.
The degree of retina can be known through Opthalmoscope.
Opthalmoscope can be used for screening of eye diseases like glaucoma, retinal detachment etc.
Oprhalmoscope was invented by von Helmholtz in 1850.
🙂 Pulse oximeter

It also shows the saturation of oxygen in the body along with the pulse and respiration
Pulse oximeter is used to check the level of oxygen in the blood.
Pulse oximeter was invented in 1974 by a man named Takuo Aoyagi.
Pulse oximeter has been used more during the corona virus pandemic.
Pulse oximeter is a painless and non-invasive method through which the level of oxygen in the blood can be checked.
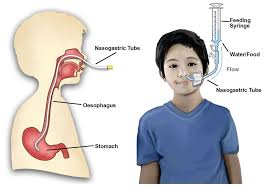
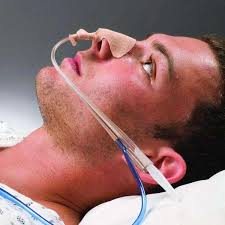
🙂 RYLE’S TUBE
The method to check that the RYLE’S TUBE is in the stomach is as follows:
Aspirate
Immerse
Ascultate
X-ray
Aspirate:
Attach the syringe to the end of the RYLE’S TUBE, then aspirate a small amount through the syringe and if the content in the stomach in the rule’s tube comes into the tube, then it is confirmed that the tube is in the stomach.
Immerse:
Keep the tip of the rule’s tube in the water-filled bowel.
If air bubbles are found in the water then it is in the trachea and if there is no moment then it can be confirmed that it is in the stomach.
Auscultate:
Attach the syringe to the end of the rule’s tube and place the stethoscope on the left hypochondrium of the stomach, and inject 10 ml of air through the syringe and listen for the gassing sound in the stomach through the stethoscope.
If gassing sound is heard then it can be confirmed that it is in stomach.
X-ray
X-ray can determine whether the placement of Ryle’s tube is correct or not.
A Ryle’s tube is necessary for diagnosis or treatment in the gastrointestinal tract, as well as for feeding. Many tubes have been designed so far, but the tube designed by Ryle of Guy’s hospital medical school is the most widely used tube.
PRINCIPAL OF CONSTRUCTION
The tube should be flexible and fine
The tube should be of sufficient length to reach different parts of the upper gastrointestinal track
It should have markings to check the location of the tip within the gastrointestinal track
The tip must be open to allow the material to pass through the tube
Keep the tip slightly weighted so that food is easier to swallow
The tube should not be too uncomfortable
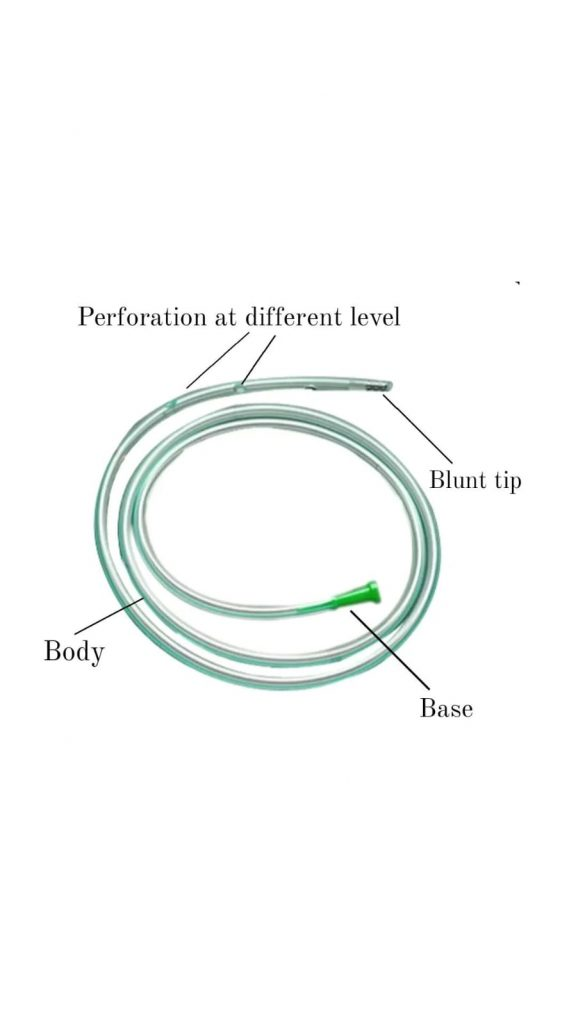
PARTS OF RYLE’S TUBE
Tip, body and base
1 – TIP
~ It is blunt (to prevent internal injury)
~ It has openings at different levels on all sides (to introduce fluid into the gastrointestinal track or to collect material from it)
(If all the holes are at one level, there is a possibility of tearing while inserting the tube)
~ It contains a small piece of lead
(There is a piece of metal inside the tip which makes it heavier, making swallowing easier due to gravity)
(The metal is radio-opaque so the position of the tip inside the gastrointestinal track can be discerned during radiology).
2 – Body
It has four markings
Mark – 1
It is located 40 cm from the tip and is marked by a transport groove. This mark indicates that the tube has reached the cardiac orifice.
Mark – 2
They are spaced 50 cm apart and marked by two transverse grooves. This indicates that the tube has reached the gastric cavity.
Mark – 3
It is at a distance of 57 cm from the tip and is marked by three transverse grooves indicating that the tip is located at the pylorus.
Mark – 4
It is located at a distance of 65 cm from the tip and has four transverse grooves
is marked by It indicates that the tube has reached the duodenum.
3 – Base
It has an opening through which material is injected or withdrawn with a syringe.
How Rails Tubes are laid
This procedure is easy if followed systematically.
Ask the patient to sit up in bed. Placing the tip of the tube on the dorsum part of the tongue (no lubrication required, saliva and other natural secretions act as lubricants.) Ask the patient to swallow the tube until the tube reaches the desired mark inside.
Apart from this, the Riles tube is well lubricated and inserted through the nose to insert it in the supine state, the patient is asked to swallow after it reaches the fairings.
Uses of Ryle’s tube
1 – To diagnose
To extract gastric juice, to know the process of gastric juice and absorption in the following diseases;
Chronic gastric ulcer
Chronic duodenal ulcer
Pyloric obstruction
In gastric carcinoma
Zollinger-Ellison syndrome
Gastric Achilles
Collection of duodenal contents for bacterial diagnosis
For example: To identify typhoid carriers
The contents are collected to check for the presence of tubercle bacilli in children (which are helpful in the diagnosis of pulmonary tuberculosis) and in patients who cannot clear the throat while sleeping and swallow the material.
To confirm the diagnosis of pernicious anemia associated with achlorhydria (absent hydrochloric acid in the gastric juice).
To distinguish between bleeding above the pylorus and below the pylorus.
If blood is present in all samples aspirated from the stomach, the site of bleeding is above the pyloric sphincter (eg, malaena). If blood is present in the duodenal sample, the site of bleeding is below the pyloric sphincter.
2- Therapeutic (for treatment) use
For gastric lavage procedures
To check drip feeding. For example: Intra gastric milk feeding
To administer intragastric nutrition to unconscious and comatose patients
to contract the stomach ; such as when there is acute gastric dilatation
To perform naso-gastric suction for post-operative comfort (this is very useful in case of paralytic ileus to further post-operative recovery.
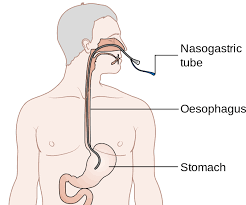
Measurement while inserting Ryle’s tube into stomach:
Place one end of the Ryle’s tube at the tip of the nose.
Then take the center part of the Ryle’s tube to the pinna of the ear.
And then take the ryles tube from there to the xiphoid process.
Marking on this part.
Insert the tube into the stomach up to this marking.
Apart from this procedure there is another way. Which are as follows:
Blue color marking is already visible on Ryle’s tube.
Insert the tube up to this marking and keep this extra part of the tube out.
🙂 URINARY CATHETER:
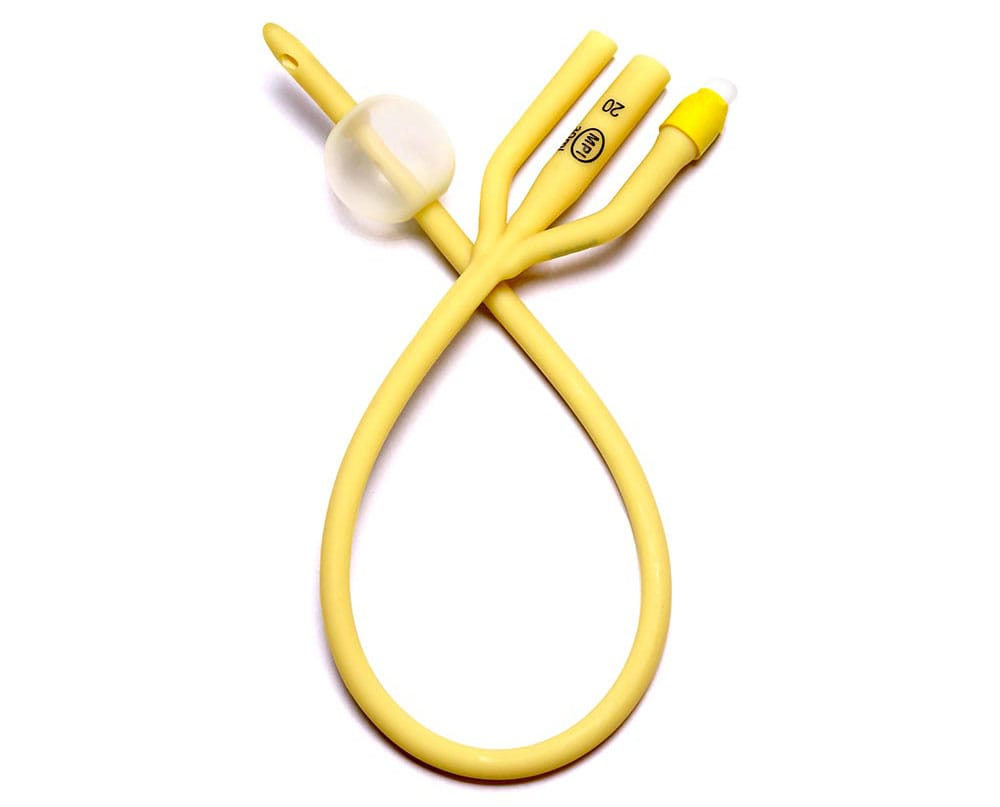

Urinary catheter is made of plastic or silicon.
Urinary catheter is a tube through which urine in the bladder (urethra) is used to drain.
Apart from that, when the patient has difficulty in urinating naturally, urinary catheter is done.
Urinary catheter has two way and three way urinary catheter.
Apart from that, it is used to measure continuous urine output in patients with renal failure, post operative patient, stricture, trauma etc.
Two way urinary catheter:
It has 2 tube channels.
In it, the balloon is inflated through which the catheter is fixed in the bladder.
And a urobag is attached through a channel through which urine is collected.
Three way urinary catheter:
It has 3 channels.
In it, the balloon is inflated through which the catheter is fixed in the bladder.
And a urobag is attached through a channel through which urine is collected.
A third channel is used for bladder irrigation through antiseptic solution.
Size:
Children: 8-10 french
Women: 14-16 french
Men: 16 – 18 french
Aftercare:
The cathertet is removed when the patient is discharged or the patient’s urine output is not to be measured.
In it, the saline water in the balloon spot is first withdrawn through a 10 ml syringe, then it is slowly removed in a round motion.
Then the catheter is separated from the urobag and the catheter is discarded in the red bin
🙂 Urobag (Eurobag):
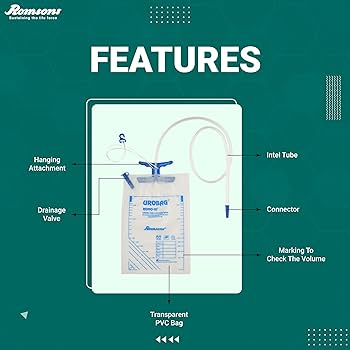
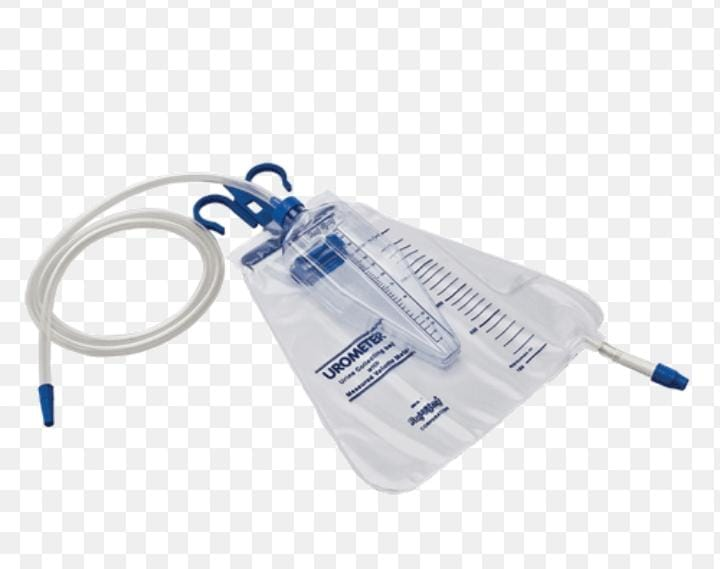
Urobag is used to collect the drained urine when a urinary catheter is in place.
The Urobag is attached to the tubing of the catheter.
Its main use is to measure urine output.
Apart from that, it is used to take urine sample.
Urobag can store urine from 50 ml to 2000 ml.
Apart from this, there is a measuring cup in the upper part of the urobag which can be used to measure the fixed urine output every hour.
🙂 Oxygen mask:
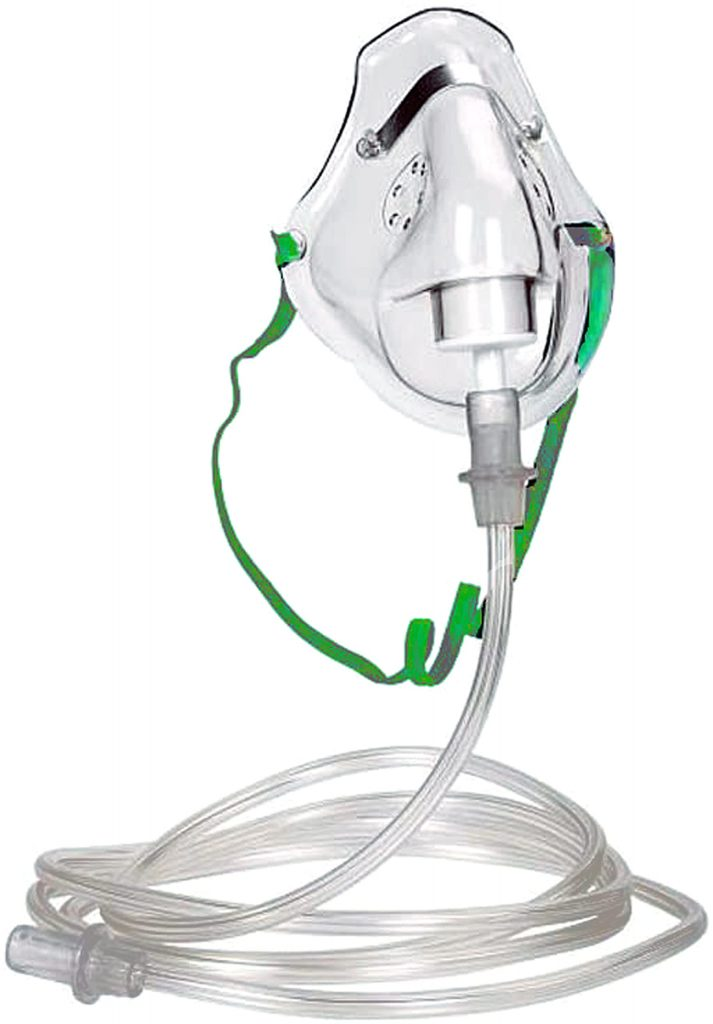
Oxygen mask is used to deliver oxygen to the patient if the patient is not getting proper oxygen.
The oxygen mask is attached to the oxygen cylinder by connecting it through tubing.
🙂 Tuning fork:

Tuning fork is made of metal, stainless steel and aluminum.
It is mainly used for vibratory sensation and hearing assessment (air conduction, bone conduction).
Tuning fork is used to perform Rinne test and Weber test for ear hearing.
🙂 Otoscope-Otoscope
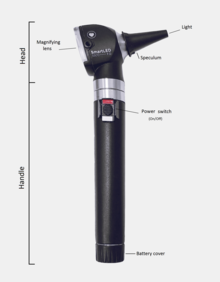
What is an otoscope?
An otoscope is a medical instrument or device. It has a clear and intense light which will help us to examine the ear canal well. Because what it does is show us better images of that area as well as the eardrum. Generally speaking, we can add that with this device you will be able to see both Middle and External Ear, making the study more complete. In the head part, we can find many terminations, which will adapt the cavity. From there the light we mentioned and the magnifying glass will begin to hold images at a much larger size.
What is this for?
An otoscope is used to look closely at both the external and middle ear. So in this way, the doctor will check for any kind of problems or infection. As we mentioned, all this will be seen more clearly thanks to the magnifying glass which will detect with the help of light whether there is a problem in the ear canal.Can diagnose problems or diseases like otitis, ear piercing or wax plug which is one of the most common causes in our ears.
How to use an otoscope
While using the otoscope, the first step we are going to take is to hold it well and for this, we should treat it like a pen or pencil. Although it seems to be something unimportant, it is not that important, as it will help us while conducting the test. You hold the patient’s face with your thumb and forefinger to support the rest of your hand. Why is the latter important? Because we will have the necessary stability to control the person if he moves forward.
Now it’s time to, with your free hand, slightly pull the ear both backwards and upwards, so that we can align the canal well and not create any problems with the entrance of the otoscope. If the person to be examined is a child, it is better to stretch backwards and horizontally.
It is important that, if there is any kind of pain or infection in one ear, always start with the other one which is healthy. In addition, when evaluating, it will allow us to better compare what is in one and the other. Now you just have to check whether you see external auditory canal, eardrum etc or not. Always check that the light on our device is correct so that it does not lead to errors.
🙂 Air Cushion
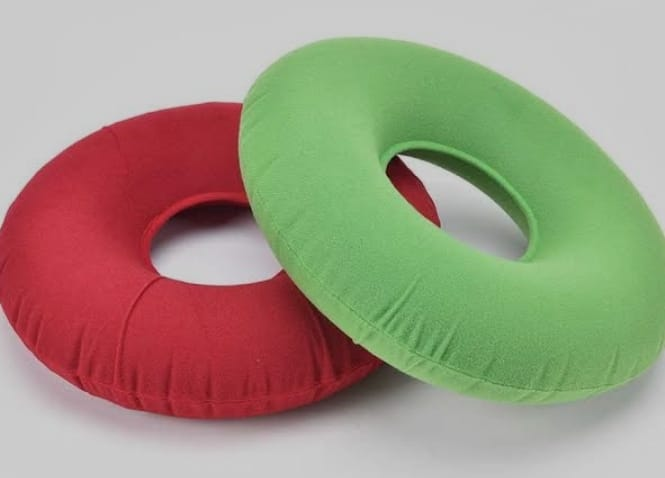
An air cushion is a type of comfort device that is made of rubber. It is of round shape and is inflated by air. Air cushions are commonly used to take off body weight.
Air cushions are not applied directly to the body and are kept in skin contact only after being properly covered.
Purpose
Air cushions are used to take off body weight and relieve pressure from certain bony prominence parts of the body.
Used to promote client comfort.
Used to relieve pressure from certain parts of the body such as bony prominences.
Air cushions provide relaxation to the client and help prevent bed sores.
This air cushion helps people who sit for a long time like office workers, drivers, wheelchair users to prevent pressure sores.
This air cushion can be inflated and deflated as per requirement due to which the client gets proper comfort.
Benefit (Benefit-uses)
Using an air cushion can improve the complete level of flight.
Air cushion also helps to relieve the pressure of tail bone and hip bone.
Air cushions enhance better posture and also work to improve circulation.
Air cushions also work as a comfort device in clients who are at risk of bedsores.
Air cushions are available in different sizes like 35cm, 40cm, 45cm, 50cm.
🙂 Nelson’s Inhalers
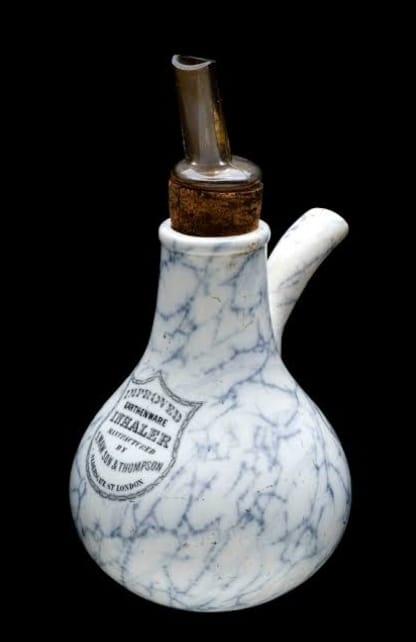
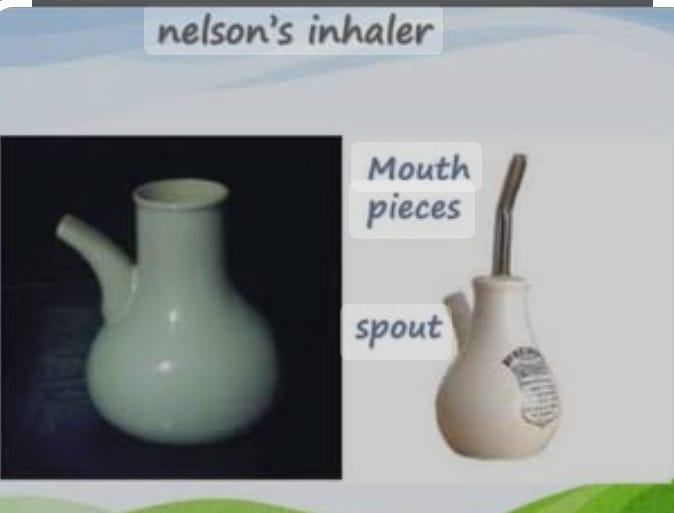
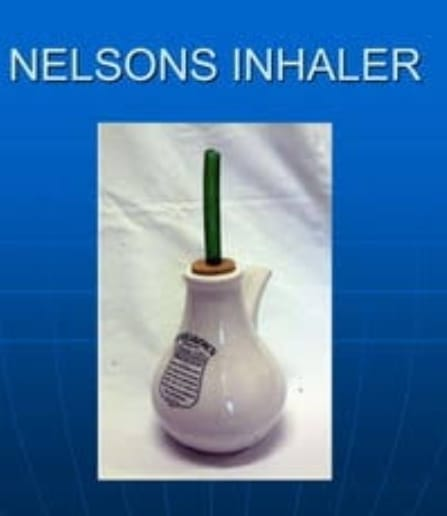
Nelson’s Inhaler is a product that is used for nasal inhalation. Nelson’s Inhaler helps provide relief from nasal congestion and other symptoms such as colds, allergies, sinusitis, and respiratory infections.
Nelson inhalers usually contain natural ingredients such as menthol, eucalyptus oil, and peppermint oil. These ingredients have properties that help clear the nasal passages, reduce inflammation, and provide a cooling sensation and help relieve nasal discomfort.
Nelson’s inhaler was invented by Dr.Nelson between 1861 and 1865.
Nelson’s Inhaler A 500ml and
Available in 750 ml size.
Purpose
Nelson inhaler is used to reduce inflammation of the mucous membrane of the nose.
If cold and
Helps to relieve the condition of sinusitis.
Nelson inhaler helps in providing a cooling sensation.
Nelson inhaler helps make breathing easier.
Benefit
Nelson’s Inhaler relieves nasal congestion if it occurs.
If there is inflammation in the mucus membrane of the nose and the condition of sinusitis, it helps to relieve it.
Nelson’s inhaler helps clear the nasal passages.
If there is a thick cough, it helps to soften it.
Helps to clear nasal passages if blocked.
Nelson’s inhaler helps clear the respiratory passages and provides a cooling effect.
If there is stuffy nose, rhinose, sinus suppressor, it helps to relieve blocked sinuses.
🙂 Hot water bag

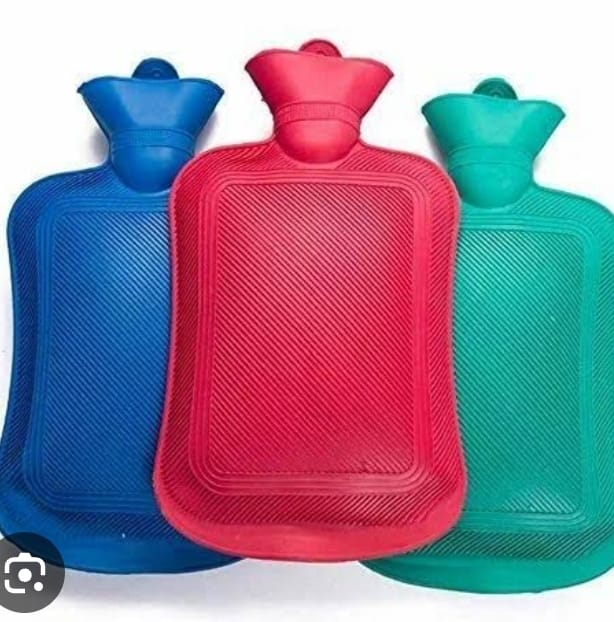
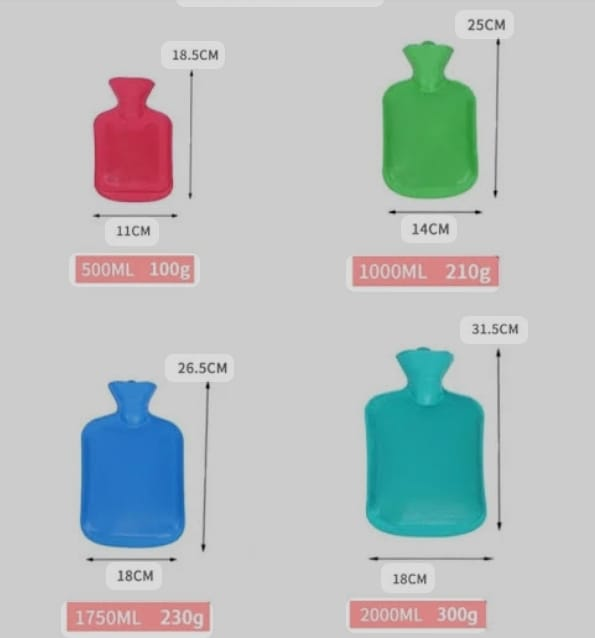
Hot waterbags are also called hot water bottles. A hot water bag is a container made of rubber, silicone and other hit resistant materials to hold hot water for therapeutic purposes. Hot water bags are usually applied to specific parts of the body for therapeutic purposes.
Hot water bags have a screw-on or snap-on cap to prevent water leakage and a wide mouth for easy filling with hot water.
The hot water bag should never be applied directly on the skin, a towel should be placed over the bag and the hot application should be provided only after that, otherwise the skin may burn.
Capacity Hot water bag capacity a
500 ml,
1000ml,
1750 ml,
Available in 2000ml.
Purpose
A hot water bag is applied to provide warmth.
Applied to relieve pain and congestion.
Applied to enhance vasodilation.
Hot water bags are applied to improve muscular relaxation.
Hot water bags work to improve circulation by dilating the blood vessels.
Helps promote healing and helps relieve deep congestion.
Peristalsis helps stimulate movement.
Benefit
Pain is relieved by application of hot water bag.
Application of hot water bag relaxes the muscles.
Application of hot water bag dilates the blood vessels and thereby increases the blood supply to the affected area.
Helps to relax tense muscles.
Application of hot water bag relieves muscle aches, menstrual cramps and joint stiffness.
Sand bag
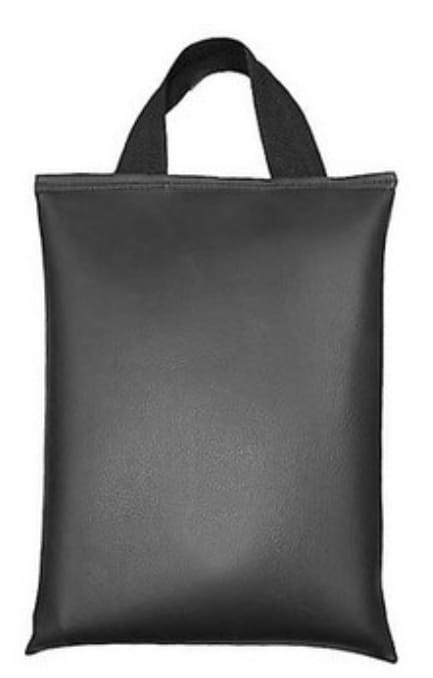

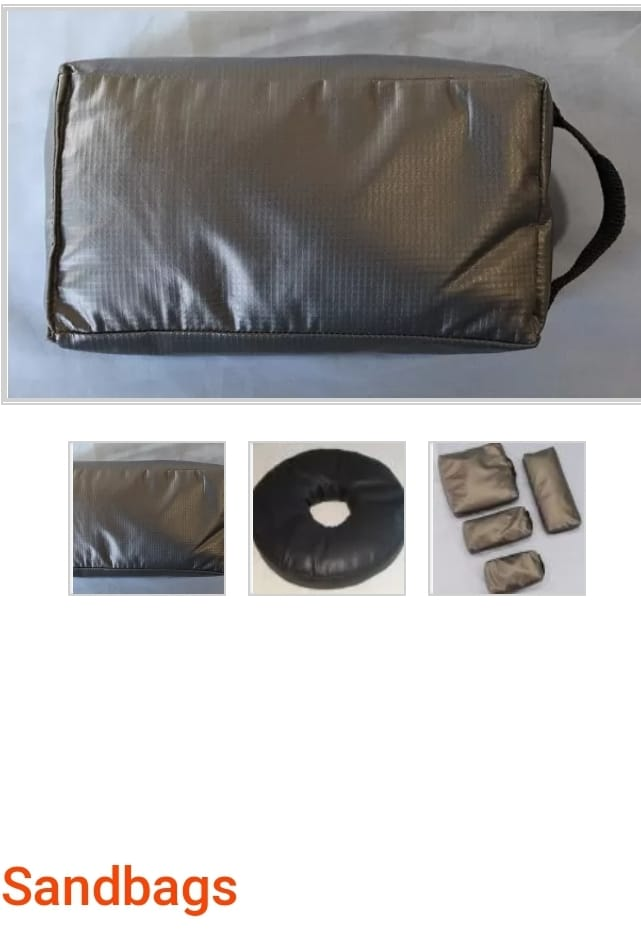
A sand bag is a comfort device made of canvas, rubber, vinyl, and plastic. A sand bag is filled with sand that can fit the body shape. The sand bag can be used in place of or in addition to the trochanter roll. Used to immobilize body parts.
The weight of sandbags is 1,5 and 10 LBS.
🙂 Purpose
Sandbags are used to provide support and shape to the body.
Sandbags are used to immobilize the extremities.
Sand bags are used to maintain body alignment.
A sand sag is used to provide support to a body part.
A sand bag is used for proper positioning of body parts.
Used to relieve discomfort.
A sand bag is used to provide support to a fractured body part.
Use of sand bag is used to prevent foot drop and wrist drop.
🙂Benefit
The benefit of sand bags is proper positioning of body parts.
A sand bag provides proper support to a body part.
Helps provide a comfortable position to the patient in any medical procedure.
Sandbags and body parts help stabilize joints and extremities.
A sand bag helps in providing proper relaxation to the patient.
Sandbags distribute body pressure and reduce localized pressure points.
Sandbags are helpful for comforting patients who are in the same position for long periods of time.
🙂 Enema cane
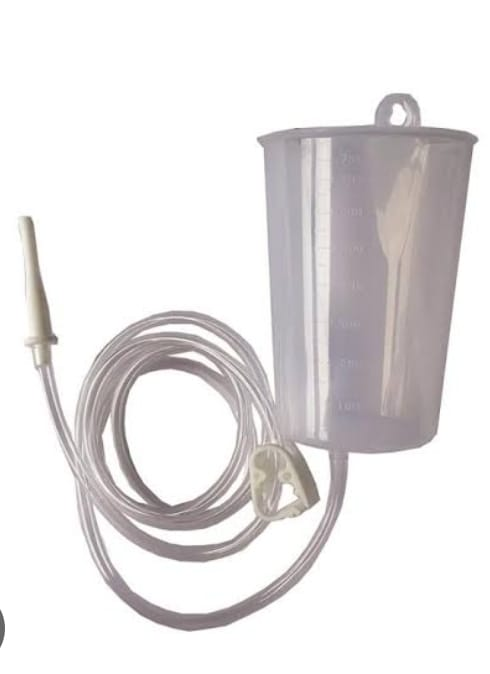

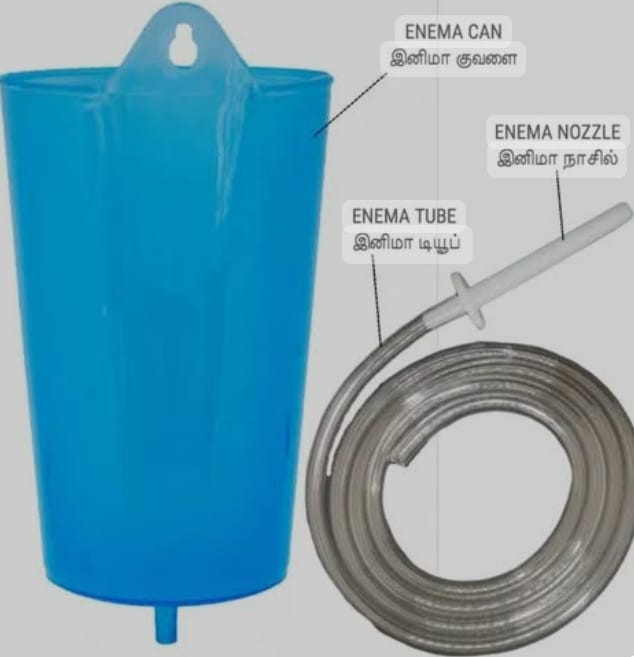
An enema can is a device used to introduce an enema solution into the rectum.
It is a procedure in which liquid is introduced through the anus into the rectum and colon. It is used for certain medical conditions such as enemas to treat constipation, fecal impaction, and to prepare for certain medical procedures.
🙂 Parts of enema
There are 3 parts to an enema.
1) Container,
2) Tubing,
3) Nozzle and tip.
••>
1) Container,
The container holds the liquid solution (enema solution) which is introduced through the anus into the rectum and colon. Enema cans are made of different materials, such as plastic, stainless steel, etc.
The capacity of cans ranges from a few ounces to a few liters.
2) Tubing,
The tubing serves to attach the container to the nozzle (tip) that is to be introduced into the rectum. Tubig advocates introducing a solution in a container into the rectum.
3) Nozzle or tip
A nozzle or tip through which the enema solution is introduced into the rectum and colon A nozzle (tip) is introduced into the rectum. The nozzle is smooth and tapered for comfortable insertion.
These cans are available in different sizes and there are also reusable and disposable types of enema cans.
🙂 Size of Enema Cane (Size of Enema cane)
Enema cans are available in different sizes such as,
1) Small size,
2) Medium size end
3) Embarrassing size.
••>
1) Small size,
Small size enema cans have a capacity of 1 to 2 liters (approximately 32 to 64 ounces).
This small size enema can is generally used for personal use, home use and for relieving constipation and cleansing the colon.
2) Medium size
A medium size enema can has a capacity of around 2 to 3 liters (approximately 64 to 96 ounces). Medium size enemas are used for a variety of medical conditions such as,
To relieve constipation,
Used to cleanse the colon, relieve fecal impaction, and prepare for certain medical procedures.
3) Embarrassing size.
A large size enema can has a capacity of 3 liters or more. (Approximately 96 ounces or more). This large size is commonly used in medical and clinical settings and is also used for diagnostic purposes.
🙂 use
Use of an enema can is used to introduce an enema.
Used to relieve constipation.
It is used to treat fecal impaction.
It is also used to clean the bowels before certain medical procedures.
Used to introduce certain medications such as laxatives.
It is also used to treat certain medical conditions such as inflammatory bowel disease.
Also used for certain diagnostic purposes, such as barium enema, using imaging studies to visualize the rectum and colon, such as X-rays.
Sterilization or Disinfection of the Enema Cane
1) Clean with soap and water.
First clean the can properly with lukewarm water and soapy water.
Gently scrub the enema can using a mild detergent and a clean cloth and sponge.
2) Rinse properly
After cleaning the can properly with detergent and washing it properly in running water.
3) Soak properly in disinfectant solution.
After cleaning the can in running water, soak it properly in disinfectant solution for 10 minutes and then scrub it properly with a clean cloth and sponge cloth.
4) Rinse in running water
After dipping in the disinfectant solution, wash the enema can properly in running water.
5) Dry air
After washing and cleaning the enema can in running water, air dry the can properly to prevent any bacteria, fungi and mold from growing in the enema can.
6) Storage
Keep the disinfected enema can in a clean and dry area. Keep away from direct sunlight and moisture area. Also, the enema can should not be stored in the area which is contaminated.
Rectal tube
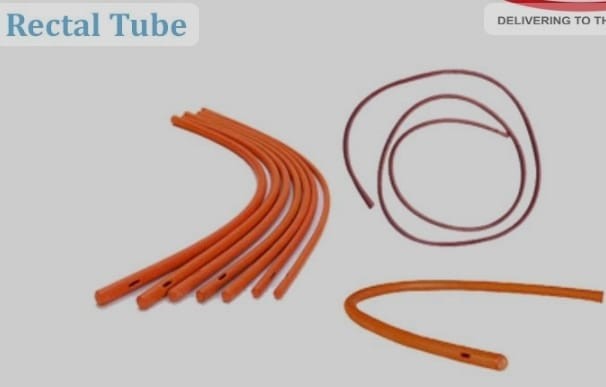
A rectal tube is a medical device used to administer medication, provide an enema, or facilitate drainage into the rectum and lower colon. An anal tube is a flexible and rigid tubing that is inserted through the anus into the rectum.
Rectal tubes are made of soft rubber and plastic. Rectal tubes are straight and quad-shaped. One end is designed for insertion into the rectum and the other end is connected to a collection bag or drainage system. .
The tube may also have multiple sideholes along its length to facilitate flatulence or fluid. Some rectal tubes also have an inflatable balloon at the insertion end to help secure the tube inside the rectum.
Rectal tubes are available in different sizes. Rectal tube a
22 fr upto 42 fr are available.
🙂 Uses
1) Fecal diversion
If there is a condition of severe constipation and faecal impaction has occurred, then a rectal tube is used to remove the faecal matter.
2) Administration of medication
A rectal tube is used to administer medications such as laxatives and enemas.
3) Rectal washout
A rectal tube is commonly used for rectal washout and irritation.
4) Gas relief
Access is used to relieve gas and discomfort if severe gas and flatulence are accumulated.
🙂 Strip of rectal tube
Parts of the rectal tube
1)Inserson End,
2) Side hall,
3) Inflatable balloon (optional),
4) Main tube,
5) Connector.

1)Insurance and,
An insertion end is the end of a tube that is designed to be inserted into the rectum. It has a round and tapered tip to reduce discomfort.
2) Side hall,
Tubes have side holes which have holes on one side or more than one side.
This hole provides a passage for gas and fluid to pass through.
3) Inflatable balloon (optional),
Some rectal tubes have an inflatable balloon at the insertion end. After inserting the tube into the rectum, its balloon is inflated, due to which the tube can be properly secured in the rectum. Due to this, the tube can be prevented from slipping out.
4) Main tube
The main rectal tube is usually a flexible tube made of rubber and plastic. The main tube serves to connect the insertion end to the other end of the tube.
5) Connector:=
At the second site of the insertion end there is a connector where the collection bag and drainage system are attached.
🙂 After use
Cleaning the rectal tube after use is important to prevent the spread of infection and maintain hygiene.
Disconnection:
Carefully disconnect the rectal tube from any collection bag, drainage system, or other equipment attached to it. Proper disposal of any waste materials.
Pre rinse:
Properly rinse the rectal tube with plain water to remove remaining fecal matter or residue.
Soak:
Prepare a solution of warm water, mild soap or detergent. Soak the rectal tube in this solution and let it soak for a few minutes. This helps dissolve any stubborn debris.
Cleaning:
Use a soft brush or cloth to gently scrub the external and inferior surface of the rectal tube.
Rinse:
Wash the rectal tube thoroughly with clean, lukewarm water to remove any soap residue and debris. Ensure that all soap traces are completely washed away.
Disinfection (Optional)
Soak the rectal tube in diluted bleach if necessary.
Drying:
The rectal tube is allowed to air dry completely before storing. Ensure that it is completely dry both inside and out to prevent mold and bacteria growth.
Storage Once dry, store the rectaltube in a clean, dry place away from contamination and direct sunlight. Use a proper container or storage bag to keep it safe till its further use.
Spirit lamp (Spirit lamp)
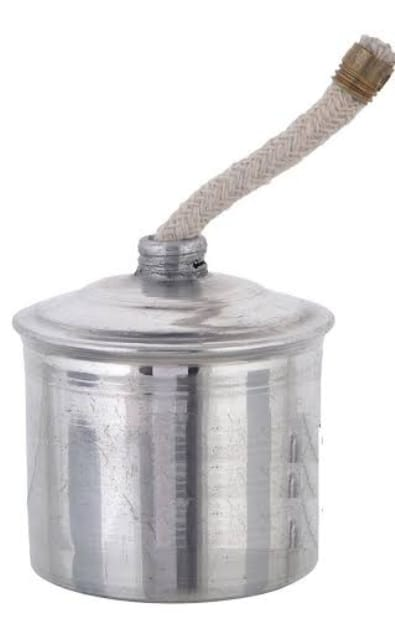
A spirit lamp, also known as an “alcohol lamp” or “spirit burner”, is a small portable heating device commonly used in medical settings, laboratories.
A spirit lamp is usually a metal or glass container filled with a flammable liquid such as ethanol or methanol. The container has a wick or burner mechanism that helps ignite the liquid and produce the flame.
🙂 Parts of spirit lamp (Parts of spirit lamp)
1) Fuel reservoir,
2) Wick (Wick),
3)Burner mechanism,
4) Flame,
5) base,
6) Cap or lid
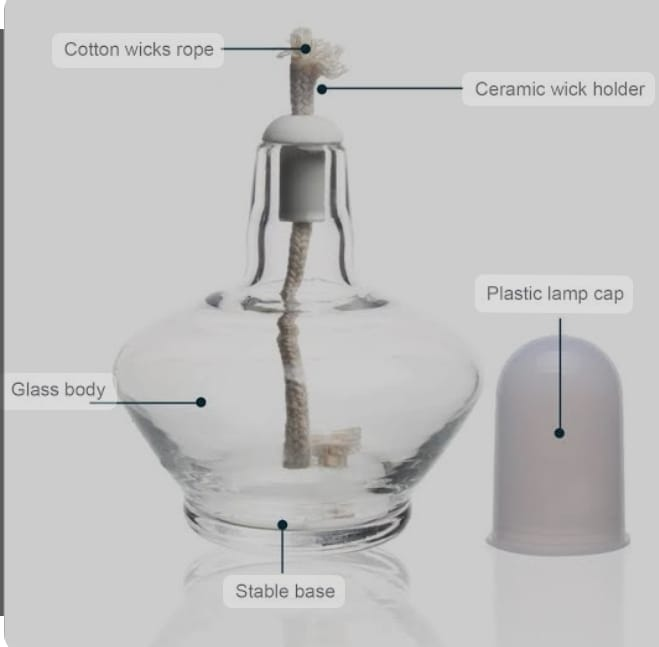
1) Fuel reservoir,
A fluid reservoir is a container which
Contains an inflatable fluid, such as ethanol or methanol, that is used as fuel for lamps. It is made of metal or glass and is usually cylindrical or round in shape.
2) Wick (Wick),
A wick (wick) is a porous material, such as cotton or fiberglass, that extends from the fluid reservoir to the flame. It absorbs the fuel and allows it to travel upwards to the flame, where it is ignited to produce a hit.
3)Burner mechanism,
The burner mechanism is the component of the lamp that controls the size and intensity of the flame. It consists of a simple metal collar or knob that can be adjusted to control the flow of fuel into the wick, thereby controlling the size of the flame.
4) Flame,
A flame is a visible, luminous gas produced by the combustion of fuel. It is a source of heat produced by a spirit lamp and is used for functions such as sterilization, heating or cauterization.
5) base,
Some spirit lamps have a base or stand to stabilize the lamp and provide support. The base is made of metal, glass or other material and is designed so that the lamp does not fall during use.
6) Cap or lid
Some spirit lamps, especially those used for storage or transportation, also have a cap or lid to cover the reservoir of fuel when the lamp is not in use and to prevent spills or evaporation of the fuel.
🙂 Uses
Sterilization of instruments
Spirit lamps are commonly used to sterilize small medication equipment such as forceps, scissors and needles. By passing instruments through the flame of the lamp, healthcare workers effectively kill bacteria and other microorganisms, and the risk of infection during medical procedures can be reduced.
Wound care
In some cases, a spirit lamp is also used to provide gentle hits for wound care procedures. A controlled flame helps to vaporize dressings or other materials that are used before applying the dressing to the wound.
which promotes comfort and aids in the healing process.
Laboratory Applications
Spirit lamps are widely used in the laboratory setting for a variety of applications, including heating solutions, drying glassware, and simple chemical reactions requiring gentle stirring.
Spirit lamps are also used in certain types of nursing procedures.
Disinfect the spirit lamp
Empty and clean
Properly empty any remaining fuel from the spirit lamp. Then, thoroughly wash the outside and inside of the lamp with warm, soapy water to remove any dust, debris, or residual fluid.
Rinz
Wash the lamp with clean water to remove any soap residue.
Disinfect
Once the lamp is clean, disinfect it by cleaning the outer and inner surfaces with a disinfecting solution.
Allow to dry
After disinfecting, allow the spirit lamp to dry completely before refilling with fuel. Properly dry all surfaces to prevent the growth of bacteria or mold.
Regular Maintenance To maintain cleanliness and prevent contamination, it is important to regularly clean and disinfect the spirit lamp after each use.
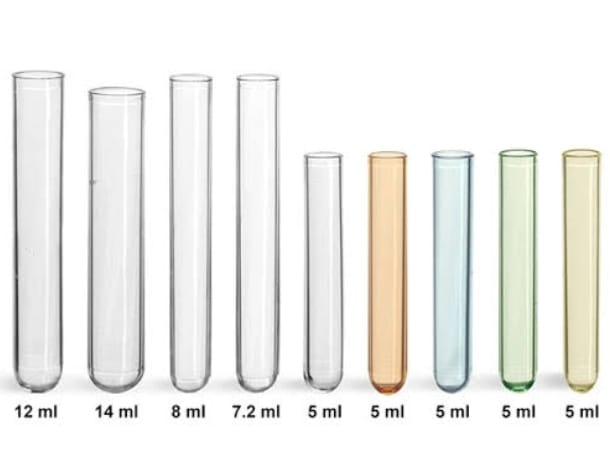
Test tube
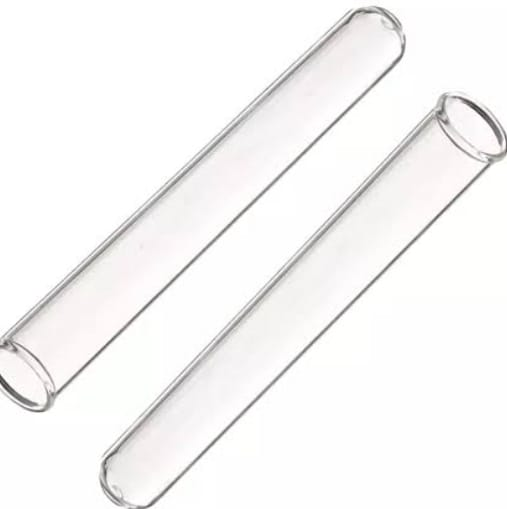
Test tubes are made of glass or hard plastic. They are also called “culture tubes” and “sample tubes”. They are long, cylindrical in shape, and open at one end and closed at one end. They are used in medical settings and laboratories. These are used for different purposes like specimen collection, storage and analysis.
Glass test tubes are reusable and can withstand high temperatures, so they can also be heated or autoclaved.
Size and shape
Test tubes come in different sizes and capacities, from small tubes with a capacity of a few milliliters, ie 5 milliliters, to large test tubes that can hold 12 milliliters or more. A test tube is usually cylindrical in shape with a flat or rounded bottom.
Uses
Test tubes are used for a wide range of purposes in laboratory and medical settings, including:-
Specimen collection
Test tubes are used to collect blood, urine, saliva, sputum and other body fluids for various diagnostic tests.
storage
Test tubes are used to store samples for long-term storage prior to analysis.
Analysis
Test tube samples are used for chemical, biochemical, hematological, microbiological and immunological analyses.
Centrifugation
A test tube is used in a centrifuge to separate components of a specimen based on their density. The specimen is placed in a test tube and rotated at high speed to separate solids and liquids.
Culture:
A test tube is intended for the growth of bacteria, fungi, viruses or other microorganisms for microbiological culture, diagnostic or research purposes.
Types
There are several types of test tubes designed for specific applications, including:-
Vacuum Tubes:
Used for blood collection and comes in different colors, with specific additives for different types of tests.
Culture Tubes: Used for microbiological culture and often have screw caps or plugs to prevent contamination.
Centrifuge Tubes: Designed to separate components in high speed centrifugation processes and may facilitate separation of components.
Urine collection tube:
Urine collection tubes are for collecting urine specimens and may have special features, such as leak-proof caps or integrated funnels.
Disinfect the test-tube
Cleansing
Wash the test tube properly with water to remove any visible debris and residue. Then, wash the tube thoroughly with warm, soapy water to clean the inside and outside surfaces. Use a brush or sponge to scrub the inside of the tube if necessary.
Rinsing
After cleansing, wash the test tube with a clean cotton swab to remove any soap residue.
Disinfection solution
Prepare disinfectant solution by diluting suitable disinfectant solution. Common disinfectants used in the laboratory setting involve bleach (sodium hypochlorite solution), alcohol (ethanol or isopropyl alcohol), or commercial disinfectant solutions.
Immersion
Immerse the cleaned test tube in the disinfecting solution, ensuring that all surfaces are completely soaked.
drying
Allow the test tube to dry completely before using it for specimen collection, or analysis. Ensure that test tubes are stored in a clean, dry environment to prevent contamination.
storage
Storage of the cleaned test tube in a proper surface so that the test tube is not contaminated until it is required for further use.
Test tube holder
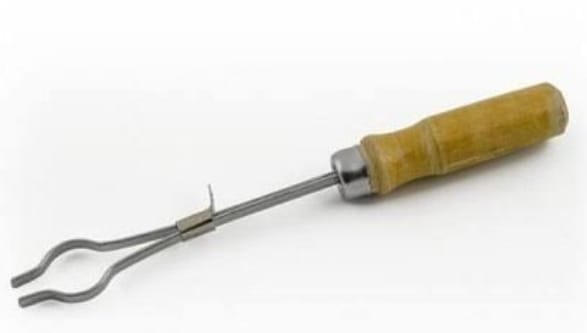
A test tube holder is a piece of laboratory equipment used to hold and manipulate test tubes in various procedures.
A test tube holder usually consists of a pair of spring-loaded clamps or jaws that can be opened and closed to hold the test tube firmly. The bars can be lined with rubber or other non-slip materials for a secure grip and to prevent damage to the test tube.
Test tube holders are usually made of metal, such as stainless steel or aluminum, which provides durability and is resistant to corrosion. The handle of the test tube holder is covered with plastic or rubber to improve grip comfort
Type
1) Single test tube holder
A single test tube holder can hold only one test tube at a time.
2)Multitest tube holder
Multiple test tubes can be held simultaneously in a multi test tube holder.
3) Adjustable test tube holder
The adjustable test tube holder can be adjusted in diameter to accommodate test tubes of different diameters.
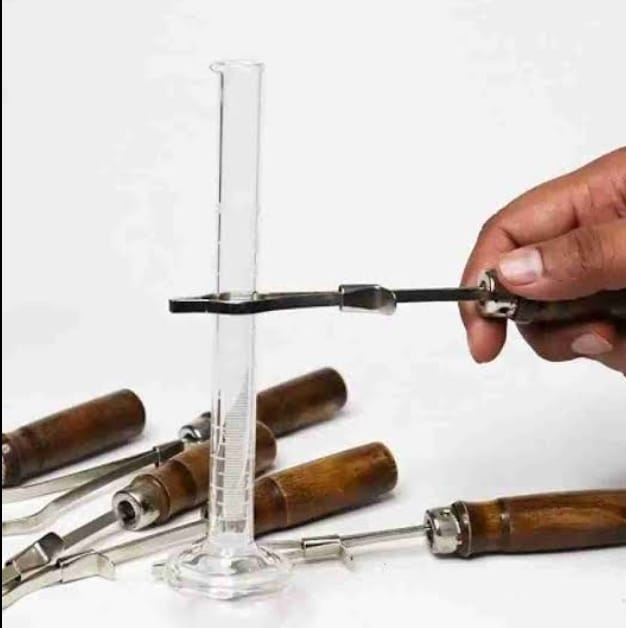
🙂 Uses
Test tube holder is used in different types of medical procedures.
Mixing and agitation
A test tube holder is used to hold the test tube for users to mix the contents well.
Heating
Test Tube Holder No Use A test tube can be heated on a flame or heating element for sterilization purposes.
Centrifugation
Test Tube Holder No Use During Centrifugation Procedure Test tubes in centrifuge rotors are used to separate the components of the specimen during the centrifugation procedure.
The test tube holder is designed to provide a secure grip to the test tube, reducing the risk of accidents and spills during laboratory procedures. However, it is important to handle test tubes and test tube holders with care to prevent breakage or injury.
Cleaning and maintenance
Test tube holders should be regularly cleaned and inspected to ensure they remain free of debris or damage. They are cleaned with soap and water or a mild disinfectant solution and the test tube holder should be thoroughly air-dried before storage.
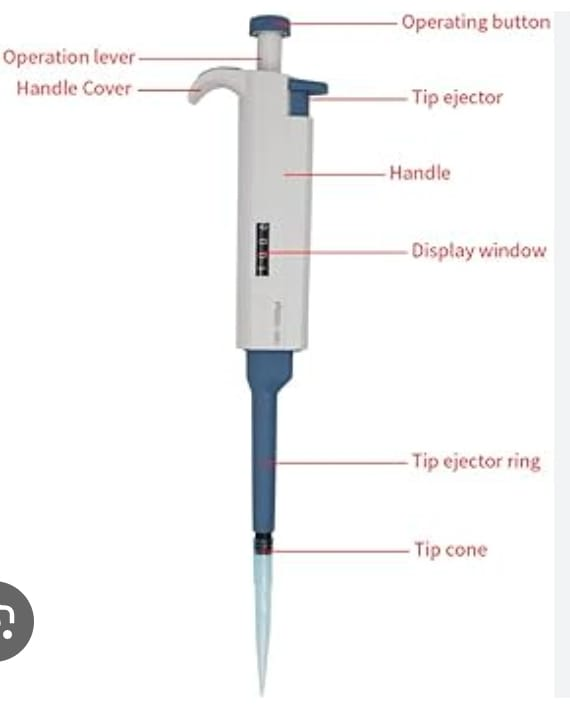
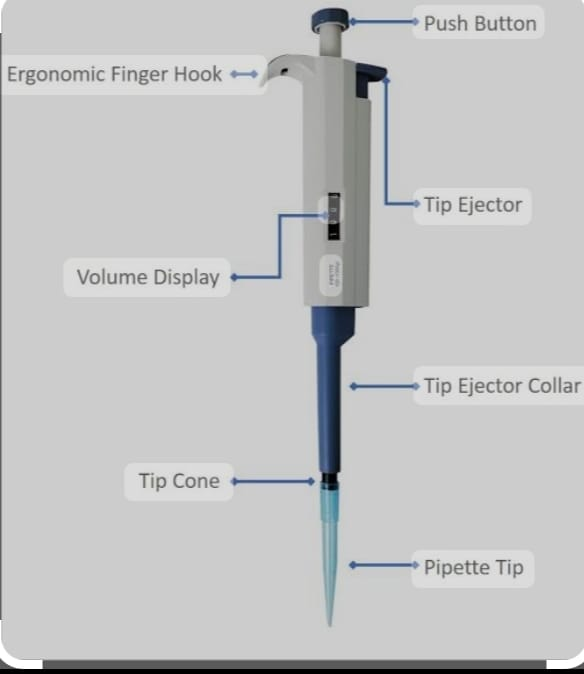
pipette
Pipette is called point and pipettor. It is a laboratory instrument. Pipette is made of glass and plastic which is used to transfer a specific amount of liquid from one container to another container.
🙂 Type of pipettes
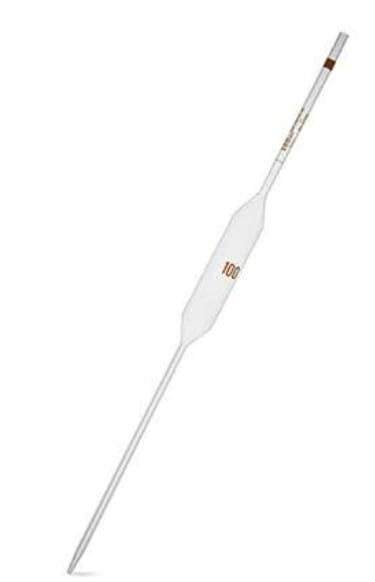
Volumetric pipettes.
These pipettes are used to accurately measure the specific volume of a fluid. They are often used to prepare solutions with concentrations.
Graduated pipettes
Graduated pipettes, also known as measuring pipettes, are graduations along the length of the tube used to measure and transfer variable volumes of fluid.
Micropipettes
These pipettes are used to measure very small volumes of fluid, especially in the microliter range. They are commonly used in molecular biology, biochemistry, and clinical laboratories.
Pasteur pipettes
These are thin, elongated pipettes that use a small amount of fluid
To transfer the volume. They do not have volume markings and are disposable.
Working Principle
A partial vacuum has to be created to draw the fluid into the tip and or barrel of the pipettes. The fluid is then released by vacuum release or using a plunger mechanism.
Pipettes are made of glass, plastic, silicone, metal.
Size of pipettes
Pipette size is different for different pipettes like,
1) Micropipettes:
Micropipettes are used to measure very small volumes of fluid, usually
in the microliter range
(1 μL to 1000 μL or more). are available in, including:
Micro volume pipettes
(1 μL to 10 μL), low-volume pipettes
(10 μL to 100 μL), medium-volume pipettes (100 μL to 1000 μL) large volume pipettes
(> 1000 μL) ).
2) Volumetric pipettes:
Volumetric pipettes are used to measure specific volumes of specific liquids.
They are generally available in sizes from 1 mL to 100 mL or more.
3) Graduated pipettes
Graduated pipettes, also known as measuring pipettes, are available in a variety of sizes, including:
Small graduated pipettes (1 mL to 10 mL),
Medium graduated pipettes (10 mL to 50 mL),
Large graduated pipettes (50 mL to 100 mL or more).
4) Pasteur pipettes
Pasteur pipettes range in capacity from a few drops to several milliliters.
5)Serological pipettes:
Serological pipettes are used for precise measurement and transfer of fluid volumes in clinical and laboratory settings. It is available in sizes from 1 mL to 50 mL or more.
6)Disposable pipettes
Disposable pipettes are available in different sizes, such as 1 mL, 3 mL, 5 mL, 10 mL and 25 mL, for single use.
🙂 Parts of pipettes (Parts of pipettes)
1) barrel,
2) Tip,
3) Plunger,
4) Volume indicator,
5) Ejector button
barrel
A pipette has a main blade, which holds the fluid.
Tip
A pipette is the narrow, tapered end from which fluid is drawn or released.
Plunger
A mechanism used to control the aspirate and release of liquid. It is a button, dial or thumbwheel.
Volume indicator
Graduations or markings on the barrel or tip of a pipette that indicate the amount of fluid being measured or released.
Ejector button
Found on some pipettes, it is used for easy removal of disposable tips after use.
🙂 Uses
Pipettes are used in a variety of laboratory procedures, including
Includes sample preparation, chemical reactions, titration and cell culture.
It is used in clinical settings for tasks such as blood and urine analysis, diagnostic testing, and drug preparation.
🙂 After use
1.Emedian Clinical
After each use, the pipette should be cleaned immediately to prevent the residue from drying out and affecting the measurement. The fluid or solution should not be kept in the pipette for a long time.
2.Disassembly (if applicable)
If the pipette is designed for disassembly, carefully remove the tip ejector mechanism and other removable parts of the pipette. Due to this, all the potatoes can be cleaned properly.
- Rinse with distilled water
Rinse the pipette thoroughly with distilled water to remove any residual fluid or contaminants. Wash the inside of the pipette barrel and tip properly. - Cleaning solution
Prepare a clinical solution by diluting a laboratory-grade detergent or enzymatic cleaner with distilled water.
- Soaking
Immerse parts of the pipette, including the barrel, tip, and any disassembled parts, in Klinig solution. Leave the pipette in the solution to loosen and dissolve any stubborn residues or contaminants. Clinical Bruses
Use a soft-bristled cleaning brush or pipette brush to gently scrub the inside of the pipette, barrel, and tip. Proper observation of any hard-to-reach areas or cracks or any residual
Accumulation is done or not.
- Rinz Thurley
After clinical, wash the pipette parts with distilled water to remove any traces of residue left by the clinical solution.
- Drying:
Allow the pipette tips to air dry completely in a clean and dust free environment.
Do not use heat, as this may damage the delicate component or cause the component to become contaminated.
- Reassembly (if applicable)
Once dry, reassemble the pipette parts, ensuring that all parts are properly assembled.
- Storage
In a clean and dry environment, protected from dust, moisture and other contamination.
Use pipette racks or holders to keep them organized and upright to prevent damage.
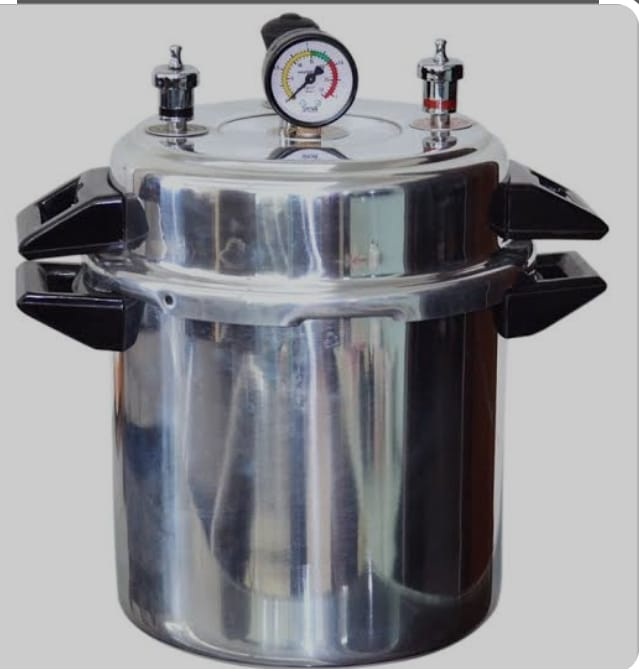
Autoclave drum (Autoclave drum)
Sterilization
Sterilization is the process by which any articles and surfaces are freed from microorganisms and their spores. Sterilization uses autoclave and many other methods.
In medical settings, autoclave drums are used for sterilizing medical equipment, instruments, and supplies. It uses high pressure, high temperature and steam to kill bacteria, viruses, fungi and their spores.
An autoclave ensures that medical equipment is safe for patient use. Autoclaves play an important role in preventing infections and maintaining cleanliness in medical settings.
Autoclave was invented by Charles Chamberland in 1879. An autoclave is an instrument made of metal. Any medical instrument is disinfected by creating high temperature and high pressure.
🙂 Principles
Autoclave works on the principles of high temperature and high pressure.
Autoclave is a moist heat sterilization process.
In an autoclave, when water is heated in a closed container, saturated steam is produced due to pressure.
If the temperature is continuously increased in the autoclave, the pressure inside the autoclave is also continuously increased.
If the temperature inside the autoclave is reduced, its pressure is also reduced.
Thus autoclave works on the principle of high temperature and high pressure.
in an autoclave
121°- 123° c temperature, 15 lbs pressure is kept for upto 30 minutes.
Due to continuous pressure in the autoclave, the microorganism and its spores are destroyed.
🙂 Parts of Autoclave
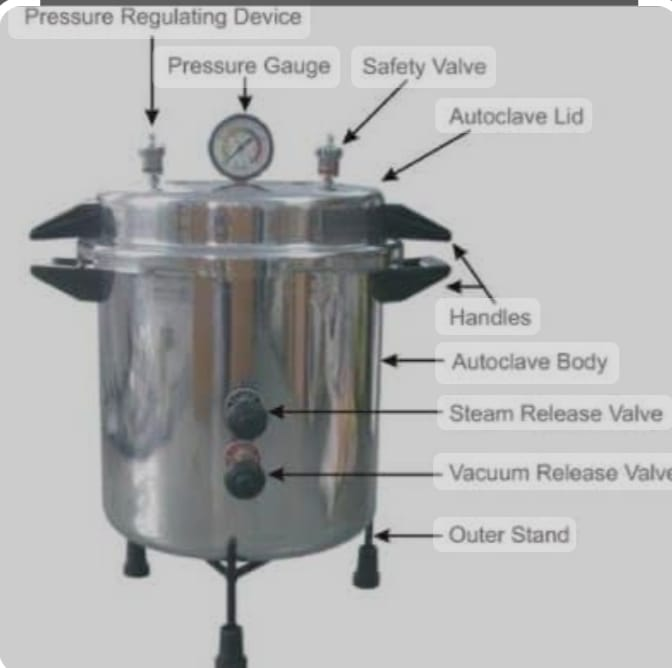
In autoclaves used in medical settings, several key parts work together to achieve sterilization.
- Chamber
The chamber is the main compartment where the items to be sterilized are placed. It is usually made of stainless steel and is designed to withstand high pressure and high temperature. The size of the chamber varies depending on the capacity of the autoclave and its use. - Door
A door seals the chamber during the sterilization process to maintain pressure and prevent steam from escaping. It also has a locking mechanism to keep it securely closed during operation.
3.Heating elements
Heating elements, usually located at the bottom of the chamber, heat the water inside to produce steam. These elements are responsible for increasing the temperature to the desired level for sterilization.
- Water reservoir
An autoclave has a water reservoir where distilled water is stored to generate steam. Continuous monitoring and maintenance of water level is done to maintain continuous production of steam during throwout sterilization process. - Pressure gauge
A pressure gauge measures the pressure inside the chamber during the sterilization process. Real-time feedback on that pressure level
provides, which allows operators to monitor and adjust as needed.
6.Temperature control system
A temperature control system helps the temperature inside the chamber to achieve and maintain the desired sterilization temperature. It ensures that the items are in contact with the appropriate hits for effective sterilization.
- Safety Features
Autoclaves have various safety features to prevent over pressurization such as,
Pressure release valves and automatic shutoff mechanisms that prevent the pressure inside the autoclave from increasing beyond normal. - Control panel
The control panel contains an interface through which operators can input sterilization parameters, monitor cycle progress, access safety features,
In which button, display, and indicator are involved. 9) Stand
The autoclave machine can be stable on a stand.
10) Inner jacket
which are present inside the autoclave and are in contact with water.
11) Outer jacket
The outer jacket present on the outer side of the autoclave is made of a metal that does not corrode.
12) Tray in internal part
If an instrument is to be studied, it is kept in a tray. This tray works to maintain the water level.
Purpose of Autoclave
The primary purpose of an autoclave is to sterilize instruments, equipment and supplies in medical settings.
Sterilization is a crucial part of medical settings used to maintain patient safety and prevent infection.
In the autoclave, high temperature and high pressure are used to kill the microorganisms and their spores and sterilize the instrument.
Overall, the purpose of autoclave is to maintain the cleanliness of instruments and perform sterilization.
🙂 Uses
In medical settings, autoclaves are mainly used for sterilizing medical equipment, instruments.
1.Surgical instrument sterilization
Autoclaves are used to disinfect surgical procedure equipment such as scalpels, forceps, scissors and clamps. It is used to free the instrument from microorganisms to prevent infection during surgical procedures.
2.Dental instrument sterilization
Autoclaves are used in dental offices and clinics to disinfect dental instruments including drills, probes, mirrors and trays.
- Medical instrument sterilization
Autoclaves are used to disinfect a variety of medical instruments, including endoscopes, catheters, syringes, and respiratory therapy equipment.
4.Laboratory glassware sterilization
Autoclaves are used in medical laboratories to disinfect glassware, culture media, petri dishes, pipettes and other laboratory equipment.
5.Wound dressing sterilization
Autoclaves are used to disinfect wound dressings, gauze, bandages, and other wound care supplies.
6.Hospital waste sterilization
Autoclaves are used to disinfect sharps, biohazardous materials, and contaminated linens prior to disposal of infectious medical waste. This reduces the risk of spreading infection to the healthcare person and the community.
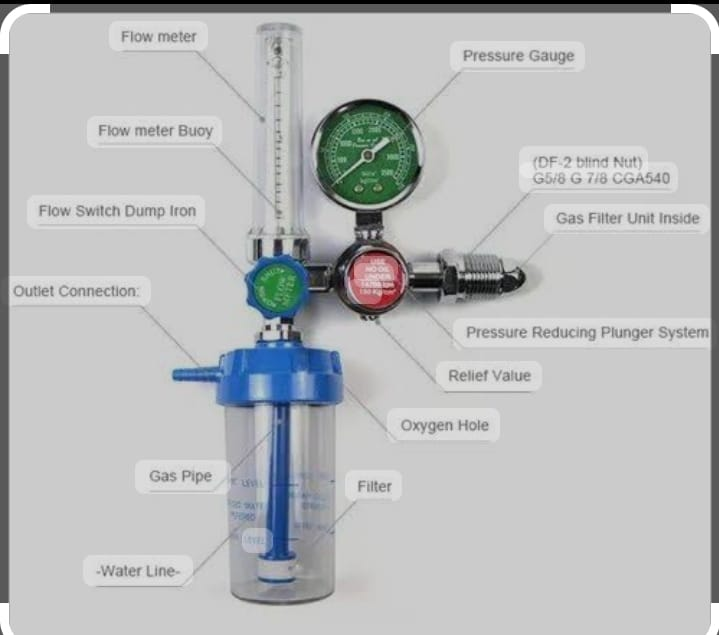
Oxygen cylinder with flow meter
(Oxygen cylinder with flow meter and humidifier)

Oxygen cylinders are a crucial component in medical settings. Oxygen cylinders are used to provide supplementary oxygen to patients who cannot breathe properly, have breathing difficulties, and require higher levels of oxygen.
An oxygen cylinder can store oxygen under high pressure
An oxygen cylinder stores oxygen under high pressure. This allows medical professionals to provide oxygen therapy to patients with breathing difficulties, such as chronic obstructive pulmonary disease (COPD), pneumonia, asthma, or patients recovering from surgery. Oxygen cylinders come in a variety of sizes and shapes, ranging from small portable cylinders to large stationary cylinders. Portable cylinders are typically used during transport for ambulatory patients, while stationary cylinders are typically used in hospitals, clinics, or long-term care.
Cylinders are usually made of aluminum or steel to withstand high pressure. They are filled with compressed oxygen gas, which is purified to medical-grade standards to ensure its safety for patient use.
The flow of oxygen from the cylinder is controlled using a flowmeter or regulator. This equipment controls the flow of oxygen to the patient, which is used by the healthcare person to adjust the flow according to the patient’s requirement.
Oxygen cylinders must be properly cared for due to the high pressure of the gas they contain. It should be stored in well-ventilated areas away from heat sources and flammable materials. In addition, proper training for oxygen therapy and its safe handling is necessary for healthcare personnel.
Oxygen levels in cylinders should be regularly observed to ensure that sufficient oxygen is available for patient care. Empty cylinders should be changed immediately to avoid interruption in oxygen supply.
🙂 Uses
Oxygen cylinders have several important uses in medical settings:
Oxygen Therapy: The primary use of an oxygen cylinder is to provide supplemental oxygen to patients with respiratory conditions. Involvement of individuals with breathing difficulties due to conditions such as pneumonia, asthma, chronic obstructive pulmonary disease (COPD), or respiratory failure. Oxygen therapy helps improve blood oxygenation, relieving symptoms such as shortness of breath and fatigue.
Emergency situation
Oxygen cylinders are essential during emergency situations such as cardiac arrest, trauma or respiratory distress. They provide a readily available source of oxygen to stabilize the patient until more comprehensive treatment is provided.
Surgical Procedure:
Oxygen cylinders are used in the operating room to provide oxygen to patients undergoing surgery under general anesthesia. Oxygen is essential for maintaining adequate tissue oxygenation during surgical procedures and for postoperative recovery.
Transportation
Portable oxygen cylinders are commonly used during patient transportation, in healthcare facilities, and during ambulance or air ambulance transfers. They ensure that patients can receive continuous oxygen therapy during the transfer, especially those who rely on supplemental oxygen for their daily activities.
Homecare: Oxygen cylinders are provided for use in a home healthcare setting for patients who require long-term oxygen therapy. These cylinders provide a convenient and reliable source of supplemental oxygen for individuals with chronic breathing conditions.
Overall, oxygen cylinders are essential to provide adequate oxygen to patients and to support breathing in various medical settings.
plays an important part in obtaining
🙂 Parts of oxygen cylinder (Parts of oxygen cylinder)
1) Cylinder,
2) valve,
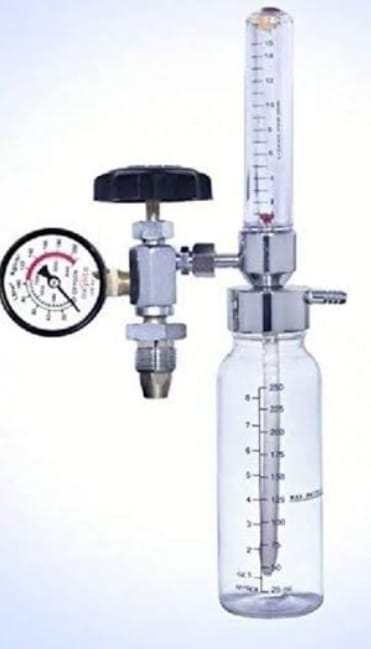
3) Regulator,
4) Flow meter,
5) Humidifier
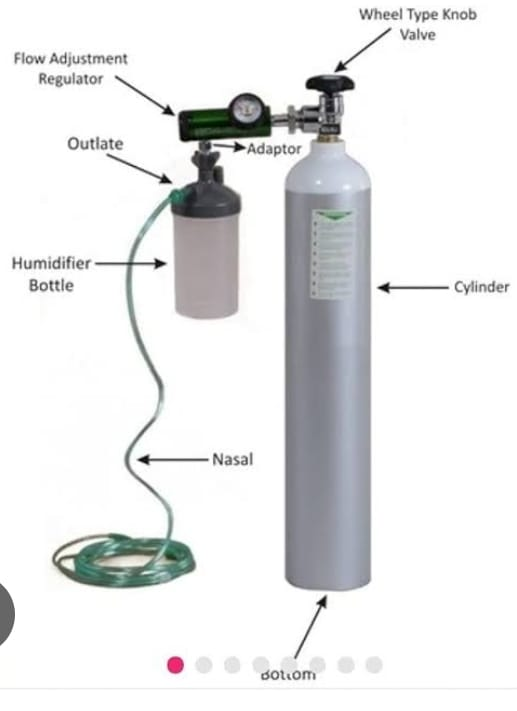
1)Cylinder: The main part of the oxygen cylinder is usually made of aluminum or steel and is designed to withstand high pressure. It contains compressed medical-grade oxygen gas.
2) Valve: The valve is located at the top of the cylinder and controls the flow of oxygen from the cylinder. It can be opened or closed to start or stop the flow of oxygen.
3) Regulator: The regulator connects to the valve and controls the rate at which oxygen flows from the cylinder. It usually has a gauge that shows the pressure of oxygen inside the cylinder and a knob or dial to adjust the flow rate. Flow is measured in liters per minute (LPM) and can be adjusted to meet the patient’s oxygen needs.
4) Flow meter: A flow meter is a device that connects to a regulator and measures the rate of flow of oxygen in liters per minute. It usually consists of a tube with a ball or float that rises or falls depending on the flow rate. The flow meter provides a visual indication of the flow of oxygen, which allows the healthcare person to adjust it as needed to provide adequate oxygen therapy.
5) Humidifier (Optional): In some cases, a humidifier is also attached to the oxygen cylinder. Humidifiers add moisture to the oxygen flow to prevent dryness and irritation of the respiratory tract, especially when used during prolonged oxygen therapy.
🙂 Types of Oxygen Cylinder (Types of Oxygen cylinder)
In medical settings, many types of oxygen cylinders are available, each designed for a specific purpose and patient need.
1.Portable Oxygen Cylinder:
These cylinders are small and light in weight, due to which their transportation is easy. They are typically used for ambulatory patients or during transfer to healthcare facilities. A portable cylinder allows the patient to maintain mobility while receiving oxygen therapy.
2.Stationary oxygen cylinder
Stationary oxygen cylinders Also known as bulk oxygen cylinders, these large cylinders are stable and typically used in hospitals, clinics, or long-term care facilities. They hold large volumes of oxygen and are connected to oxygen delivery systems to provide continuous oxygen therapy to multiple patients.
3.Liquid Oxygen Systems Liquid oxygen systems store oxygen in liquid form at very low temperatures. These systems are often used in home healthcare settings for patients requiring long-term oxygen therapy. Compared to compressed gas cylinders, liquid oxygen systems offer higher oxygen volumes and require less frequent refilling.
4.Emergency oxygen cylinder
These cylinders are specifically designed for use during emergencies, such as cardiac arrest, trauma, or breathing difficulties. It usually has a quick-release valve or regulator to facilitate oxygen therapy in critical situations.
have
- Aviation oxygen cylinder
These cylinders are designed for use in aircraft to provide adequate oxygen to passengers and crew at high altitudes where oxygen levels are low. Aviation oxygen systems are used to maintain safe oxygen levels during air travel, especially for individuals with breathing conditions.
🙂 Cylinder according to color code.
In medical settings, oxygen cylinders are often distinguished by color-coding, which helps healthcare persons quickly identify the cylinders.
1.Green:
Green cylinders usually contain oxygen. They are used for medical oxygen therapy and are the most common type of oxygen cylinder in healthcare settings. Green color is known as universal color for oxygen.
2.Blue: Blue cylinders usually contain nitrous oxide, commonly known as “laughing gas”. Nitrous oxide is used for analgesia and anesthesia during medical procedures and is often mixed with oxygen for safe administration.
- Gray or Silver:
Gray or silver cylinders often contain carbon dioxide (CO2) or other special gases used in medical applications, such as carbon dioxide for insufflation during endoscopic procedures and for cryotherapy. - White
White cylinders are commonly used for nonmedical gases, such as nitrogen or compressed air, which can be used for a variety of purposes including medical equipment such as powering medical equipment and pneumatic tools.
Humidifier
A humidifier in an oxygen cylinder is a device that adds moisture to the flow of oxygen to prevent dryness in the airways. It helps keep the respiratory tract moist and can be especially useful for people using oxygen therapy for long periods of time.
Typically, a humidifier is a container filled with sterile water through which oxygen is passed, drawing out moisture before being inhaled. This helps prevent burning sensation and discomfort in the nose, throat and lungs.
🙂 Purpose
The purpose of a humidifier for an oxygen cylinder is to add moisture to the oxygen given to the patient, especially during oxygen therapy.
When oxygen is delivered through a nasal cannula or mask, it can sometimes produce dryness and a burning sensation in the respiratory tract. Humidifiers help relieve this discomfort by moistening the oxygen.
and ensuring that the airway remains moist and reduces the risk of burning, dryness and mucus membrane damage.
Humidifiers are especially important for individuals who require long-term oxygen therapy, as they help improve comfort during treatment.
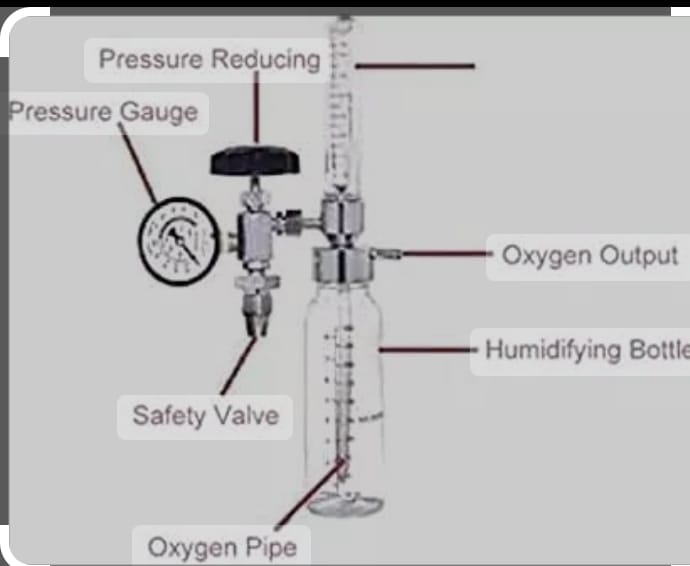
🙂 Parts of Humidifier (Parts of Humidifier)
Parts of a humidifier in an oxygen cylinder typically include the following:
1) Reservoir or water chamber
This is the main container where the sterile water is stored. Oxygen is passed through this chamber, and the oxygen is moistened during flow.
- Inlet and outlet ports:
These are the openings where oxygen enters and exits the humidifier.
The inlet port connects to an oxygen source, such as an oxygen cylinder or concentrator,
While the outlet port provides moisturised oxygen to the patient. - Wick or Wick Pad:
Some humidifiers use a wick or wick pad to help evenly distribute moisture in the flow of oxygen. Oxygen passes through the wick, absorbing moisture before delivering to the patient. - Baffle or Diffuser:
This component helps in the uniform distribution of oxygen in the chamber of water.
5.Adjustment dial or control: Many humidifiers have an adjustment dial or control that allows users to regulate the amount of moisture added to the oxygen flow based on patient needs and environmental conditions.
- Safety features
Many modern humidifiers have safety features such as pressure release valves and alarms.
🙂 Use
The use of a humidifier in an oxygen cylinder involves the following:
1.Moisturizing the Airway:
Oxygen therapy sometimes produces dryness and a burning sensation in the respiratory tract. Humidifiers add moisture to the oxygen, ensuring that the airways remain moist and reducing the risk of discomfort and mucus membrane damage.
- Elevating dryness
By moistening the oxygen, humidifiers help relieve dryness in the nose, throat, and lungs, making breathing more comfortable for individuals undergoing oxygen therapy.
3.Improving Comfort:
Humidified oxygen is more comfortable to breathe, especially for patients on long-term oxygen therapy who require continuous oxygen support for long periods of time.
4.Reducing irritation:
Dry air can produce a burning sensation in the airways, leading to coughing, sore throats and other discomforts. Humidifiers help reduce the burning sensation by maintaining moisture levels in the flow of oxygen.
5.Enhancing Therapy Adherence: Comfortable oxygen therapy for the patient is crucial. By ensuring that oxygen is sufficiently moist, a humidifier increases patient comfort.
Thus, a humidifier helps in preventing dryness by properly moisturizing the oxygen.
🙂 After use
1.Disconnect from oxygen source
Before cleaning, ensure that the humidifier is disconnected from the oxygen cylinder and concentrator to avoid accidental flow of oxygen.
- Emptying the water chamber:
Carefully empty any remaining water from the humidifier’s water chamber. - Disassembling the parts:
To isolate the reservoir, water chamber, inlet and outlet ports, wick or wick pad (if applicable) and any other removable parts. - Clean with mild soap and water:
Wash all removable parts thoroughly using a solution of mild soap and warm water. Use a brush or sponge to remove any residue or deposits. Pay attention to any cracks or areas where bacteria or mold can accumulate. - Rinz Thurley:
After cleaning, rinse all pots with clean water to remove any soap residue. - Disinfect:
To disinfect a humidifier, a mixture of one part white vinegar and three parts water can be used.
Fill the water chamber with the vinegar solution and let it soak for at least 30 minutes.
After that, wash thoroughly with clean water. - Dry completely:
Allow all parts to air dry properly before reassembling the humidifier.
Ensuring that there is no moisture, as moisture can promote the growth of bacteria. - Reassemble and reconnect
Once dry, reassemble the humidifier. Ensure that all pots are properly connected. And regular maintenance and checking of humidifier.
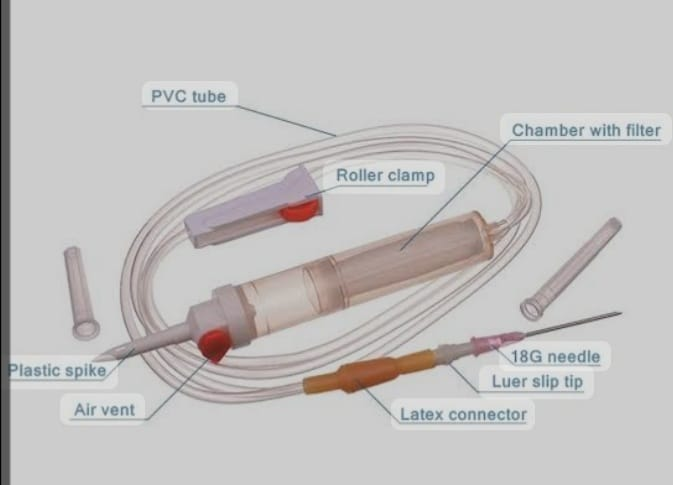
Intra Venus set (IV set) Intra Venus set
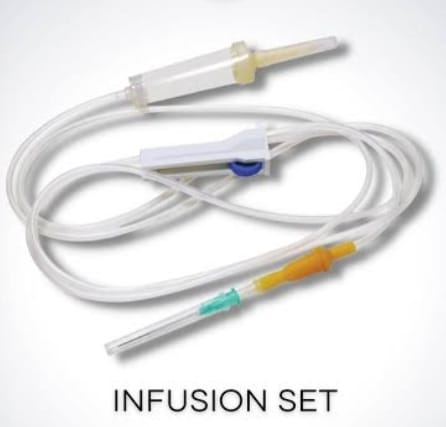
Iv set is called intra venous set. It is a medical device used to administer fluid, medication and nutrients from a pint of parenteral fluid into the patient’s body.
🙂Parts of IV set (Parts of IV set)
1) Spike,
2) Airvent,
3) Drip chamber,
4) Solution filter,
5) pvc tubing,
6) Roller clamp,
7) injection site,
8) Connector,
9) Needle.
••>
1) Spike,
The spike is long and pointed at the front which is used to insert the intravenous set into a pint of parenteral fluid.
2) Airvent,
An air vent is used to allow excess air to escape from the pint of fluid into the chamber whenever the fluid passes into the chamber.
3) Drip chamber,
In the drip chamber, intravenous fluid enters the chamber as drops from a pint.
4) Solution filter,
Solution filter When the fluid from the pint enters the chamber, if there are any particles in the fluid, they are cleared in the solution filter.
5) pvc tubing,
A PVC tube is a plastic tube that serves to convey the fluid from the chamber to the connector.
6) Roller clamp,
The roller clamp can be rolled and used to slow and fast the intravenous fluid as needed.
7) injection site,
Intravenous fluid from the injection site reaches the connector.
8) Connector,
The connector is the part that attaches to the IV cannula installed in the patient’s body.
9) Needle.
The needle is covered by a cap which is used to prick the pint and remove air from it.
🙂 Uses
An intravenous (IV) set is a crucial medical device used in a variety of medical settings to administer fluids, medications, or nutritional fluids into a patient’s bloodstream.
Fluid Replacement:
IV sets are commonly used to provide fluids to patients who are dehydrated, hypovolemic (low blood volume), or unable to tolerate oral fluids.
Medication Administration:
An IV set is used to administer medication directly into the blood stream,
Which allows for rapid absorption. Medications usually given through an IV set involve antibiotics, pain killers, chemotherapy medications, anticoagulants, and emergency medications.
Nutritious Support:
IV sets are used to administer parenteral nutrition (PN) solutions to provide parenteral nutrition to individuals who cannot receive adequate nutrition orally.
Parenteral solutions contain essential nutrients like carbohydrates, proteins, fats, vitamins and minerals.
Fluid Resuscitation:
IV sets are used for immediate fluid resuscitation in patients with severe dehydration, hypotension, trauma, or other life-threatening conditions.
Diagnostic testing:
IV sets are used as contrast agents for various diagnostic procedures and imaging tests, such as computed tomography (CT) scans, magnetic resonance imaging (MRI), or nuclear medicine scans.
Intravenous therapy:
IV sets are used to provide intravenous therapy to patients with acute or chronic medication situations that require continuous observation and treatment. An IV set is used to provide IV antibiotics to treat infections, IV hydration to patients with fluid imbalance, or IV chemotherapy to treat cancer.
🙂Disposal
After using the IV set, its needle should be cut in a white container, then the IV set should be properly cut by scissors, then it should be properly cut and disposed of in a red bean.
Blood Transfusion Set (BT Set)
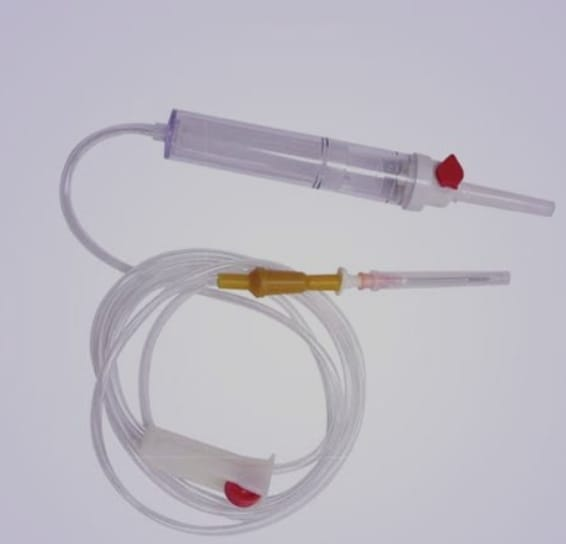
Blood transfusion set also called blood administration set is a special type of medical device which is used to administer blood and blood products in the patient’s body.
🙂 Parts of BT set (Parts of BT set)
1) Spike,
2) Airvent,
3) Drip chamber,
4) blood filter,
5) pvc tubing,
6) Roller clamp,
7) injection site,
8) Connector,
9) Needle.
••>
1) Spike,
A spike is long and pointed at the front which is used to insert into a pint of blood for blood administration.
2) Airvent,
An air vent is used to allow excess air to escape from the pint of blood into the chamber whenever it passes from the pint of blood to the chamber.
3) Drip chamber,
In the drip chamber, blood enters the chamber as drops from a pint.
4) blood filter,
Solution Filter When the blood comes from the pint into the chamber, if there are any particles in the blood, they are cleared in the blood filter.
5) pvc tubing,
A PVC tube is a plastic tube that works to transport blood from the chamber to the connector.
6) Roller clamp,
The roller clamp can be rolled and used to slow and fast the blood flow as needed.
7) injection site,
Blood from the injection site reaches the connector.
8) Connector,
The connector is the part that attaches to the IV cannula installed in the patient’s body.
9) Needle.
The needle is covered by a cap.
🙂 Uses
Blood transfusion set is used as follows.
Blood Transfusion:
The primary purpose of a blood transfusion set is to safely deliver whole blood or blood products such as packed red blood cells, platelets, or plasma from a blood bag into the patient’s bloodstream.
Emergency Situation:
In emergency situations, such as trauma, severe bleeding, accidents, blood transfusion sets are used to immediately provide blood products to stabilize the patient.
Therapeutic Purpose:
Blood transfusion sets can also be used in therapeutic procedures, such as plasmapheresis or exchange transfusion, where a specific product of the patient’s blood is removed and replaced with a donor’s blood product.
🙂Disposal
After using the blood transfusion set, cut the needle in it and put it in a puncture-proof white container, then properly cut the blood transfusion set and dispose it in a yellow bag as it is contaminated by the blood product.
Note := The filter in the blood transfusion set has a big filter in the blood transfusion set to clean the blood product as compared to the intravenous set.
Oropharyngeal airway:
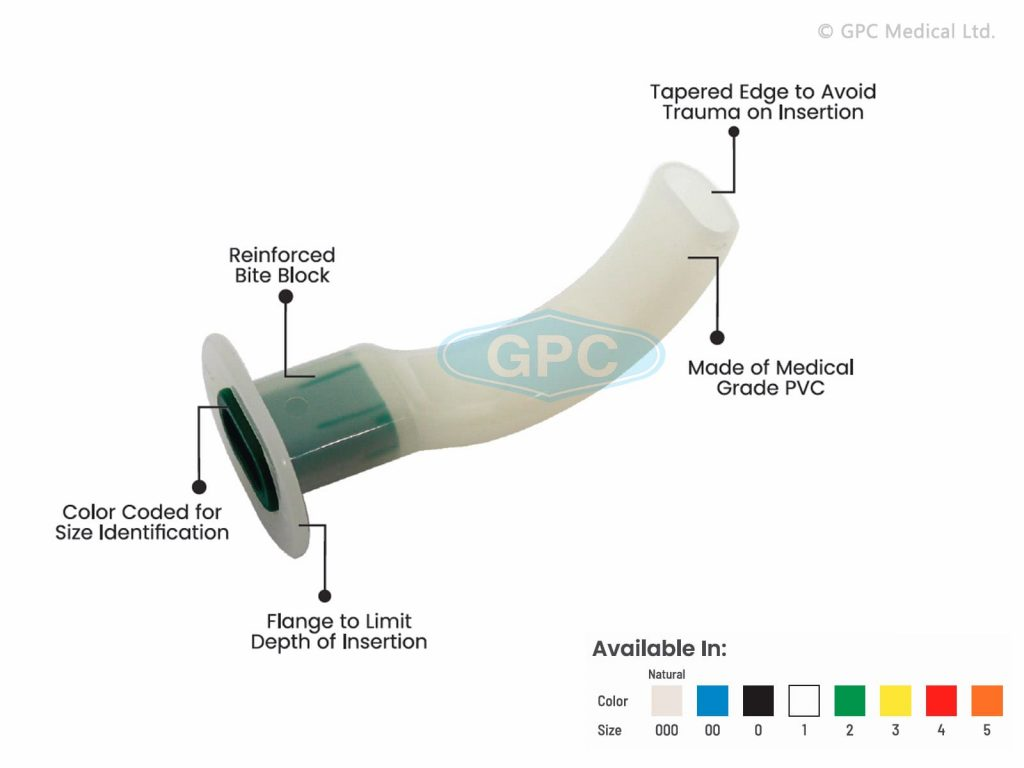

Oropharyngeal airway is made of plastic.
An oropharyngeal airway is placed in an unconscious or minimally responsive patient.
Apart from that, it prevents the tongue from dropping.
Airway is useful mainly to prevent aspiration.
Usage:
Keep the airway open
To prevent tongue bite
To perform suction
To prevent occlusion of endoteachal tube (to prevent blood clotting).
Oxygen mask:


Oxygen mask is used to deliver oxygen to the patient if the patient is not getting proper oxygen.
The oxygen mask is attached to the oxygen cylinder by connecting it through tubing.