ENGLISH-FON-GNM-UNIT -3-MEETING THE BASIC NEEDS OF A PATIENT-PART -1 (PHYSICAL NEED)-UPLOAD
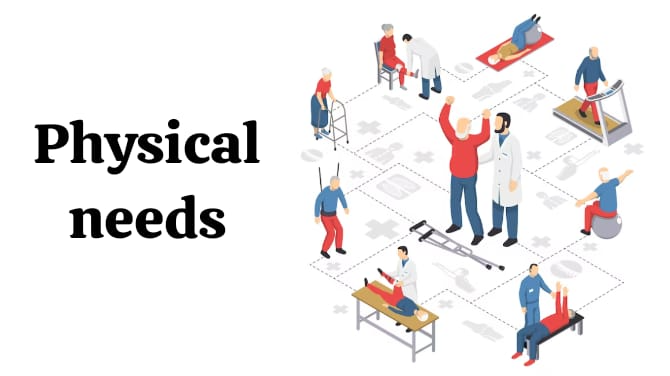
Physical Needs
- Key terms:
- Comfort: Comfort is a state of freedom from pain, trouble, and tension.
- Comfort Devices: Comfort devices are used to relieve discomfort and promote comfort, such as pillows, hot bottles, cushions, etc.
- Range of motion: The range of motion a client uses to maintain normal function of a joint.
- Abduction: In abduction, a joint is moved away from the midline.
- Adduction: In adduction, a joint is brought toward the midline.
- Flexion: In flexion, the angle between two bones is decreased.
- Extension: In extension, the angle between bones is increased.
- Opposition: Opposition is the movement of the thumb across the palm to touch the finger tips of the same hand.
- Supination: It involves turning the body parts upward.
- Bed making: Bed making is the procedure of making a neat and clean bed for a patient in a hospital.
- Restraints: Restraints are protective devices used to protect a client from harm to themselves and others, to immobilize body parts, and to restrict activities.
- Splint: A splint is a device used to maintain alignment, immobilize, and provide support to affected body parts.
- Side Rails: These are safety measures attached to both sides of the bed that are used to prevent the client from rolling out of bed or falling down.
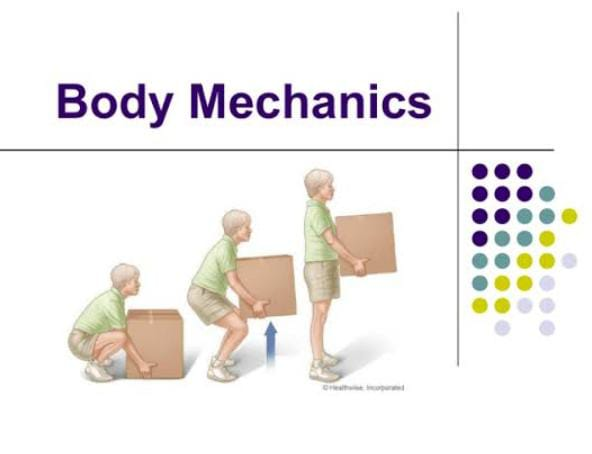
- Body Mechanics:
- ડેફીનેશન
- Body mechanics is the coordinated efforts of the musculoskeletal system and nervous system to maintain balance, posture, and body alignment during lifting, moving, positioning, and daily routine activities.
- Body mechanics is the efficient use of the body as a machine and as a means of locomotion, body mechanics is nothing but the posture and balance of the body. In this, bones, joints, muscles, nerves, and the brain work together to maintain posture and balance. Gravity plays an important role in body mechanics. The center of gravity is located at the point where the mass is centered.
- When standing, the center of gravity is located in the center of the pelvis, approximately between the umbilicus and the symphysis pubis. The line of gravity is a vertical line that passes through the center of gravity. Everything is constantly pulled towards its center by the Earth, which helps in maintaining good posture and balance.
- Importance of body mechanics:
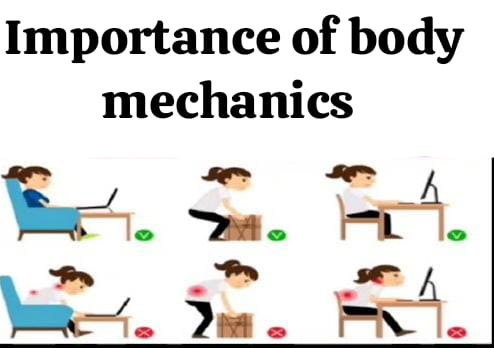
- Proper body mechanics are very important for nurses in their work and are equally beneficial for the patients.
- The following points explain the importance of body mechanics:
- Proper body alignment and posture are used to prevent fatigue and deformities.
- It also promotes the physiological functions of the body.
- It also helps in circulation and digestion.
- It reduces the use of energy.
- It helps in maintaining the balance of the body without strain and spasm.
- It helps maintain the size and shape of the thoracic, abdominal, and pelvic cavities, which can prevent conditions such as kyphosis, lordosis, and scoliosis.
- Purposes of body mechanics:
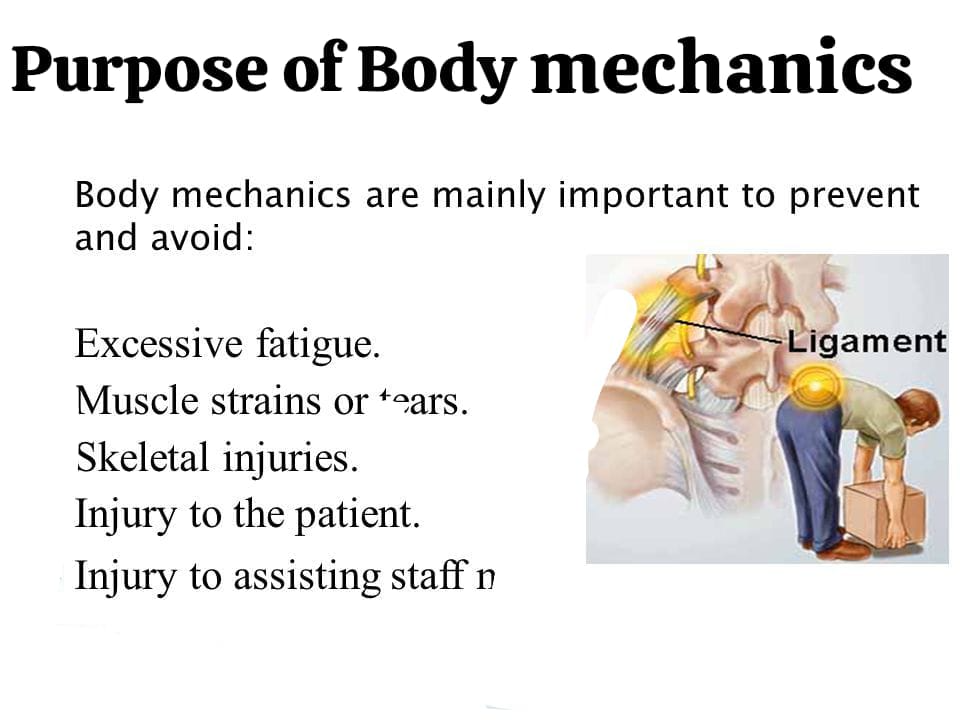
- To maintain balance properly.
- It reduces energy use.
- To reduce excessive fatigue.
- To avoid muscle strain and strains.
- To avoid skeletal injury.
- To avoid injury to the patient.
- Principles of body mechanics:
- The wider the base of support, the greater the stability.
- The lower the center of gravity, the greater the stability.
- Use the strongest and longest muscles of the arms and legs to provide the necessary energy.
- The object is in equilibrium as long as the line of gravity passes through its base of support.
- Facing in the direction of the movements prevents abnormal twisting of the spine.
- Dividing the balance activity between the arms and legs reduces the risk of back injury.
- It is easier to pull, push, or roll an object than to lift it.
- The movement should be smooth and coordinated, not jerky.
- When friction between an object to be moved and the surface it is being moved on is reduced, less force is required to move it.
- It takes less energy or force to keep an object moving than to start and stop it.
- Use as many arm and leg muscles as possible, and as little back muscle as possible.
- Keeping the object as close to the body as possible puts less strain on the back, legs, and arms.
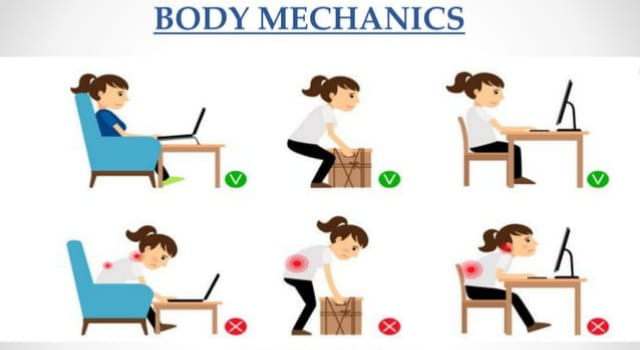
- Keep the worktop at a comfortable height to avoid excessive bending at the waist.
- Keep the legs apart for better balance and proper support.
- Keep the body in good physical condition to reduce the chance of injury.
- Rest between periods of work promotes the ability to work.
- Body mechanics:
1)Standing :
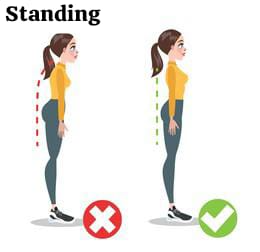
- Head should be extended with chin tucked in.
- The normal arch of the back should not be exaggerated.
- The chest should be forward.
- The ankles should be slightly abducted.
- The elbows should be slightly flexed.
- The wrists should be extended.
- The fingers should be flexed.
- The abdomen should be flat and relaxed.
- The buttocks should be contracted.
- The thighs should be extended and slightly abducted.
- The hips should be slightly flexed.
- The legs should be parallel, about 3 inches apart.
- 2) Sitting:

- There is more stress on the back in the sitting position than in the standing position.
- The head should be straight.
- The curves of the back should be normal.
- The chin should be tucked in.
- Part of the chest should be forward.
- The ankles should be abducted.
- The elbows should be supported with flexion.
- The wrists should be extended and the fingers should be flexed.
- The abdomen should be flat and relaxed.
- The thighs should be flexed towards the trunk at a right angle.
- The feet should be flexed towards the legs at a right angle and supported on the floor or footrest.
- Eradicate the hollowness of the back by sitting properly with the buttocks.
- When sitting for a long time, get up hourly, stretch and relax.
- 3) Bending:
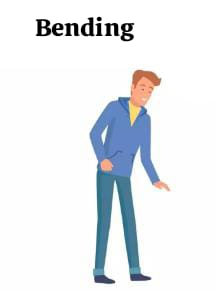
- Place one foot in front of the other.
- Bend your knees and hips.
- Keep your back straight to lift something from the floor.
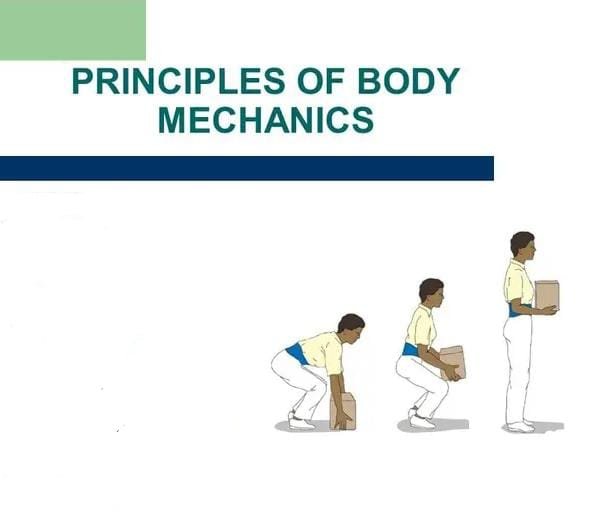
- 4) Lifting Weights:
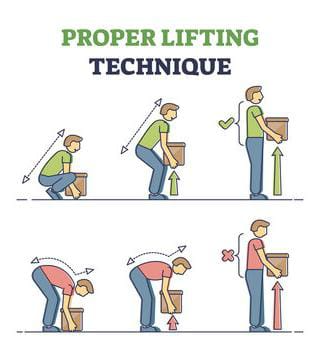
- The load is carried in the same way.
- Stand with both legs firmly on the floor and wide apart.
- Stand close to the weight.
- Bend the knees slightly.
- When lifting a weight (object), keep it close to the body.
- Avoid twisting the trunk.
- Stand tall enough to avoid lifting above waist level.
- Level the head end of the patient to lift him onto the bed.
- It is better to push rather than lift.
- 5) Carrying:
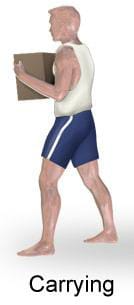
- Keep both legs flat on the floor.
- Keep the object close to the body near the center of gravity.
- Keep the head erect and straight.
- 6) Pushing:
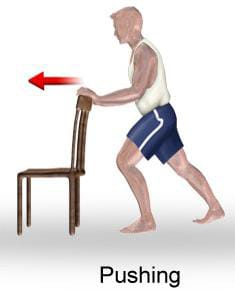
- Stay close to the object.
- Stay in proper body alignment.
- Tense the muscles and prepare for the movement.
- Hold the object close to the body and near the center of gravity.
- Lean towards the object.
- Move away from the object using your body weight to add force.
- 7) Pulling:
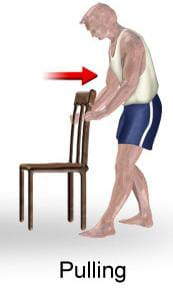
- To pull something away from you to pull it towards you.
- 8) Reaching:
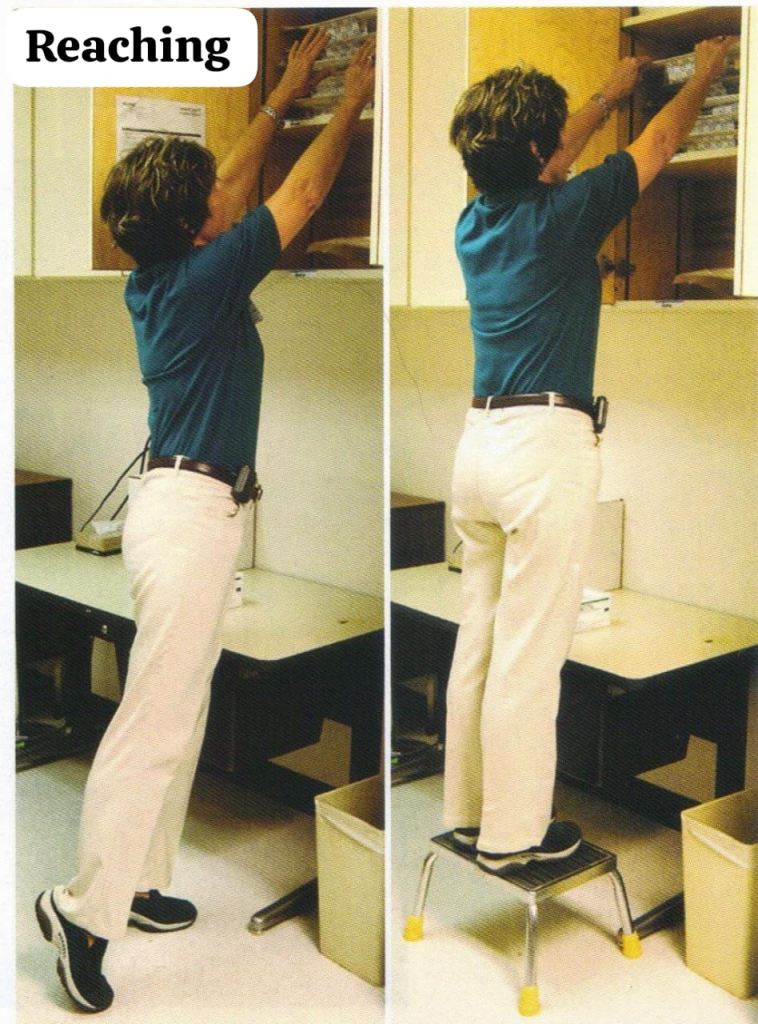
- To reach an object above head level.
- Stand close to the object.
- Keep one foot forward and one foot behind.
- Keep your back properly straight.
- Reach with both hands.
- While performing a procedure on the patient.
- Stand close to the bed.
- Bring the patient to the center of the bed.
- Keep your legs 3 inches apart.
- Keep your back straight and reach the patient.
- 9) While working in standing position:

- Always face the work.
- Keep your feet ≥ 3 inches away.
- Keep your back straight.
- 10) While shifting a patient from bed to chair:
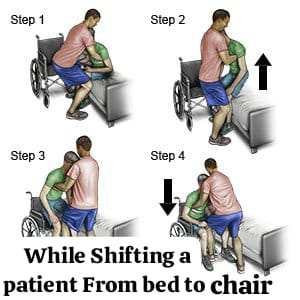
- Face the patient.
- Keep your back straight and legs apart.
- Have the patient sit on the edge of the bed.
- Always face the work.
- Bend your knees while lifting the patient.
- Do not lift and twist at the same time.
- Lock the wheels of the chair/trolley before shifting.
- If the patient is helpless, seek help from others.
- Factors Affecting Body Alignment and Mobility:

- Mobility:
- Mobility means effective standing, sitting and walking that involve body movements.
- મોબીલિટી(Mobility):
- મોબિલિટી એટલે કે ઇફેક્ટિવ સ્ટેન્ડિંગ,સીટિંગ અને વોકિંગ કે જેમાં બોડી મુવમેન્ટ્સ ઇન્વોલ્વ થાય છે.

- Body Mechanics:
- Body mechanics refers to the coordinated use of alignment, posture, and balance to perform activities such as lifting, bending, and moving.
- Factors Affecting Body Alignment and Mobility:
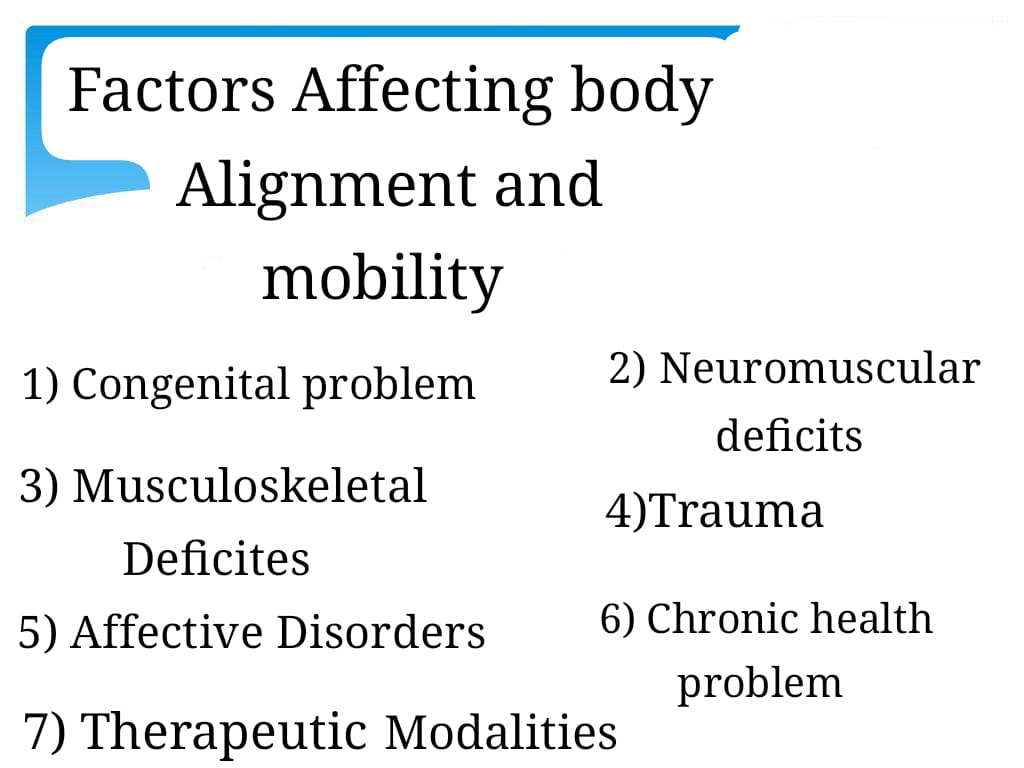
- 1) Congenital problem:
- Congenital problems affect normal musculoskeletal and neurological development. Congenital problems such as congenital dysplasia can be corrected with treatment, but some conditions such as spina bifida or cerebral palsy cannot be cured, so the aim of treatment is to promote functional mobility to the greatest degree and prevent complications.
- 2) Neuromuscular deficits:
- Any disease that impairs the ability of the nervous system to control muscular movement and coordination and functional mobility. Often these disorders (such as muscular dystrophy, Parkinson’s disease, and multiple sclerosis) are progressive, in which the ability to move normally gradually decreases and destroys the ability to move until the person is confined to a bed or wheelchair.
- 3) Musculoskeletal deficits:
- Any impairment of the musculoskeletal system can affect body alignment, joint mobility, skeletal strength, and body movement. Demineralization of bone, such as in osteoporosis, increases the risk of fracture. Rheumatoid arthritis limits mobility because movement causes pain.
- 4) Trauma:
- Trauma often results in accidental injury to joints, tendons, ligaments, muscles or bones. Such damage may be minor, affecting body alignment and mobility for a short period of time. Severe trauma may cause extensive damage to the spinal cord or brain. When the spinal cord is severely damaged, paralysis occurs below the level of injury. The term paraplegia is used to describe loss of motor and sensory function in the legs. Quadriplegia is used to describe paralysis involving the arms and legs.
- 5) Affective Disorders:
- Severe affective disorders impair mobility. Depression and catatonic states result in limited mobility, which may not be due to physical impairment but rather to a person’s lack of desire for movement. Fear, especially pain on movement, can cause people to restrict their movement.
- 6) Chronic health problems:
- Chronic health conditions decrease mobility because certain disorders reduce the delivery of oxygen and nutrients to the muscles. Lung disorders reduce the amount of oxygen delivered to all tissues of the body, including skeletal muscles. Cancer or other conditions that reduce the amount of nutrition reduce the energy needed for movement.
- 7) Therapeutic Modalities:
- Many times, movement is limited to treat a medical problem. Restrictive devices such as casts, braces, and splints are used to immobilize certain areas of the body to promote healing. This can lead to decreased mobility.
- Alterations in body alignment and mobility:
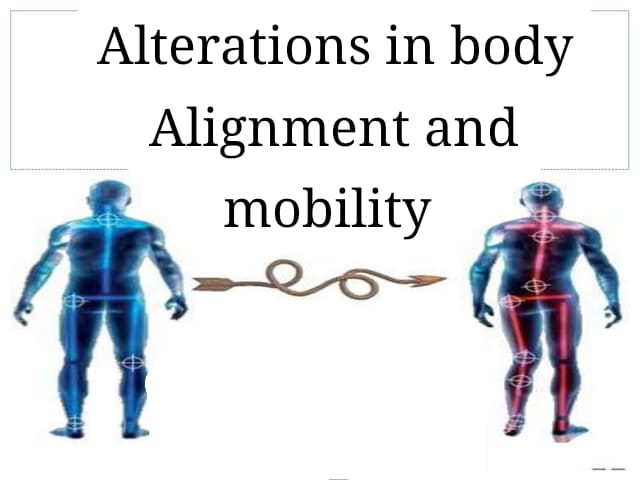
- Immobility:
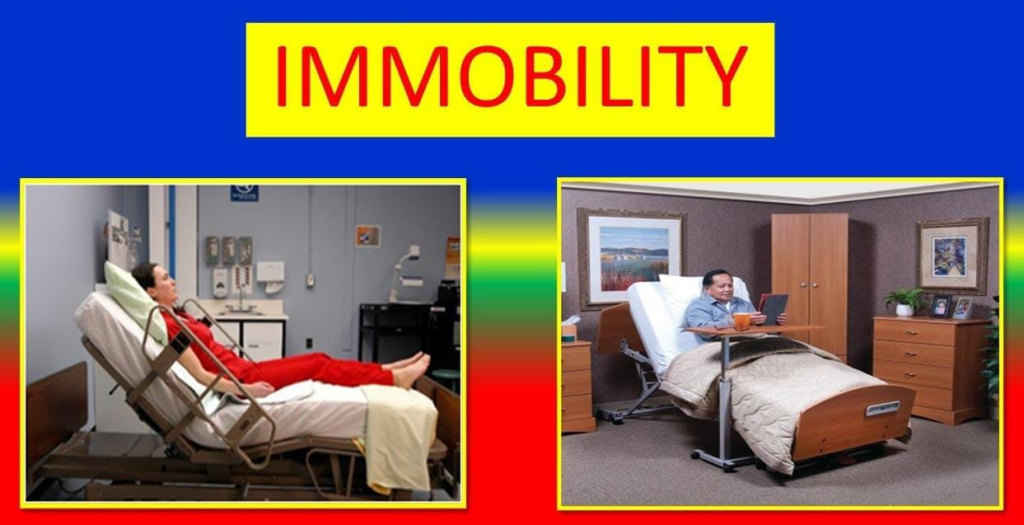
- Immobility is a condition in which there is an inability to move body parts or the whole body. Immobilization can be a prescribed or unavoidable restriction of movement.
- Types of immobility:

- 1) Social immobility:
- Interruption or withdrawal in the normal pattern of social interaction is called social immobility.
- 2) Emotional immobility:
- Emotional immobility can occur when stressors exceed coping abilities.
- 3) Intellectual immobility:
- Intellectual immobility can occur in individuals who do not have the ability to acquire the necessary knowledge.
- 4) Physical immobility:
- Can occur due to physical problems or necessary therapeutic measures.
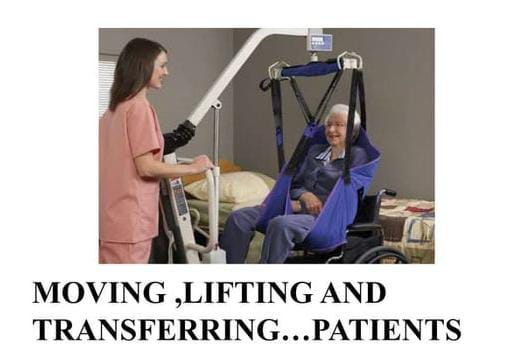
- Moving, lifting, transferring, walking of the patient:
- Moving a client up in bed:
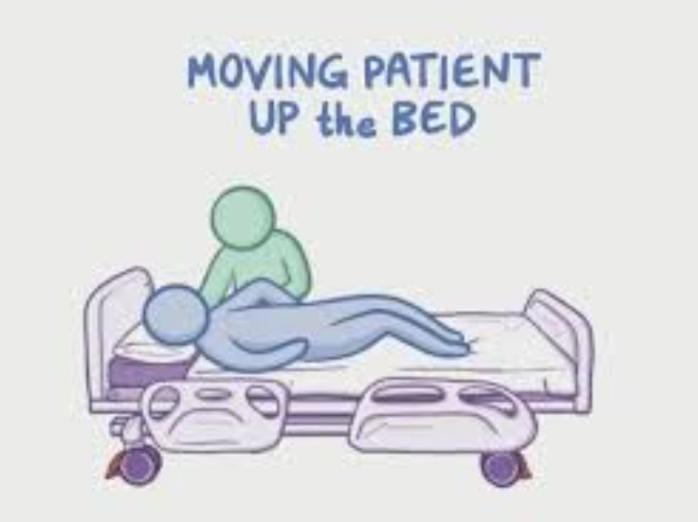
- Adjust the head of the bed to a flat position and as low as the client can tolerate.
- Raise the bed to the nurse’s height, center of gravity, and lock the bed’s casters.
- Ask the client to flex their hips and knees and position them so they can use them effectively for pushing.
- Remove all pillows and place one pillow against the head of the bed to protect the client’s head from upward movement.
- If the client has limited mobility or upper extremity strength and cannot assist, place their hands on their chest.
- Ask the client to flex the neck during the movement.
- Bend the trunk forward at the hips. Flex the hips, knees, and ankles.
- Place one hand under the client’s back and ankles and the other hand under the thighs.
- Tighten your gluteal, abdominal, leg, and arm muscles.
- Shift weight from the back foot to the front foot and back again and onto the front foot as the client pushes with the heel and pulls with the arm. Move the client to the head of the bed.
- Elevate the head of the bed. Provide appropriate support devices for the client’s new position.
- Moving a client to the side of the bed:
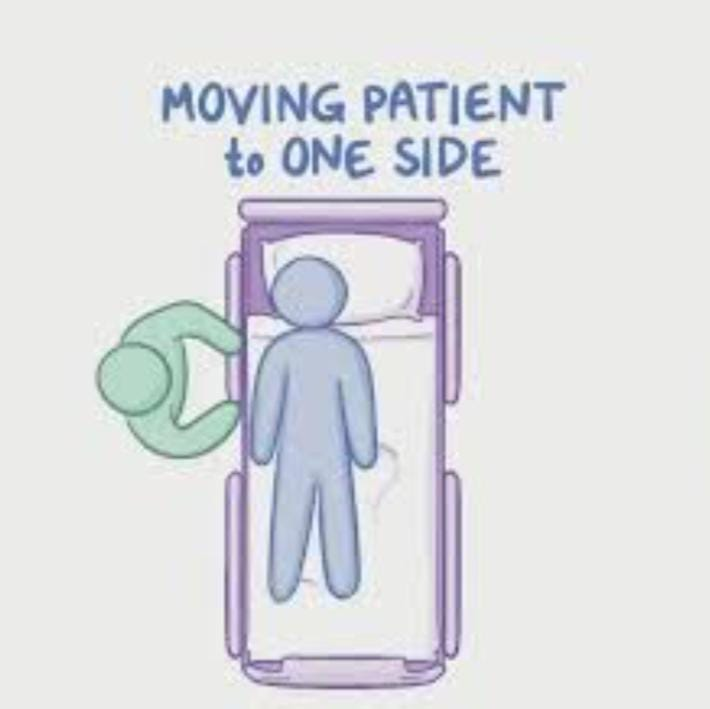
- Stand as close as possible to the side of the bed to which the client will be moved and stand facing the client’s chest.
- Place the client’s nearest hand on his chest.
- Bend your trunk forward from the hips. Flex your hips, knees, and ankles.
- Place the palms of your arms and hands together under the client’s shoulders.
- To move the client’s legs and feet, place your hands close together under the client’s legs.
- Elevate the side rails.
- Transferring a client from a bed and wheelchair:
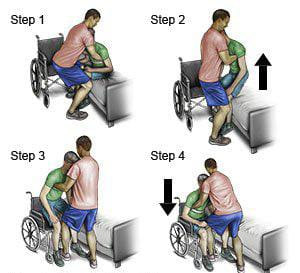
- Assist the client to a sitting position at the side of the bed.
- Assist the client to put on slippers.
- Place the transfer belt tightly around the client’s waist.
- Lower the bed to its lowest position so that the client’s feet are flat on the floor. Lock the chair wheels.
- Position the wheelchair at a right angle to the bed and as close to the bed as possible.
- Ask the client to move forward to sit on the edge of the bed, lean slightly forward from the hips, place the strong foot under it and the other foot forward.
- Ask the client to place his hands on the bed surface or on the nurse’s ankles so that he can push with his hands when standing.
- Stand straight in front of the client: bend the trunk forward from the hips. Flex the hips, knees, and ankles.
- Hold the client’s waist with your hands and the transfer belt on the client’s back.
- Tighten your gluteal, abdominal, leg, and arm muscles.
- Support the client in an upright standing position for a few moments.
- Ask the client to place the stranger leg slightly behind the other leg so that the weight is on it. Proceed to place both hands on the wheelchair handles.
- Ask the client to push himself back into the wheelchair seat and provide the proper position.
- Crutches:
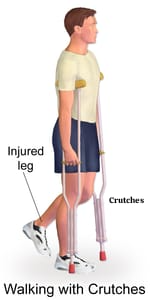
- Crutches are artificial devices used by patients who are unable to walk on their own.
- Crutches are mainly used to provide ambulation and independence to patients who have lower extremity injuries.
- Preparation for Crutches Walking:
- Inform the client that he/she should wear well-fitted shoes.
- Before using crutches, ask the patient to stand with the support of a chair and to achieve balance.
- Have the patient stand with the support of a wall and provide a neutral position.
- It is important to practice walking with crutches before starting.
- Explain the procedure to the patient.
- Ask the patient to wear full clothing and non-slippery shoes.
- Crutch walking gait:
- 1)Four point gait:
- Four point gait is mainly used when some weight can be borne on both lower extremities.
- 1) First, forward the right crutch.
- 2) Then forward the left leg.
- 3) Then forward the left crutch.
- 4) Then forward the right leg.
- 5) Repeat in this manner in the crutch-foot, crutch-foot sequence.
- 2) Three point gait:
- Three point gait is mainly used when some weight bearing cannot be done.
- 1) In three point gait, forward both crutches and forward the affected leg (non-weight bearing).
- 2) Then forward the unaffected leg (strong leg).
- 3) Repeat the sequence again.
- 3) Two point gait:
- Two point gait is mainly used when a small amount of weight is to be borne above both lower extremities.
- 1) Move the left leg and the right crutch forward together.
- 2) Move the right crutch and the left leg forward together.
- 3) Then repeat the sequence.
- 4) Swing to gait:
- 1) Swing both crutches forward together.
- 2) Lift the weight with the arm and swing on the crutch.
- 5) Swing through gait:
- 1) Move both crutches forward together.
- 2) Lift the weight with your hands and move both extremities in and out of the crutch.
- 3) Then repeat in the same pattern.
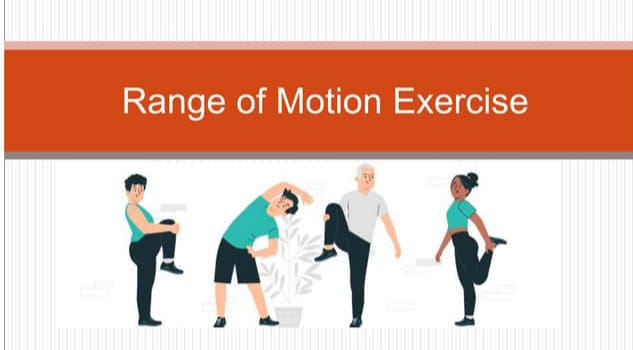
- Range of Motion Exercises (ROM):
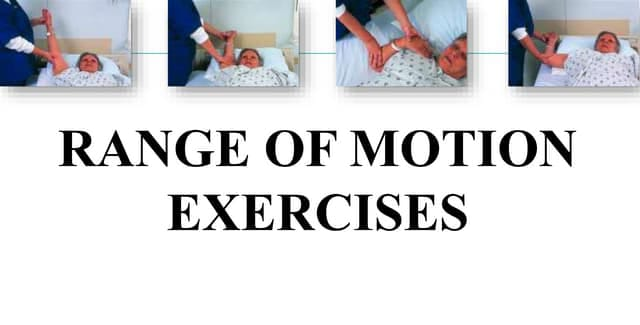
- Range of motion exercises help patients who are unable to move. Exercises help maintain joint mobility and muscle strength. Exercises are performed one to two times throughout the day. Exercises can be performed independently or with an assistant.
- Types of “Range of Motion” Exercises:
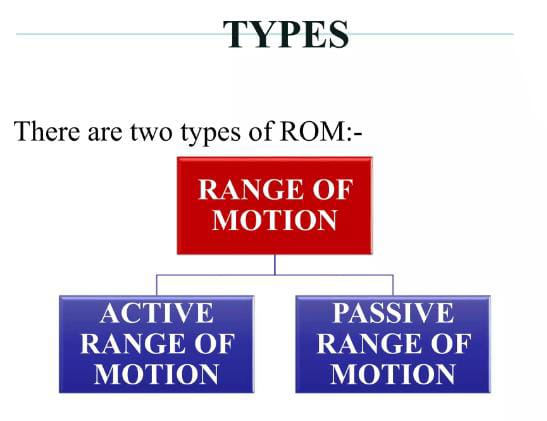
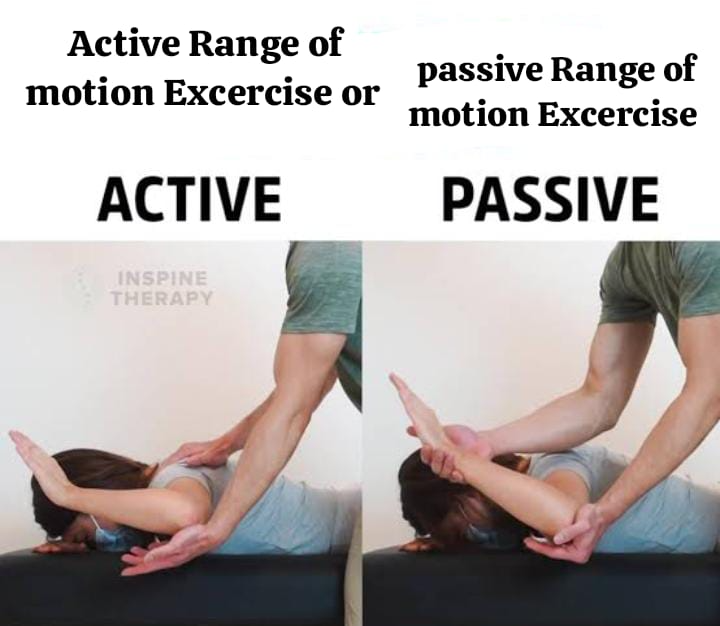
1.Active Range of Motion Exercises
2.Passive Range of Motion Exercises
- 1.Active Range of Motion Exercises:
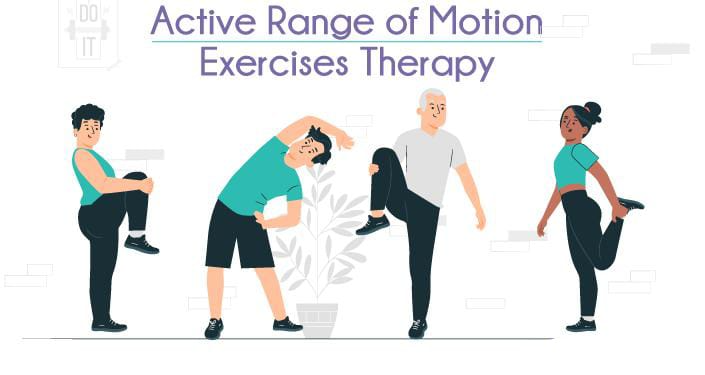
- Active range of motion exercises are exercises in which the patient exercises himself. In these exercises, a nurse or physical therapist supervises the patient who is exercising to see if the patient is exercising properly or not.
- Doing these active range of motion exercises increases the strength of the muscles and helps in maintaining the strength of the muscles. Doing these exercises can prevent joint problems and contractures from developing.
- 2.Passive Range of Motion Exercises:

- Passive range of motion exercises are performed by a nurse or physical therapist for the patient. These exercises are performed by a nurse or physical therapist for patients who are completely immobilized and cannot perform range of motion exercises because in range of motion exercises, the muscles do not contract and muscle strength increases and is maintained. These can only be performed by a nurse or physical therapist.
- Points to remember while performing range of motion (ROM) exercises:
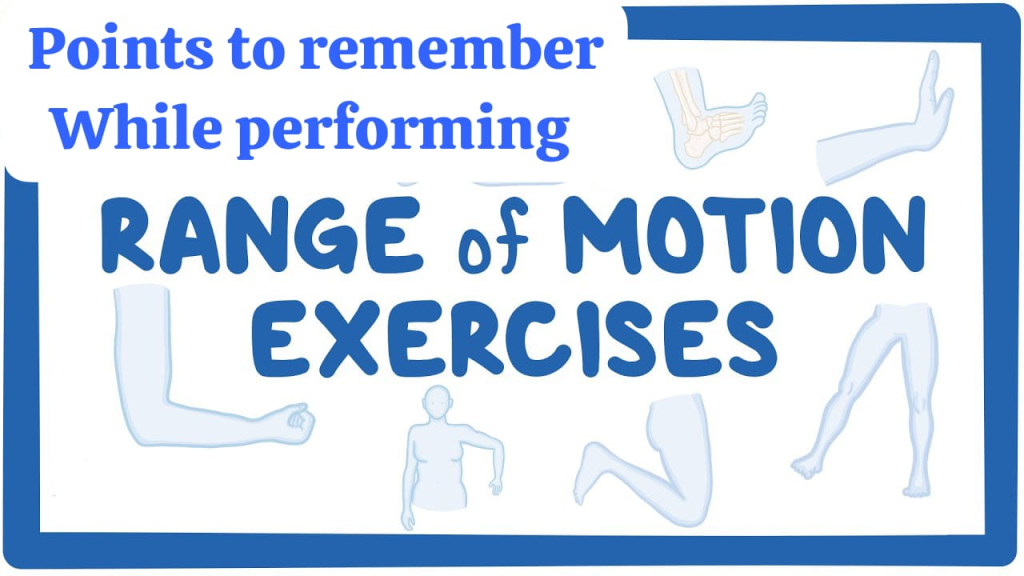
- When assessing range of motion, the nurse should physically examine the client for stiffness, swelling, pain, limited movement, and uneven movement.
- Establish a specific time schedule for the patient to perform the exercise.
- Provide proper support to the patient when performing the movement if the client is weak.
- Perform the exercise only if the patient is able to do it.
- If the patient does not have a contraindication to exercise, move the extremities through the full range of motion as much as possible.
- Move the movements slowly and smoothly to reduce the level of pain.
- Do not move the joint beyond its capacity.
- During the exercise, one movement should be repeated five times.
- The nurse should stand near the patient’s bed when performing passive range of motion exercises.
- Indications for exercise:

- It is important to reduce the risk of injury to the musculotendinous unit.
- To reduce prolonged immobilization.
- It is necessary to maintain normal range of motion of joints and soft tissues.
- To prevent muscle contracture.
- To maximize the flexibility of joint tissues.
- Contraindications for exercise:
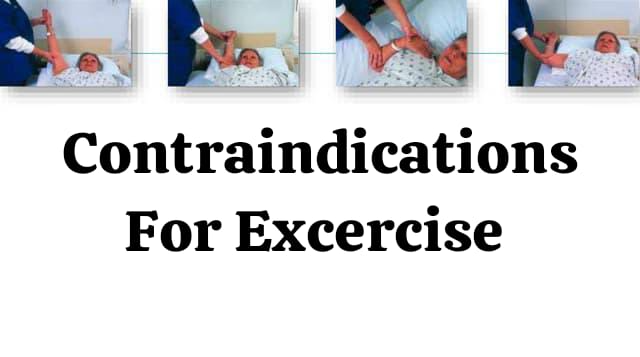
- Should not be done by a person who is already hypermobile.
- People who have any major disease condition.
- People who have inflamed joints.
- Goals of Active Range of Motion Exercises:

- To maintain the physiological elasticity and contractility of muscles.
- To provide feedback from contracting muscles.
- To provide stimuli to the integrity of bone and joint tissue.
- To increase circulation and prevent thrombus formation.
- Activity to develop coordination and motor skills.
Goals of Passive Range of Motion Exercises:
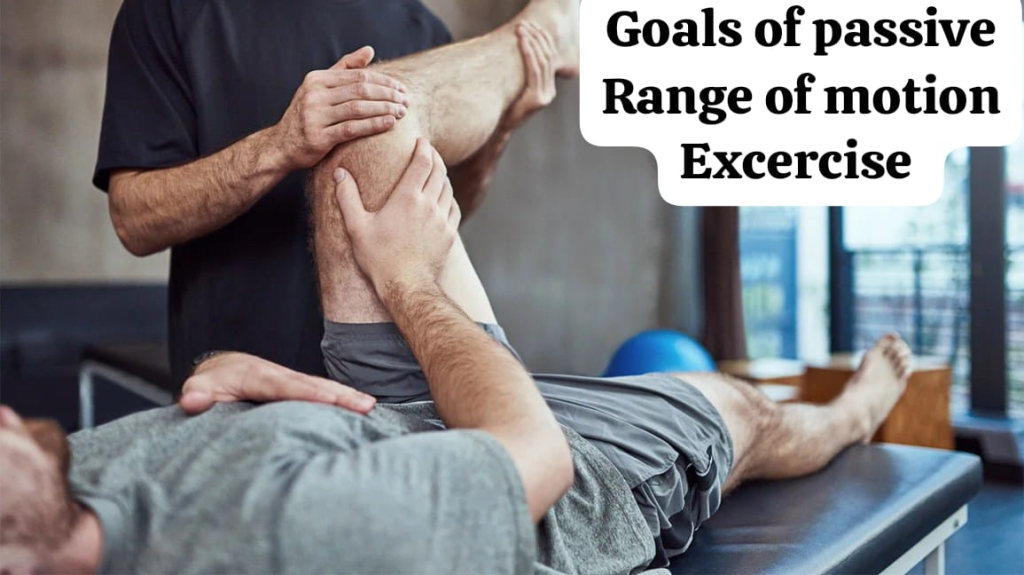
- To maintain mobility of joints and connective tissues.
- To minimize the formation of contractures.
- To maintain the mechanical elasticity of muscles.
- To improve circulation.
- To improve synovial movement.
- To inhibit pain.
- To improve healing after any injury or surgery.
- To bring awareness of movement in the patient.
Guidelines and precautions:
- It is necessary to warm up the muscles before stretching them vigorously.
- Care should be taken while stretching the muscles around the painful joint.
- In patients who have osteoporosis or suspected osteoporosis and those who have been on bed rest for a long time Caution should be taken while stretching.
- Stretching should be done at least three times a week and a maximum of five to six times.
- Care should be taken while stretching in the elderly as their collagen has lost its elasticity and their capillary blood supply is also less.
- To increase flexibility, the muscles should be stretched beyond their elastic range of motion.
- The ligaments around the joints and The capsule should not be overstretched.
- Ballistic stretching should only be performed by patients who are already flexible.
- Care should be taken when stretching patients with frail integumentary ligaments.
Principles and Procedures for “ROM”:
Which Equipment should be kept ready as needed.
Examination, Evaluation and Treatment Planning:
Examine and evaluate the patient’s impairment and level of function.
Assess the patient for any pre-existing conditions.
Assess the patient’s ability to perform ROM (range of motion exercises).
Assess what type of exercise the patient is capable of doing.
ACTIVE RANGE OF MOTION EXCERCISE (AROM) OR PASSIVE RANGE OF MOTION( PROM) EXCERCISE.
- Assess the patient’s range of motion.
- Assess the patient’s general condition.
- Assess the patient’s vital signs.
- Assess the patient for any warmth or abnormal color.
- Documentation.
- Re-evaluation.
Patient Preparation:
- Communicating with the patient.
- Explaining the complete procedure to the patient.
- Do not ask the patient to wear tight clothing.
- Provide a comfortable position for the patient.
- Health care personnel should also adopt proper positions.
Active Range of Motion Exercises:
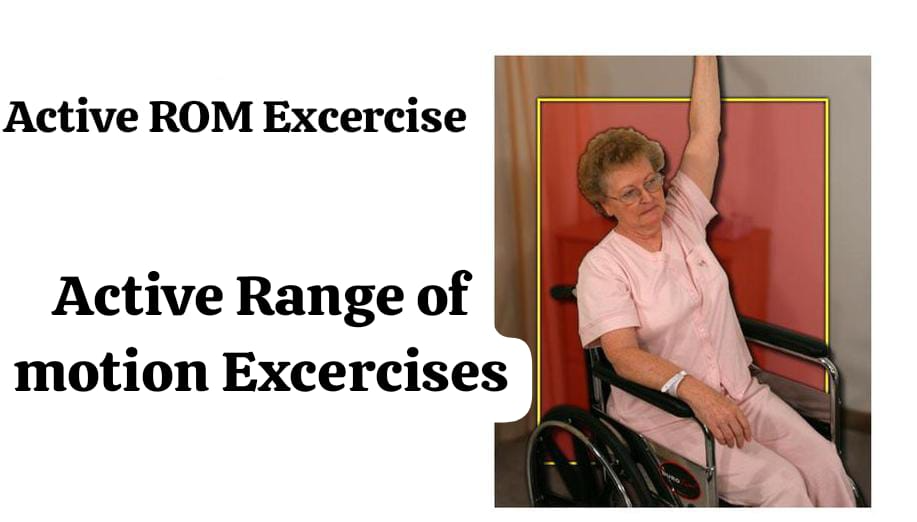
Active range of motion exercises help improve joint function.
Range of motion exercises help joints move properly and increase muscle strength.
Moving makes the joints flexible, reduces pain levels, and improves balance and strength.
1)explain the neck exercise:
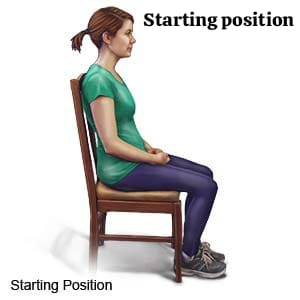
- Sit or stand before doing neck exercises.
- Face forward and keep both shoulders straight and relaxed.
Head tilts forward and backward :
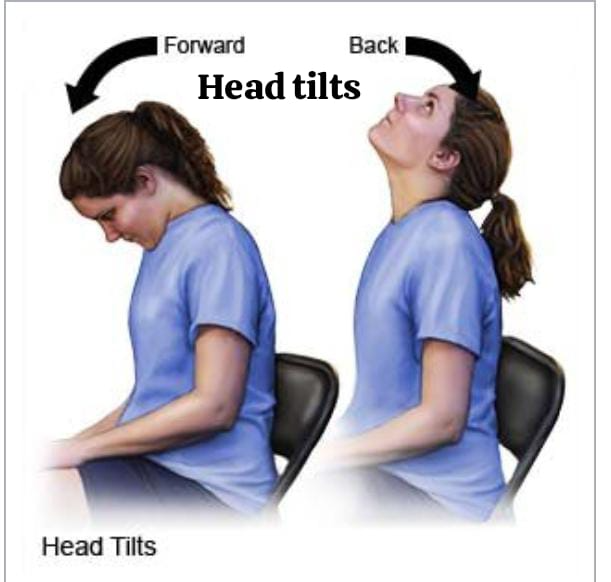
- In this, bring the head forward and try to touch the chest through the chin.
- Then bring the head back and as far as it is comfortable, backward Keep.
- Then bring the head back to the normal starting position.
HEAD TILT SIDE TO SIDE:
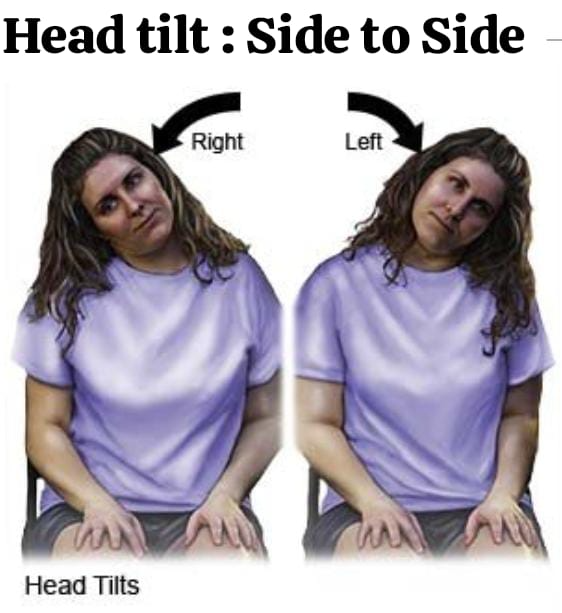
- In this, turn the head from side to side and try to bring the ear to the solder and do this procedure on both sides.
- Then bring the head back to the normal position.
HEAD TURNS:
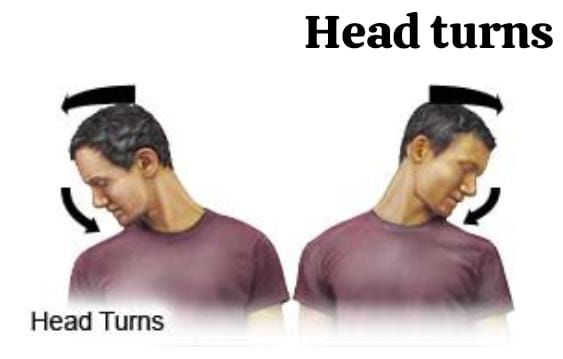
- Try to turn the head and bring it towards the solder.
- Then touch the solder through the chin but do not raise the solder to touch the chin.
- Do this procedure on both sides.
- Then come to the normal position.
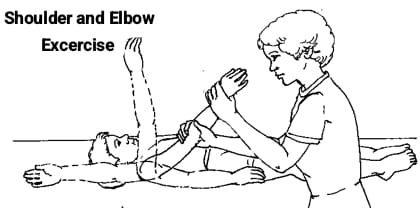
2) Explain shoulder and elbow exercise:
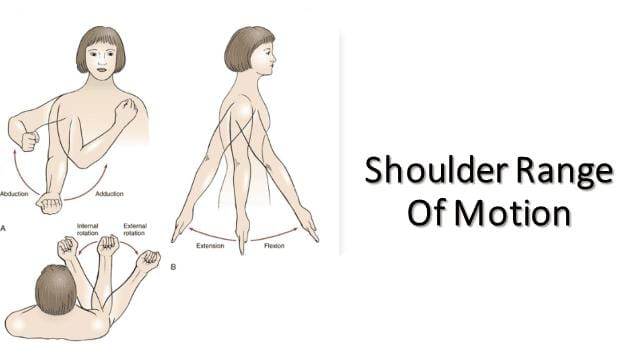
- standing or Sitting
- Keep both arms straight down at your sides.
- The palms should face your body.
shoulder movement up and down:
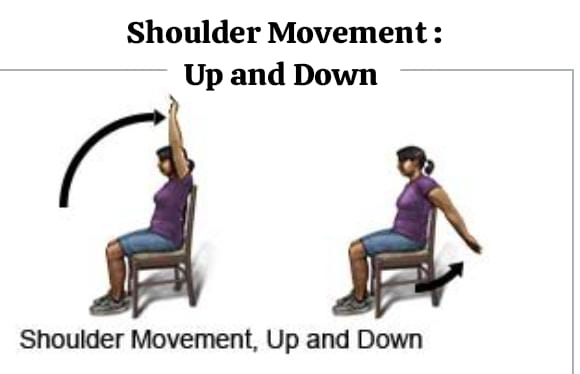
- Raise both arms forward and then over the head.
- Try to raise them so that the inner arm can touch the ear.
- Then bring both arms back down and keep the arms behind the body as far as possible.
- Then return the hand to its normal position.
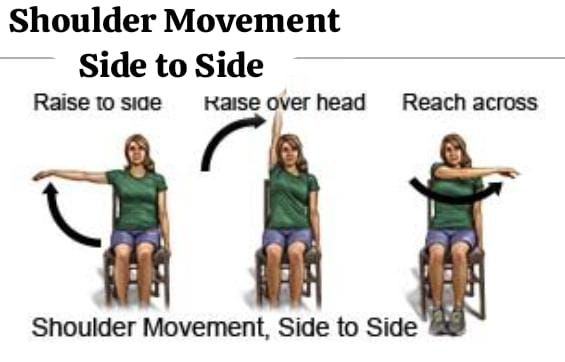
Explain the shoulder movement side to side :
- Raise both the person’s arms and then keep both the arms above the head as high as possible. Then bring the arms back to the side, then bring the arms to the front of the body and reach the opposite ankles, then bring the arms back to their normal position.
shoulder rotation:
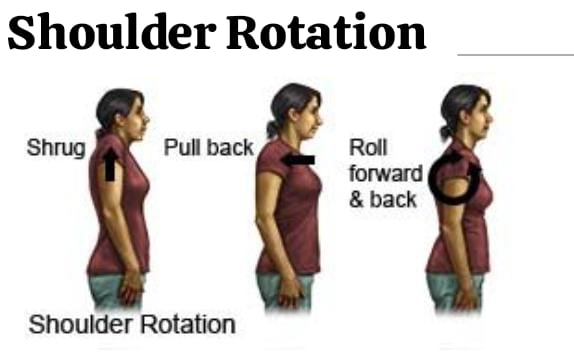
- Raise both your shoulders towards your ears.
- As if you were trying to shrug.
- Then lower it back to the starting position.
- Then let the solder rest. Pull your solder back and then let it rest again.
- Then rotate the solder in a simple circle and then rotate the solder back in the opposite direction.
Elbow bent:
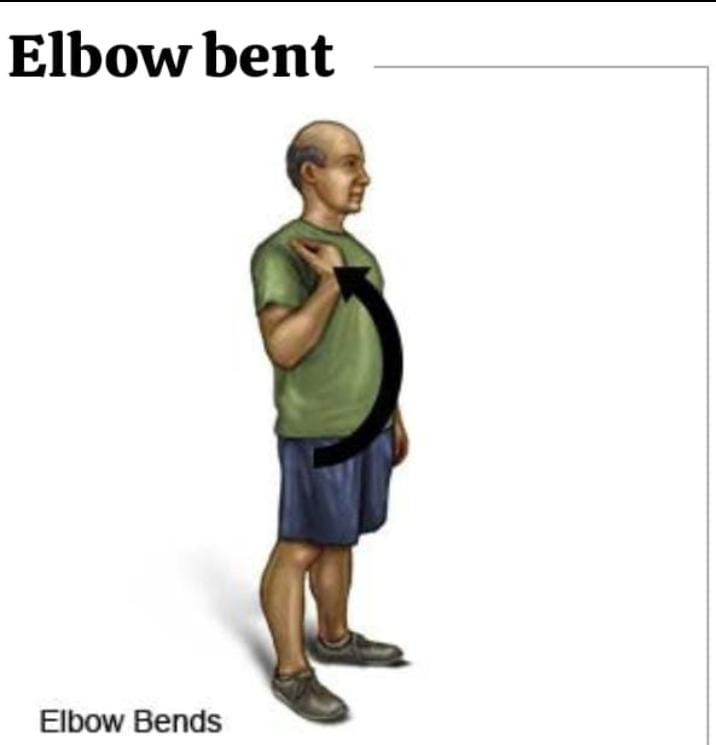
- Bend the elbow then try to touch the solder with the finger tip and bring the hand back to the normal position.
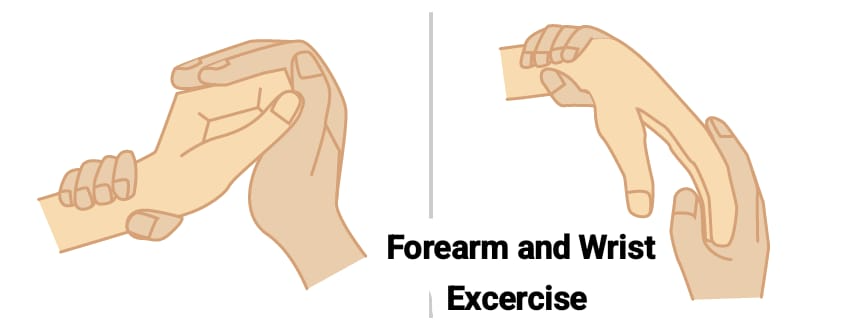
3)Arm and wrist exercise:
- Sit quietly, then bend the elbow and place both hands on a flat surface such as a table or lap and ensure that both wrists are relaxed. hangs way or not.
wrist bends:
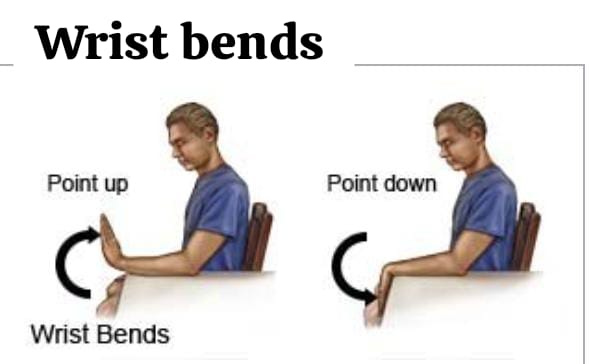
- Roll both of your hands back toward your wrists so that your fingers are pointing toward the ceiling. Then, rotate your hands downward so that your fingers are pointing toward the floor.
wrist rotation:
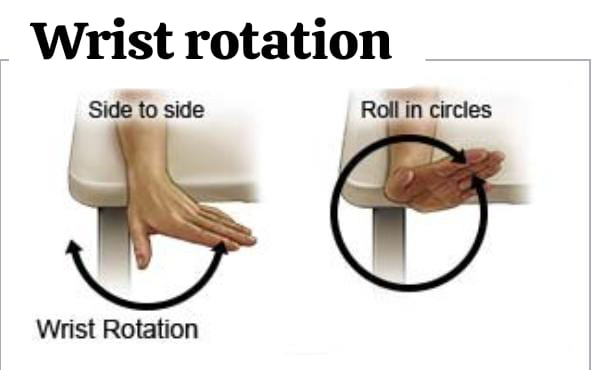
- Move your hand from one side to the other.
- Then rotate your hand in a circle in one direction and then rotate your hand in a circle in the other direction.
palm up , palm down:
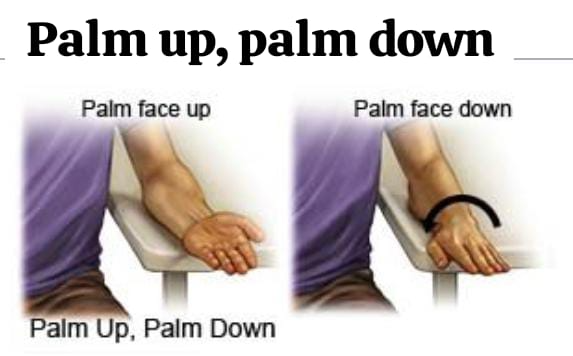
- Stay in the same position.
- But tuck the bent elbow towards your side.
- Then lower the palm and turn the palm so that it faces the ceiling and then turn the palm so that its face is facing downwards.
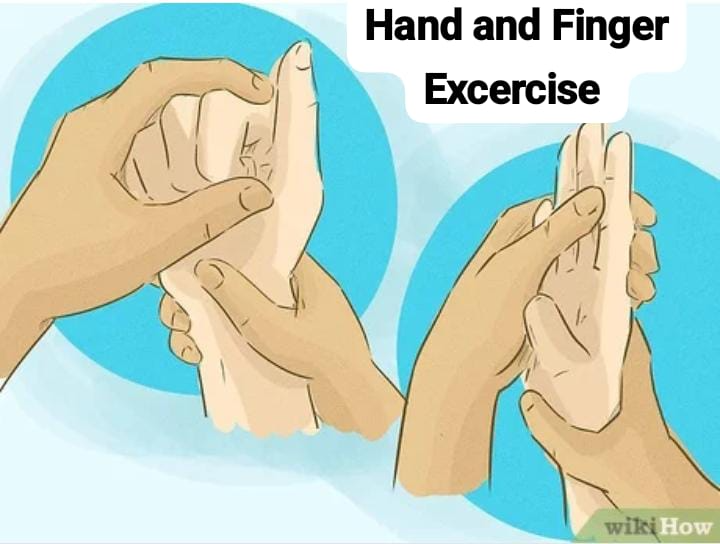
4)Hand and finger exercise:
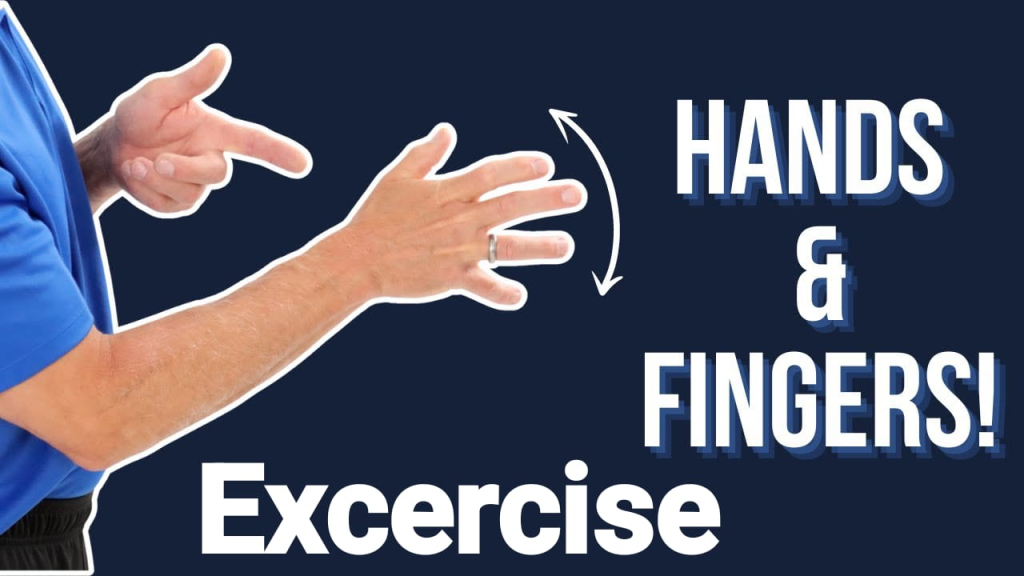
- Sit or stand and then place your hand in front of you.
Finger bends:
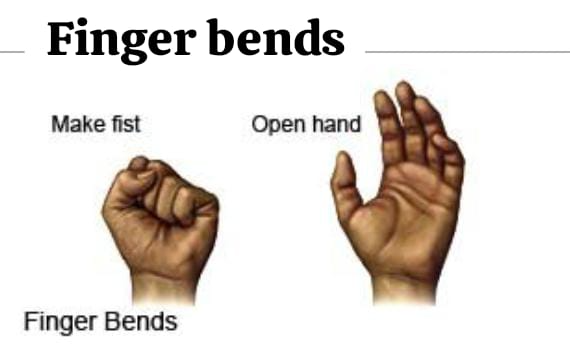
- Make a very tight fist and then open it and relax the hand.
Finger spread:
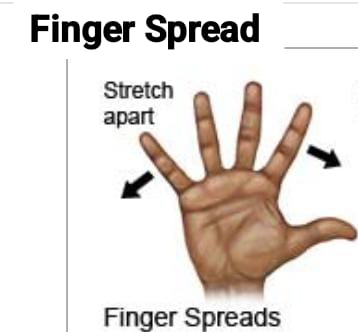
- Open the hand and then stretch the fingers as far as possible.
- Bring the fingers back to their normal position.
Finger to thumb:
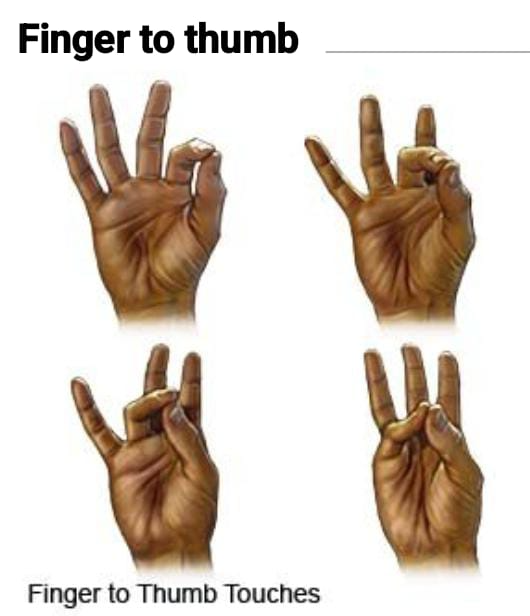
- To touch the fingers one by one with the thumb.
Thumb to palm:
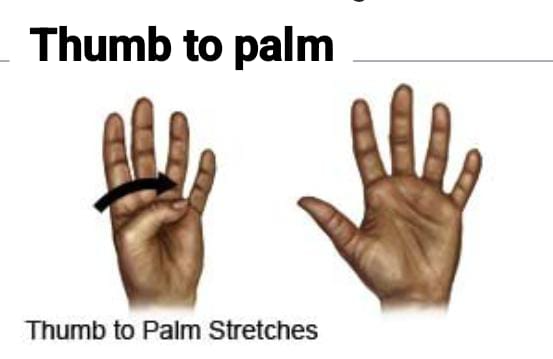
- Touching the palm with the thumb.
5)Hip and knee exercise:
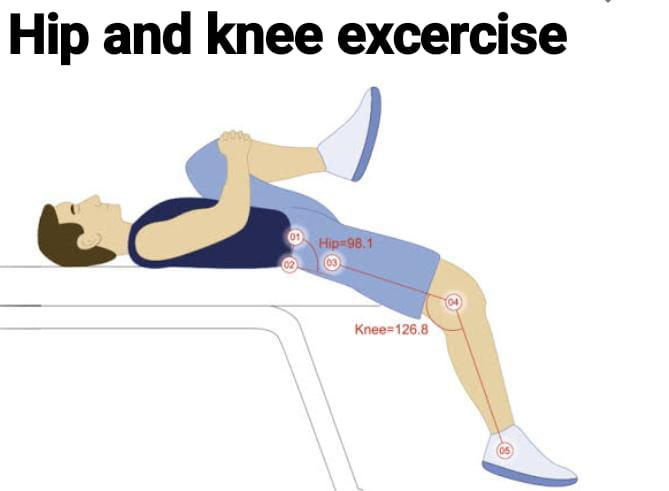
- If any person has a hip injury or surgery, then he should do hip exercise is.
Hip and knee bends:

- Point your toe.
- Then bend the knee towards the chest.
- Then straighten the leg back and place it back in a flat position on the bed.
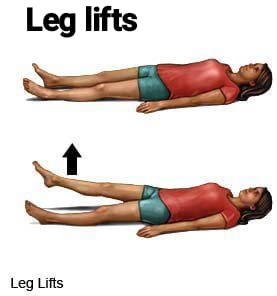
leg lifts:
- Elevate the legs, then let them remain in the air and bring them back to the normal position on the bed.
leg movement side to side:
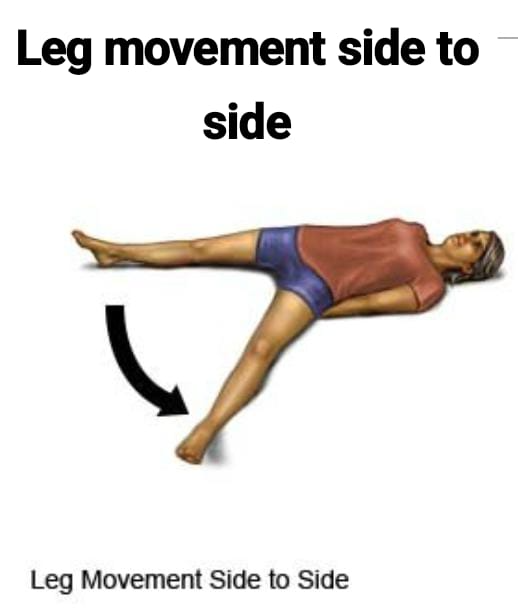
- Flex your leg and then place the toe in such a way that the point of it is pointing towards the ceiling. It happens.
- Then move your leg from side to side and bring it back to its normal position.
leg rotation in and out:
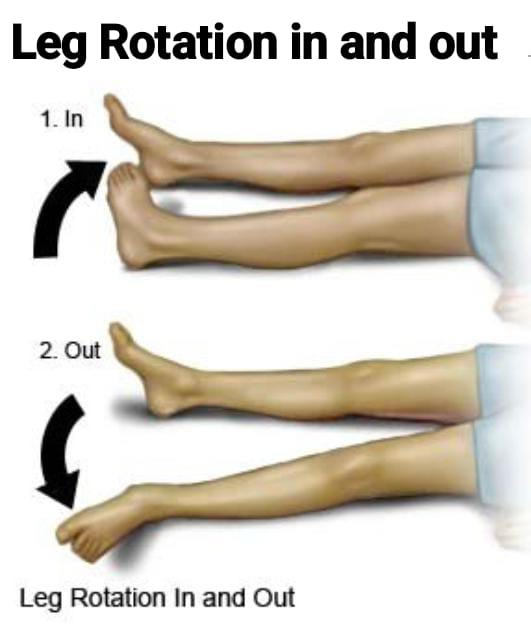
- Place your feet on the bed and then roll your feet inwards so that the big toe touches the bed and then roll your feet outwards so that the little toe touches the bed.
knee rotation in and out:
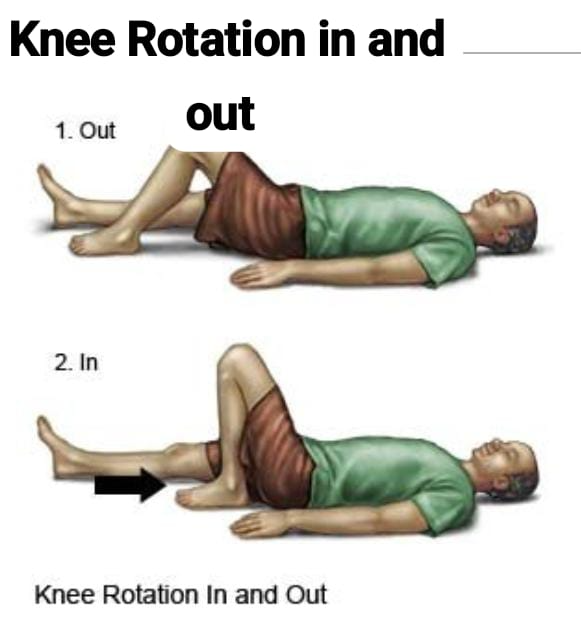
- Lie down on the bed.
- Then bend the foot and the band.
- Bend the band in such a way that the soles of the feet touch the bed.
- Then rotate the knee and then bring the foot back to its normal position.
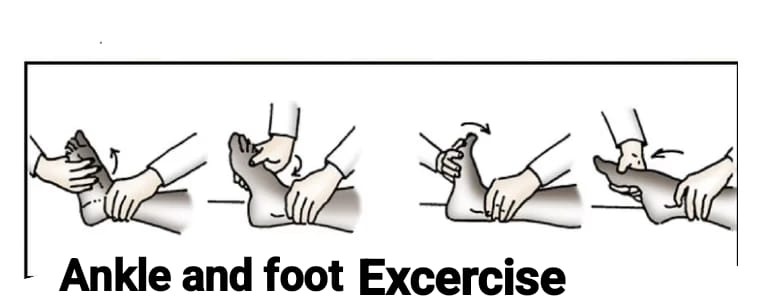
6) Ankle and foot exercise:
- Sit comfortably.
Ankle bends:
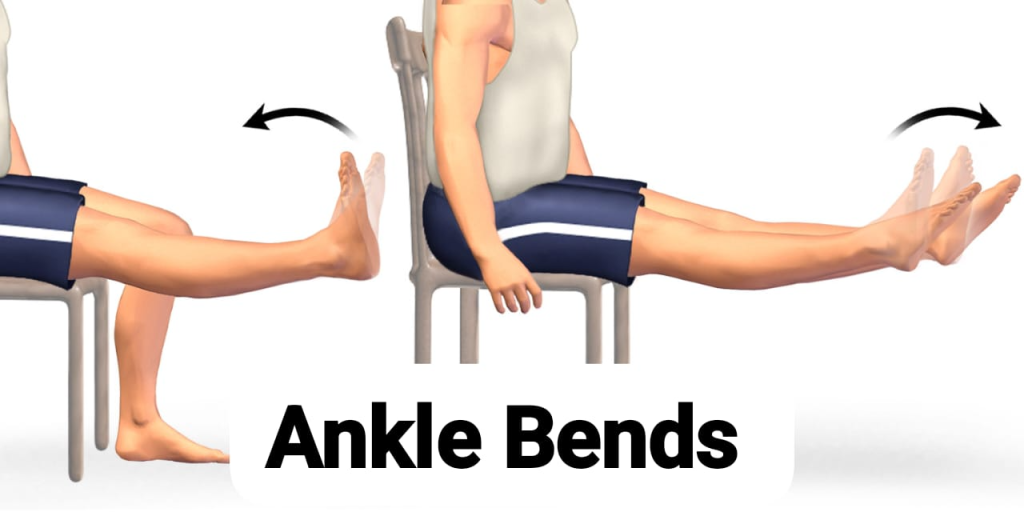
- Keep your toes on the floor and lift your heels.
- Then bring the heel back to the normal position and keep it on the floor and raise the toes.
Ankle rotation:

Take your foot slightly off the floor and then roll your ankle in a circular motion and then roll it in the opposite direction.
toe bends:
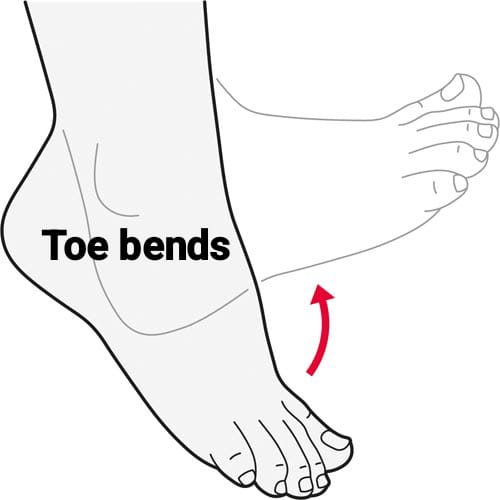
Reach your toes towards the ground, then straighten them towards the ceiling and bring your foot back to its normal position.
toe spread:

Spread your toes and then bring them together.
Passive Range of Motion Exercises:

- Passive range of motion exercises make a person’s joints flexible.
- Exercises allow a person’s joints to move fully.
1)Neck exercise:
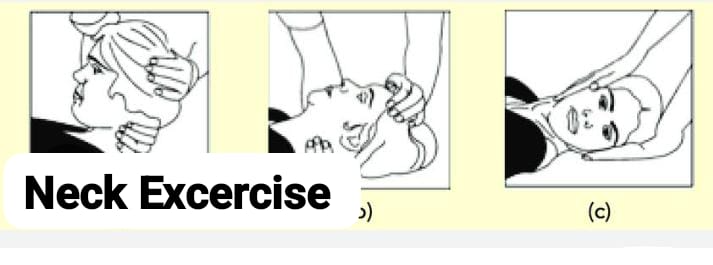
Provide support to the patient’s head with your hands and then return the patient’s head to its normal position after each exercise.
Head turn:
In the side of the patient’s head Then turn him to the other side and bring the head back to the normal position.
Head tilt:
In head tilt, turn the patient’s head towards the shoulder so that his head touches the shoulder and then turn the head back towards the other shoulder and bring the head back to the normal position.
chin to chest:
Turn the patient’s head towards China.
2)Shoulder and elbow excercise:
Support the patient’s shoulder with one hand and then provide support for the patient’s wrist with the other hand.
shoulder movement, up and down:
Raise the person’s arm forward and above the head and return the arm to the normal position at the side.
shoulder movement, side to side:
Raise the person’s arm as high as possible and then return it to its normal position.
elbow bends:
Hold the person’s arm so that the palm is facing up, then bend the person’s arm and straighten it.
3)forearm and wrist exercise:
Provide support to the person’s wrist and hold their fingers.
Wrist bends:
Bend the person’s hand so that their fingers are facing the ceiling, then bend their hand down so that their fingers are facing the floor.
wrist rotation:
Gently grasp the person’s hand, then rotate their wrist in a circular motion and then rotate it in the opposite direction.
Palm up and down:
Hold the person’s hand properly, then keep his palm facing the ceiling and then keep it facing downwards so that the palm touches the floor.
4)Hand and finger exercise:
Hold the person’s hand with both your hands.
finger bend:
Bend the person’s fingers and then straighten them again, then bend and straighten each finger.
finger spread:
In this, spread the thumb and the other finger and bring them to the normal position, then straighten the first finger and middle finger and bring them to the normal position, in this way straighten the fingers alternately and bring them to the normal position.
finger to thumb:
Touch the finger tip with the person’s thumb. Touch each fingertip in turn and bring it to the normal position.
finger rotation:
In this, rotate the finger in one direction and then rotate it in the other direction.
Then rotate the thumb in one direction and then rotate it in the other direction, thus rotating all the fingers in turn.
5) hip and knee excercise:
hip and knee bends:
Bend the knee and bring it towards the chest then bring it back to the normal position.
Leg movement:
In this, bring the leg from one leg to the other in the side direction then bring the leg back to the middle position.
leg rotation:
Bring one of your legs towards the other leg and then take it out.
6)Ankle and foot exercise:
Ankle bends:
In this, the person bends his leg and bends his foot in such a way that his toes are pointing towards the ceiling and then bends it back in the other direction in such a way that his toes are pointed.
Ankle rotation:
Ankle rotation involves rotating a person’s ankle in one direction and then rotating it in the other direction.
Types of movements at various joints:
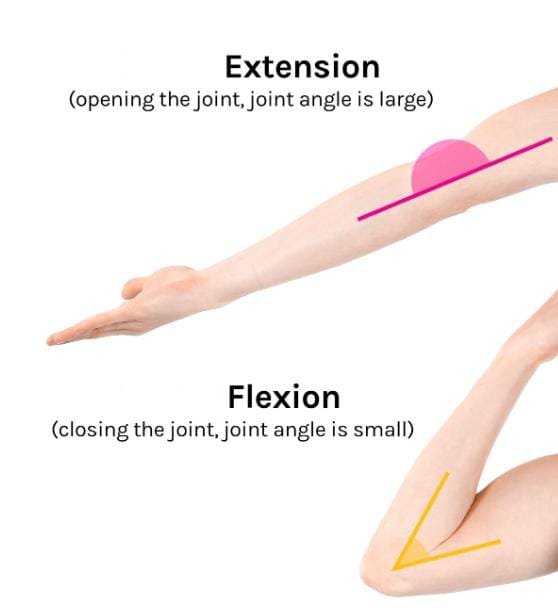
1) Flexion:
Reducing the angles between circulating bones or decreasing the angle between two bones in flexion.
- Head to chest Bending.
- Movement of the palm towards the inside of the forearm.
- Making a fist.
- Bending the toe downwards.
2) Extension:
To straighten the joints. To increase the angles between the circulating bones. To restore a part of the body to its anatomical position after flexion or to increase the angle between the bones in extension.
- To provide an erect (straight) position to the head.
- Straighten the toes.
3) Hyperextension:

The normal movement of a part of a joint, extension or extension beyond the anatomical position of the condition is called hyperextension. When a joint of the body is extended beyond its normal range, it is called hyperextension.
4) Abduction:
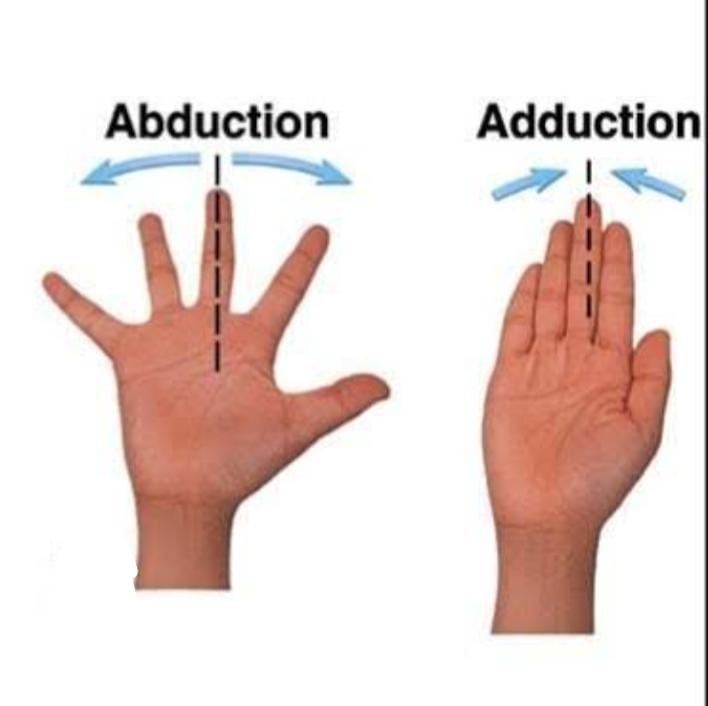
In abduction, the joint or extremities are moved away from the midline.
- The palm is moved laterally (from the side) at the joint of the palm )Move.
- Move the femur laterally in the hip joint.
5) Adduction:
In adduction, the joint or extremities are moved towards the midline.
- Fingers together to bring.
6) Circumduction:
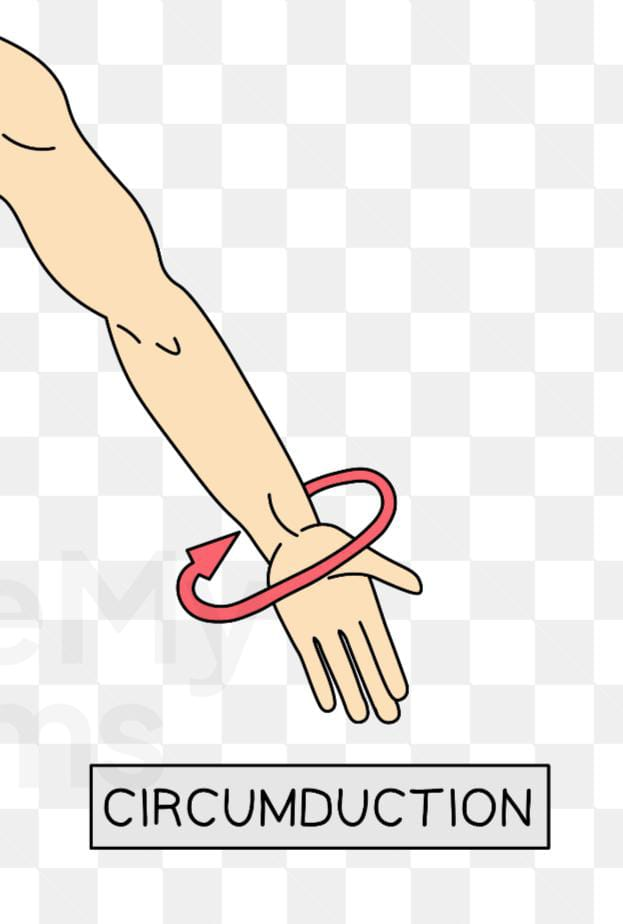
To move a part of the body inwards in a widening circle. It results from a continuous sequence of flexion, abduction, extension, and adduction. Eg.
- Moving the humerus in a circle of the solder joint.
7) Rotation:
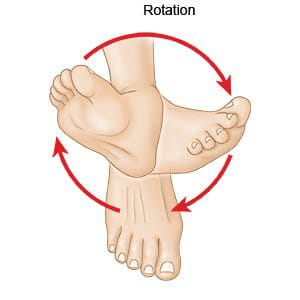
In rotation, the bone rotates around its longitudinal axis.
- Rotating the head from side to side
Two types:
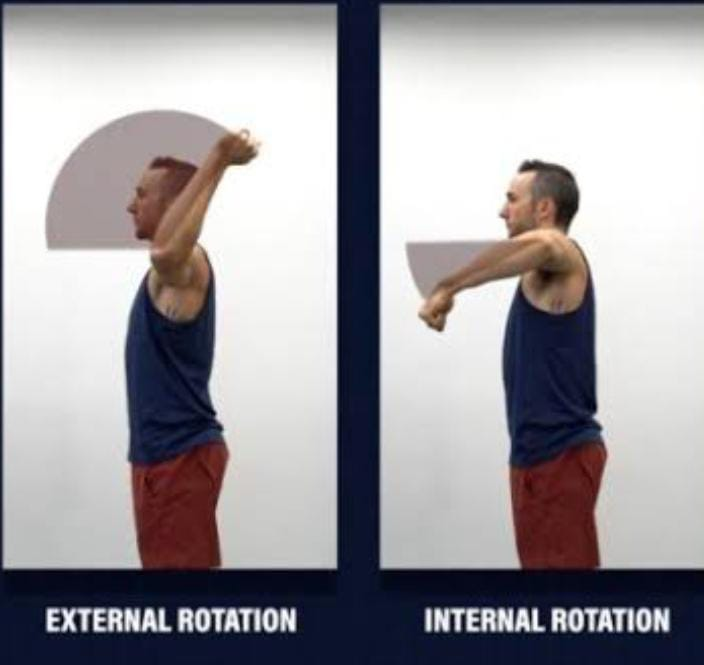
I) Internal rotation:
In internal rotation, the joints of the axis or the extremities are turned towards the midline of the body.
- Turning the foot or leg towards the other leg.
II) External rotation:
In external rotation, the joints or extremities of the axis are moved away from the midline of the body.
- Moving the foot and leg away from the other leg To do.
8) Supination:
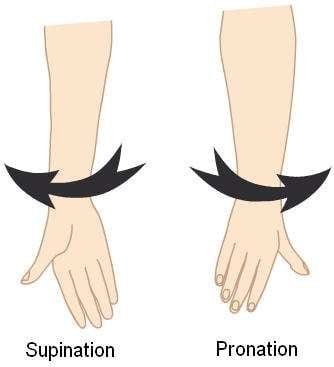
In it, the body parts are turned upward.
9) Pronation:
In it, the body parts are turned downward.
10) Inversion:
Turn the feet inward, so that the toes point towards the midline.
11) Eversion:
Turn the foot outward so that the toes point away from the midline or move the sole laterally at the intertarsal joint so that the soles are away from each other.
12) Dorsi Flexion:
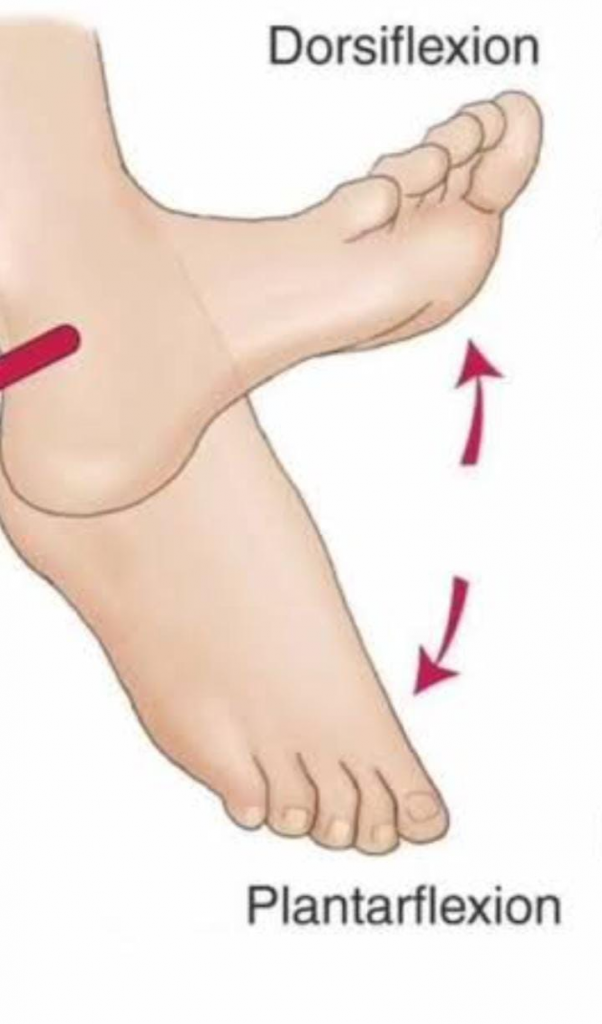
Bending the foot in the direction of the dorsum (top surface) at the ankle. E.g. Standing on heels.
13) Palmer Flexion:
Bending the foot at the ankle joint in the direction of the plantar (inferior surface) e.g. standing on the toes.
14) Opposition:
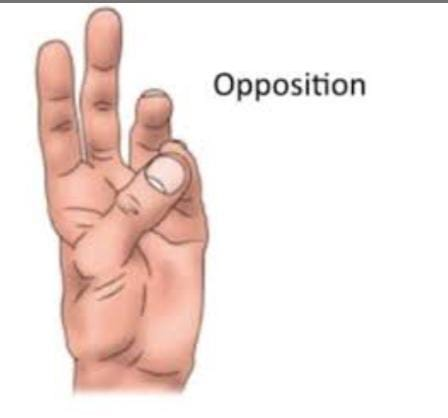
Apposition is the movement of the thumb across the palm to touch the finger tips of the same hand.
15) Lateral flexion:
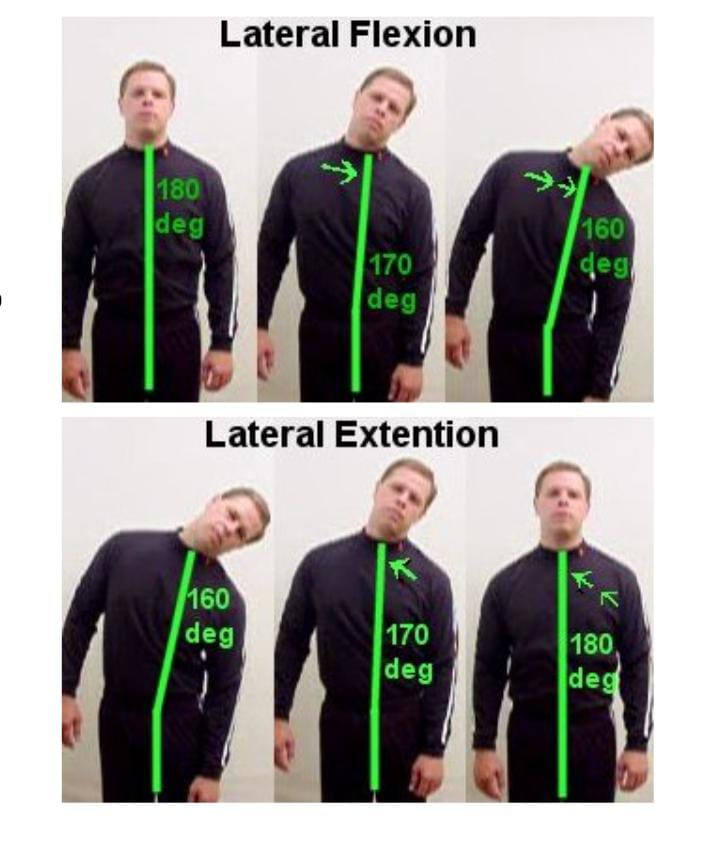
Lateral flexion occurs in the frontal plane. Movement of the trunk occurs in the frontal plane. It involves the intervertebral joints, e.g. Tilt the head as far as possible towards each side.
Types of movements in different parts of the body:
1) Neck: Flexion, extension, hyperextension, lateral flexion, rotation.
2) Shoulder: Flexion, Extension, Hyperextension, Abduction, Adduction, Internal Rotation, External Rotation, Circumduction.
3) Elbow: Flexion Extension.
4) Forearm: Supination, Pronation.
5) Wrist: Flexion, Extension, Hyperextension, Abduction, Adduction.
6) Fingers: Flexion, Extension, Hyperextension, Abduction, Adduction.
7) Thumb: Flexion, Extension, Abduction, Adduction, Apposition.
8) Hip : Flexion, Extension, Hyperextension, Adduction, Abduction, Internal Rotation, External Rotation, Circumduction.
9) Knee : Flexion, Extension.
10) Ankle : Dorsal flexion, plantar flexion.
11) Foot: Inversion, eversion.
12) Toe: Flexion, extension, abduction, adduction.
Body position:
Positioning :
The purpose of positioning a patient is to provide the patient with a position that allows the healthcare provider to properly perform the patient’s therapeutic intervention. To perform any medical procedure, a position is provided according to the procedure and the patient’s condition. The position of the patient is also provided to improve his health and to prevent the patient from immobility, disability and injury.
Purpose of position:
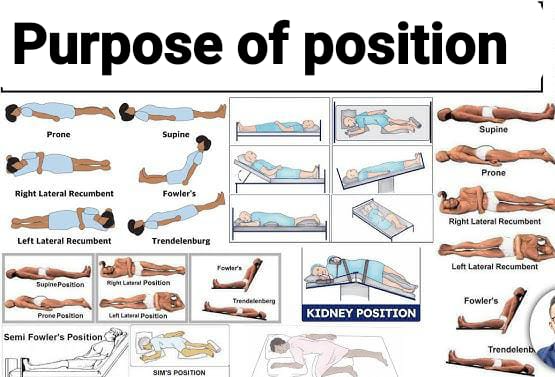
- To provide comfort and safety to the patient.
- To maintain the patient’s privacy and dignity by preventing unnecessary exposure of body parts.
- To improve circulation and prevent pressure ulcers and maintain skin integrity.
- Providing the patient with proper positioning keeps the patient’s airway open and circulation maintained.
- Body alignment is maintained properly and deformity formation can be prevented.
- Providing the patient with proper positioning also prevents nerve damage.
- Positioning is also provided for specimen collection.
- The patient is provided with a position to perform the surgical procedure properly.
- Proper position is also provided to conduct delivery or labor.
- Proper position is provided to provide any nursing intervention.
Guidelines for patient positioning positioning):
- Properly explain the position to the patient.
- Encourage the patient to assist in positioning as much as possible.
- Take help from family members if necessary while positioning the patient.
- Use mechanical aids such as a bed while positioning the patient. Beds, slide seats, slide boards, pillows, patient lifts and slings etc.
- Adjust the patient’s bed properly so that the patient does not suffer any injury and the nurses can maintain proper body alignment.
- Change the patient’s position frequently so that the condition of pressure ulcers can be prevented.
- Always lift the patient and avoid friction and shearing.
- Whenever providing a position to the patient, make sure that the bed sheet on the patient’s bed does not have any folds, creases, moisture and the bed sheet should be smooth. If there are creases in the bed sheet, then pressure sores can develop on the patient’s body.
Proper body mechanics:
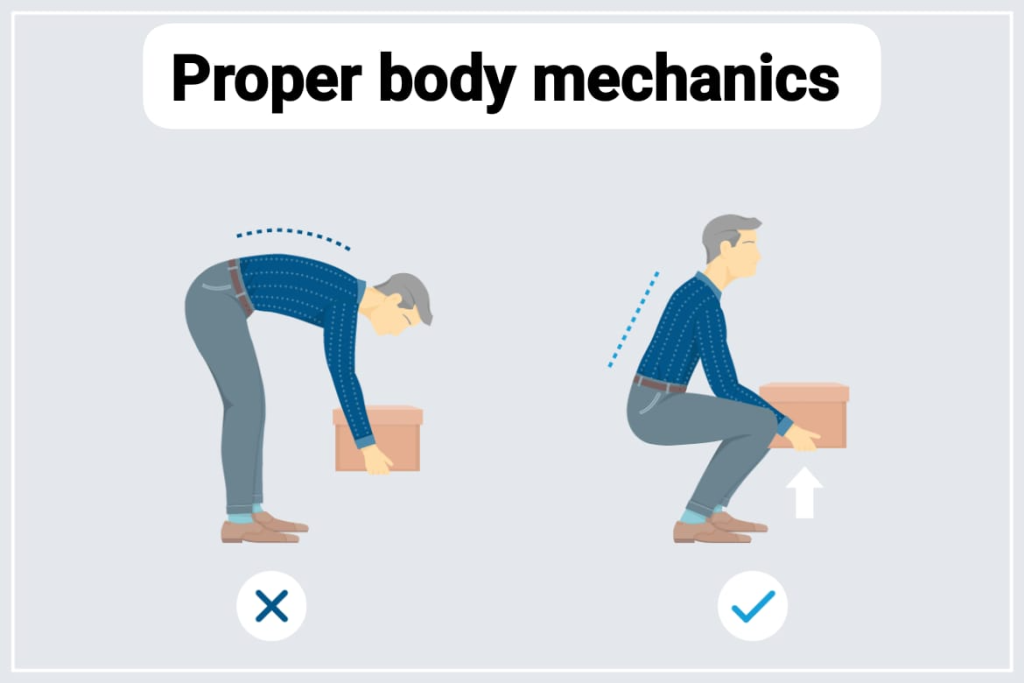
- Stay close to the patient while providing the patient with a position.
- Whenever providing the patient with a position Do not bend your back and neck while doing this.
- Stay close to the patient while providing the patient with a position.
- Do not bend the back and neck while providing the patient with a position.
- Bend the knees and do not bend the body too much and keep the feet slightly wide.
- Use the arms and legs to lift the patient, not the back. Then use the abdominal and gluteal muscles To properly tighten.
Position:
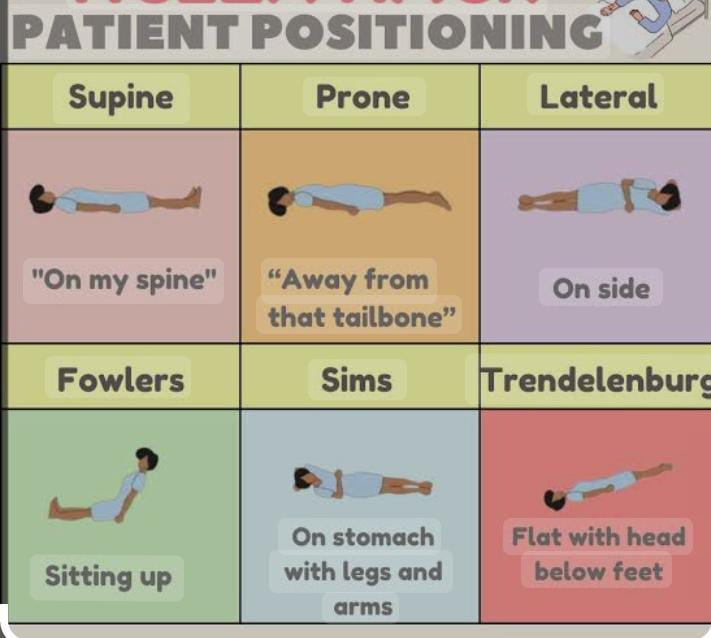
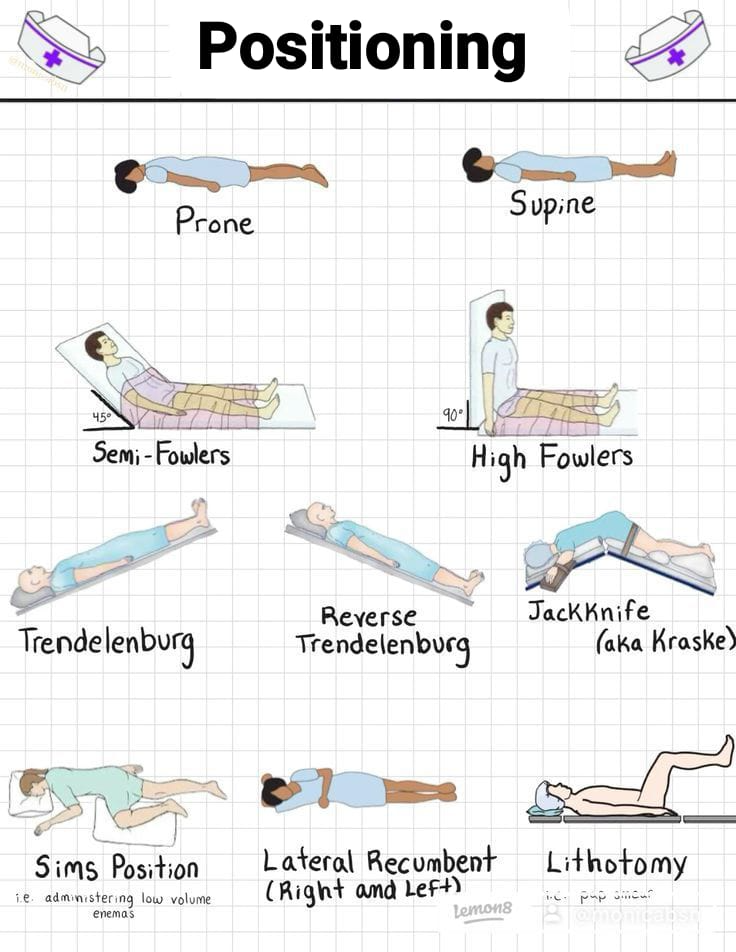
1) Supine position/ Dorsal/ Horizontal recumbent position:
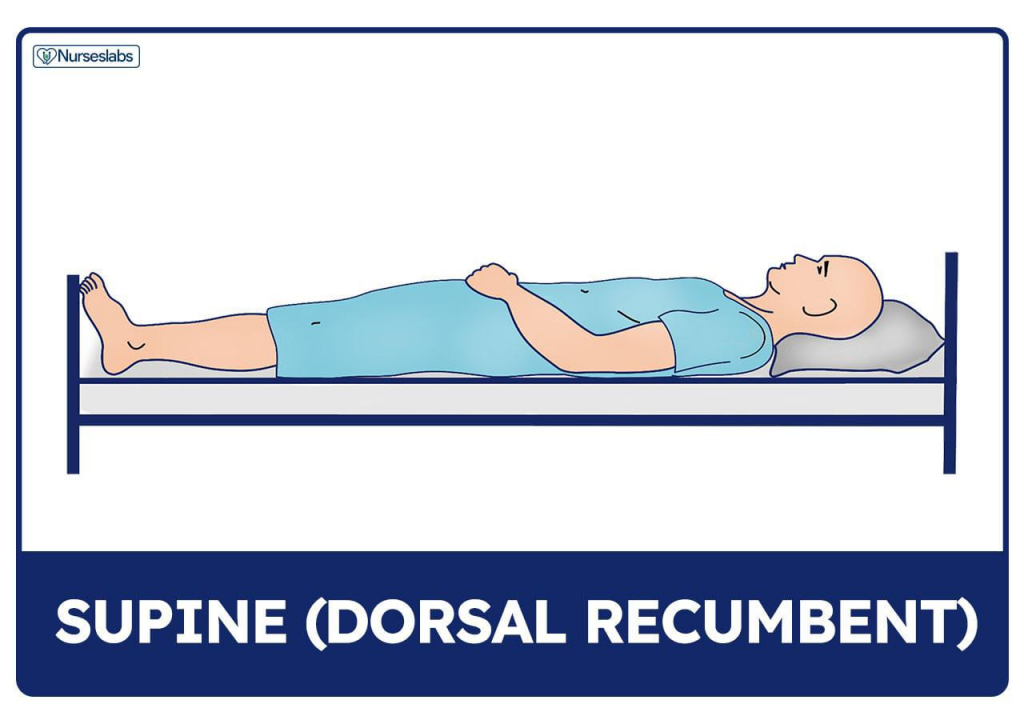
- Lie the client down on his back in the supine position.
- The legs can be slightly bent or kept straight depending on the patient’s condition.
- The arms can be up or down.
- In the supine position, the head can be supported by pillows and the legs can be either extended or slightly bent. A small pillow under the patient’s knees usually makes him comfortable. Providing air cushions under the elbows, heels, buttocks, and a cotton ring under the knees will prevent bedsores. In bedridden patients, foot drops are used to prevent the legs from dropping.
Use :
- The supine position is the most commonly used position. The patient is provided with a supine position when a head-to-toe assessment of the patient is being performed.
- The supine position is provided whenever the procedure is to be performed on the anterior side of the body, such as in the abdomen or thoracic area.
- The supine position is also provided for some cardiac procedures, such as angiograms and cardiac catheterization.
Since a headache may occur due to leakage of cerebrospinal fluid (CSF) after a lumbar puncture is performed, the supine position is provided to minimize this risk. - If a procedure has been performed on the front part of the body, the patient is provided with a supine position so that the part that underwent the procedure can heal properly.
Check for :
- When the patient is provided with supine position, pressure ulcers may develop on the bony prominences of the patient’s body such as the heel, coccyx, thoracic vertebrae, scapula, occiput or nerve damage may also occur, so keep checking the bony areas of the patient’s body frequently and provide reposition to the patient.
- If spinal anesthesia has been provided or spine surgery has been performed, do not give the patient a pillow.
Contraindications:
- Respiratory distress
- Increase intracranial pressure.
2) Prone position:
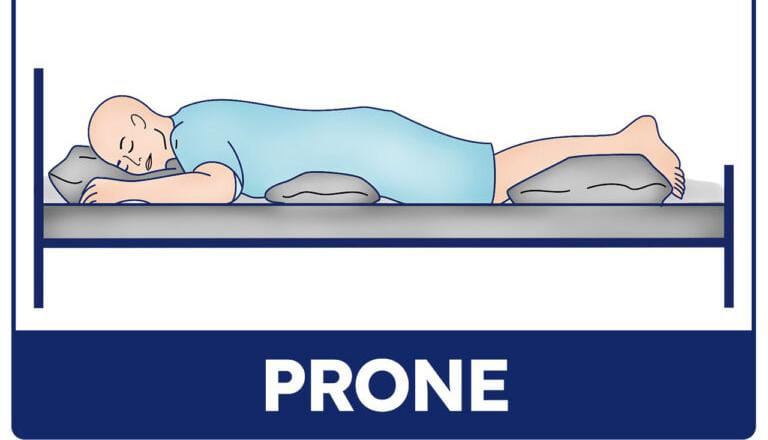
- The prone position is the opposite of the supine position. In which the patient is made to lie down on the back in the supine position while in the prone position the patient is made to lie down on the abdomen.
- In the prone position the patient is made to lie down on the abdomen and then the patient’s head is turned to one side.
- The patient is also provided with a pillow on which the patient can place his head and the patient’s legs are kept straight.
- The patient’s arms are kept in a comfortable position or even on an arm rest. is.
Use:
- The prone position promotes drainage and secretions, so the patient who is unconscious or the patient who is recovering from sedation is provided with the prone position so that his secretions can be drained.
- Patients with respiratory problems Prone position is also provided in the abdomen so that secretions can drain.
- Prone position is used to access the posterior thorax, hip joint.
- In the prone position, the patient’s back is visible, so if any surgery is to be performed on the posterior thorax (back) or if the patient has a burn or injury on the back side, then the prone position of the patient is provided in such a condition.
- Prone position is also provided for spinal surgery is.
- In patients who have had lower extremity amputations, there is a possibility of hip contracture, so to prevent this contracture, the patient is provided with a prone position.
Contraindications:
- Spine injury
- When abdominal surgery has been performed.
Check for :
Properly assess whether any pressure ulcers have developed on the patient’s bony prominences such as toe, knee, elbow, ear, eye.
3) Fowler position:
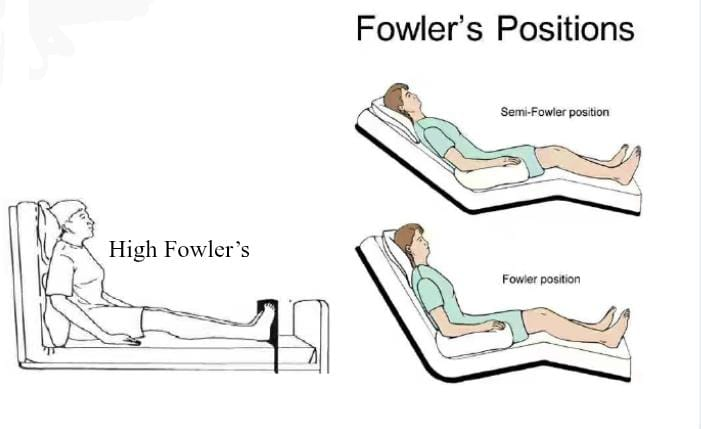
- Fowler position is similar to supine position but in Fowler position the patient’s head is elevated.
- Fowler position is also called semi-sitting position.
- Fowler position has four variations based on the angle is:
1) Low Fowler:
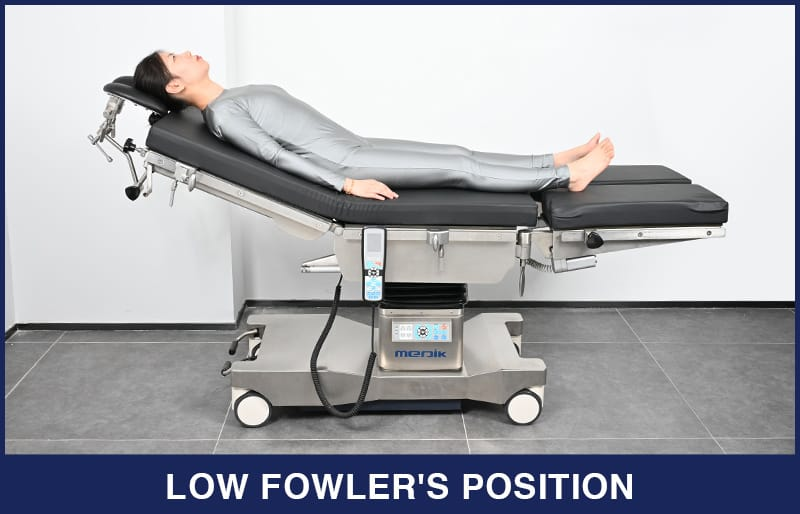
In Low Fowler, the patient’s bed is elevated by 15 to 30 degrees.
2) Semi Fowler:
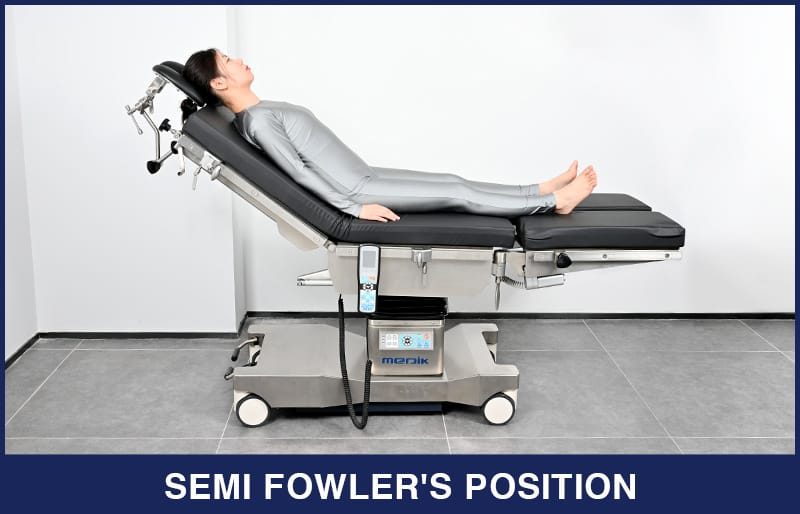
In semi-Fowler, the patient’s bed is elevated by 30 to 45 degrees.
3) Standard Fowler:
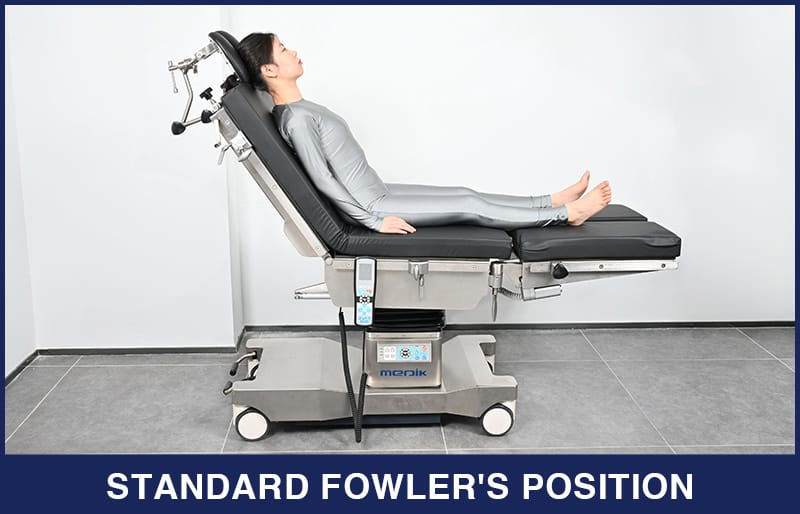
In standard Fowler, the patient’s bed is elevated by 45 to 60 degrees.
4) High Fowler:
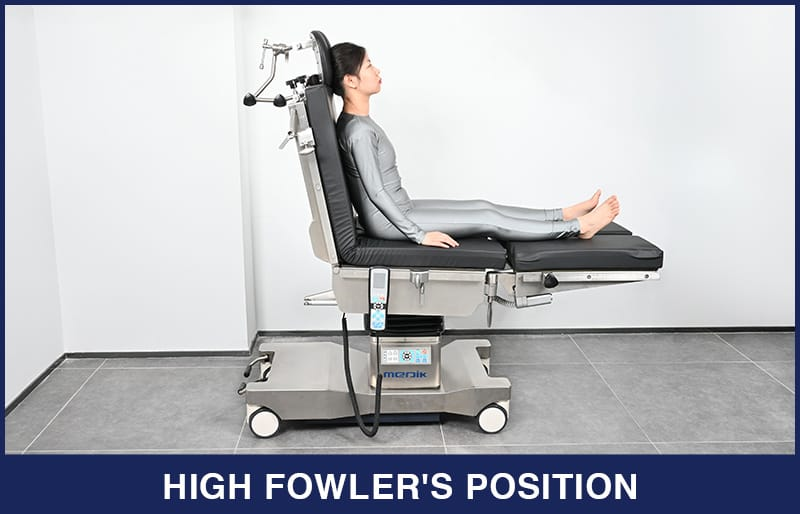
In high Fowler’s, the patient’s bed is elevated by 60 to 90 degrees.
Use :
Low Fowler Position (Low Fowler Position) :
- This position is used to provide a comfortable position to the post-procedure patient.
- To reduce lower back pain.
- When the patient is given drugs Low Fowler position is used during administration or tube fitting.
Semi Fowler, Fowler position used for:
- To relieve breathing difficulties.
- The semi-Fowler position is used to maintain intracranial pressure (ICP) and cerebral perfusion.
- To relieve suture tension on the abdomen.
- The Fowler position also helps in drainage of the abdominal cavity after abdominal surgery.
- To provide comfort to the mother during childbirth.
- It is also useful in the insertion of a nasogastric (NG) tube.
- It also increases cardiac output.
- It improves ventilation.
- The high Fowler position is used to manage anatomical dysreflexia.
Contraindications:
- This position cannot be provided when the patient has undergone any spine surgery.
Check for:
- After providing the patient with the Fowler position, if the patient is kept under the knee for a long time, there is a chance of deep vein thrombosis (DVT) occurring, so the patient’s Keep monitoring properly.
- In this position, the risk of pressure on the scapula, sacrum, coccyx, and back of the knee increases due to increased pressure on the lower body, so keep monitoring the patient properly.
4) Dorsal Recumbent position:
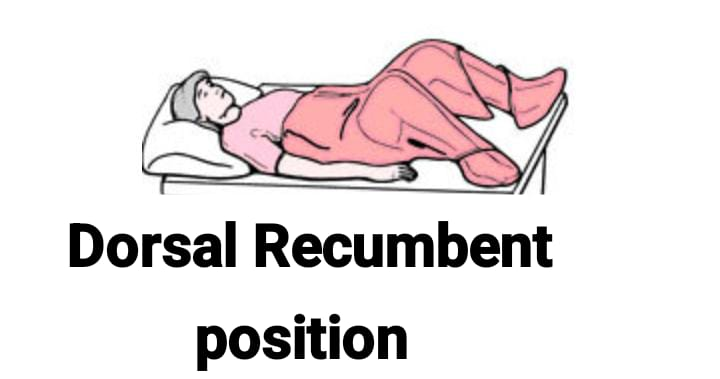
In this position, the patient is made to lie down on his back and is advised to keep the legs separate and his legs flexed at the knee. And the patient is advised to keep the sole of the foot on a flat surface i.e. bed or table. The patient is provided with a pillow under his head.
Use:
- This position is mainly provided during female catheterization.
- This position is also provided to the patient during vulval or vaginal examination.
- Perineal This position is also provided during care of the area.
- The dorsal recumbent position is also provided during vaginal operations.
- In the dorsal recumbent position, the legs are bent. Due to this bending of the legs, the abdominal muscles contract, so this position is not provided during abdominal assessment.
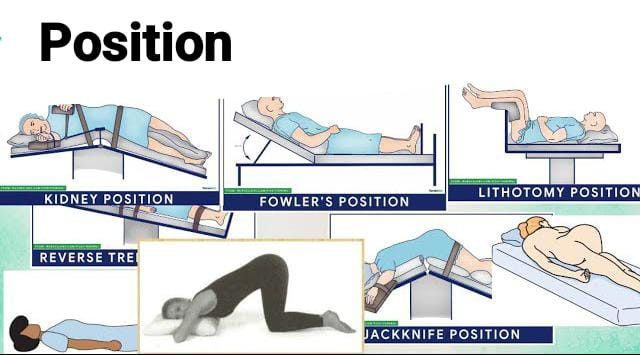
5) Lithotomy Position (Lithotomy position):
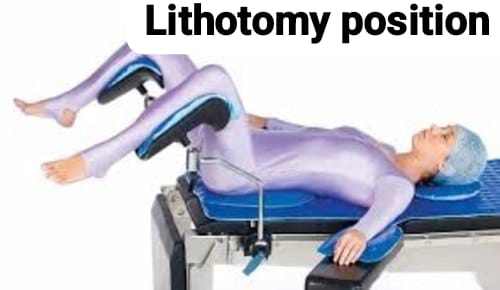
In this position, the patient is asked to lie down in a supine position and the patient’s legs are kept elevated on stirrups rather than on the bed. In this position, the patient’s hips are flexed, the calf muscles and heels do not touch the bed but are parallel to the floor, and the patient’s back is supine.
In this position, the patient’s buttocks are on the edge of the bed and the legs are placed on stirrups that provide support for the legs so that the patient can support his or her legs. In this position, the legs are well separated (thigh) and flexed from the hips and the legs are flexed from the thighs.
Types of Lithotomy Position:
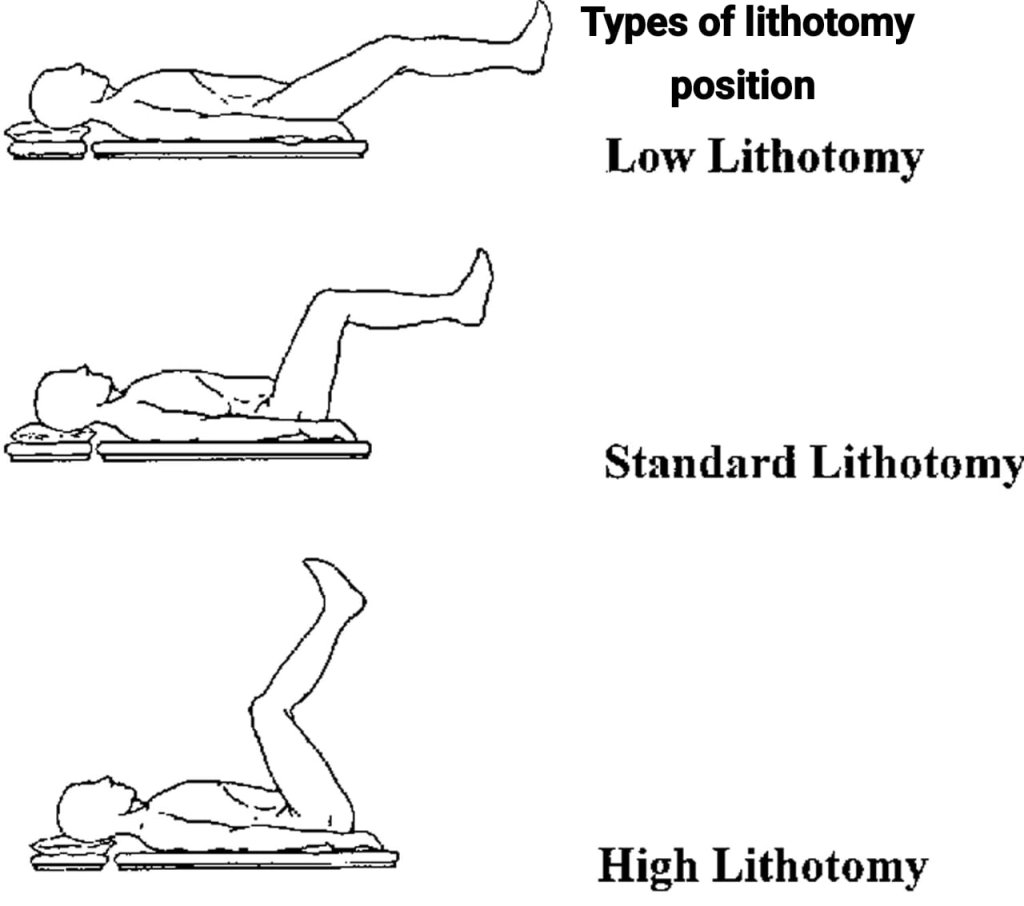
1) Low lithotomy:
In this position, the position of the legs is lowered by a small amount
2) Standard lithotomy :
The standard lithotomy position is provided to the patient during the procedure.
3) High lithotomy :
In high lithotomy, the lower legs are highly elevated. Therefore it is called high lithotomy.
Use:
- Lithotomy position is mainly provided for any gynecological examination or treatment.
- Lithotomy position is provided during labor.
- Lithotomy position is a urinary The lithotomy position is also provided to remove stones from the system or during procedures on the urinary system.
- This position is also provided for examination or operation of the rectal area.
Check for :
- Embolism,
- Nose damage due to stirrups.
6) Lateral or side lying position:
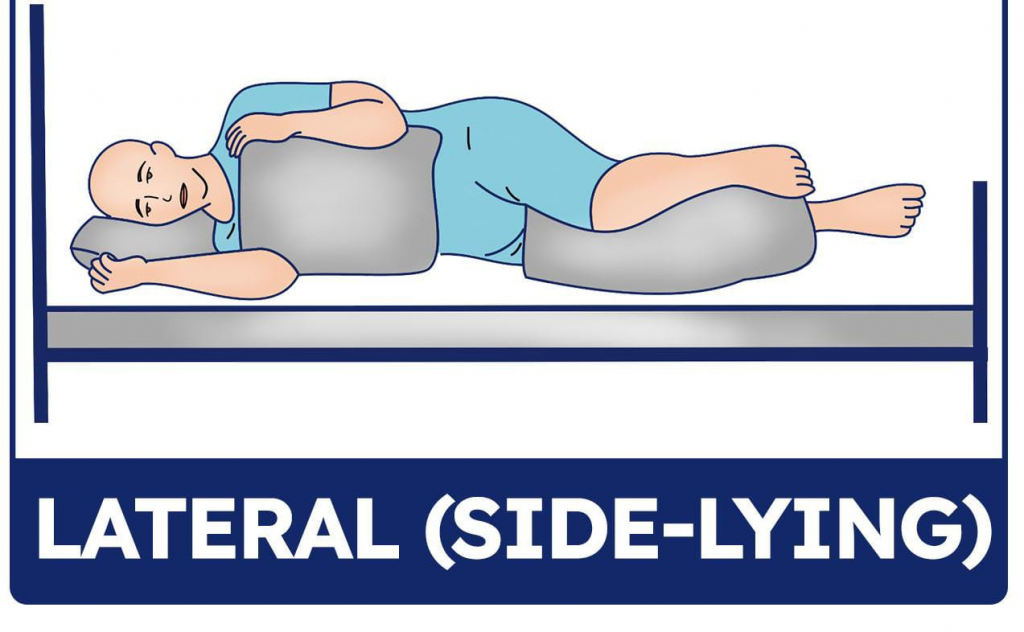
In this position, the patient lies down on one side, either the right side or the left side. In this position, the patient lies down slightly on his side with both knees flexed towards the abdomen, one knee bent more than the other. The pillow under the head supports the head, the pillow behind the back supports the back, the pillow in front supports the hands and abdomen, the pillow between the knees takes the weight of the upper leg. The left lateral position is similar to the lateral position but the pillow under the patient’s head is placed on the left side. Uses: This position is used to relieve pressure from the patient’s bony prominence area. This position is used to relieve pressure from the patient’s bony prominence area. This position is used to relieve pressure from the patient’s bony prominence area. /wp:list-item –>
Contraindications:
Avoid providing lateral position in patients who have undergone hip replacement and orthopedic surgery.
Check for :
Assess whether there is any pressure damage such as pressure on the ear, shoulder, elbow, hip and ankle.
It is commonly used to give enemas, suppositories, take rectal temperature and examine the rectum. is.
7) Sims Position (Semi Prone Position)(Sim’s Position):
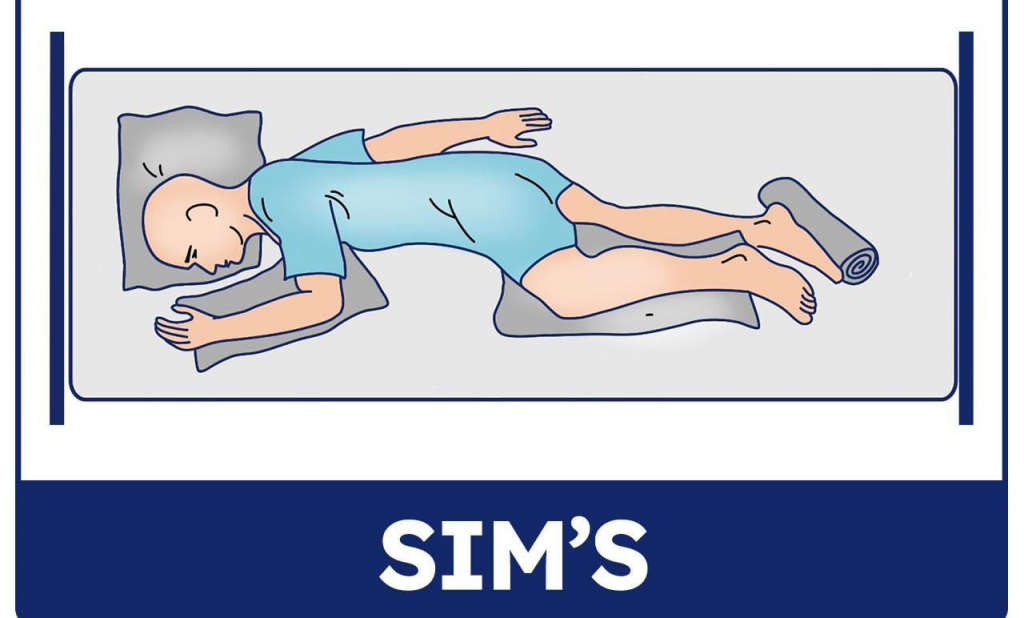
In this position, the patient is neither in a lateral position nor in a completely prone position, so the patient is in a position between the lateral and prone positions. In this position, the patient lies down on his left side. The patient’s left arm is behind the patient and his right arm is slightly flexed at the shoulder and elbow.
In this position, the patient’s right leg is slightly flexed at the knee and the knee and left leg are almost straight.
In the Seams position, if the patient is lying down on his left side, then the left position and if on the right side, then the left position. If lying down, it is called the right Sims position.
Uses:
- To prevent aspiration of fluid in an unconscious patient.
- For comfort in pregnant women.
- In the Sims position, the perineal area is properly visible. and the Sims position is also provided when administering an enema.
- The Sims position is provided for catheter insertion in some female patients who cannot tolerate the dorsal recumbent position.
- The Sims position is also provided to relieve pressure from the bony prominence area and is also used to relieve pressure damage.
Contraindications:
Do not provide this position if there is a deformity of the knee or hip.
Check for:
Assess for pressure damage on the ear, side of the heel, and ankle.
8) Trendelenburg Position:
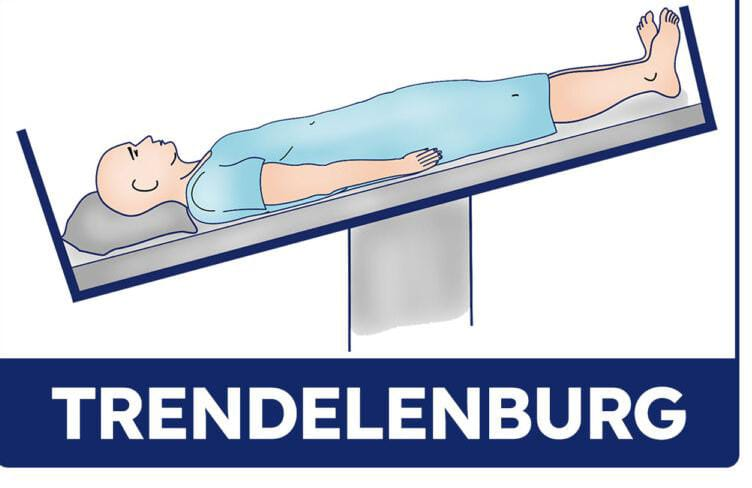
The Trendelenburg position is similar to the supine position, but the difference is that in the Trendelenburg position, the legs are elevated in comparison to the head. The head is in a lower position of 30 to 40 degrees than the feet and the legs are elevated at a 45 degree angle.
Uses:
- This position is used to prevent venous return in conditions of hypotension, shock, and hemorrhage. It is used to promote.
- If there is bleeding in the lower extremities, then the Trendelenburg position is also provided to reduce it.
- In some conditions, the intestine is displaced into the pelvic cavity, then in this condition, the Trendelenburg position is also provided to place the intestine from the pelvic cavity to the upper abdominal site.
- This position is also provided in postural drainage.
Check for:
This position should not be given to the patient for a prolonged period of time as it can increase intracranial pressure (ICP).
9) Reverse Trendelenburg Position:
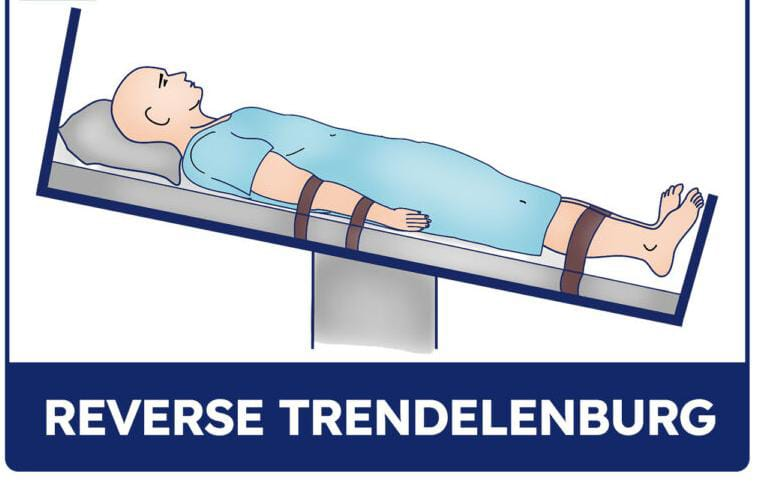
In this position, the head is up and the legs are downward. This position is opposite to the Trendelenburg position, so it is also called the reverse Trendelenburg position.
Uses:
- Gastroesophageal reflux disease (GERD) )
- To treat air embolism in the vein to promote perfusion in obese patients
- This position is used to prevent the condition of pulmonary aspiration.
10) Knee Chest position:
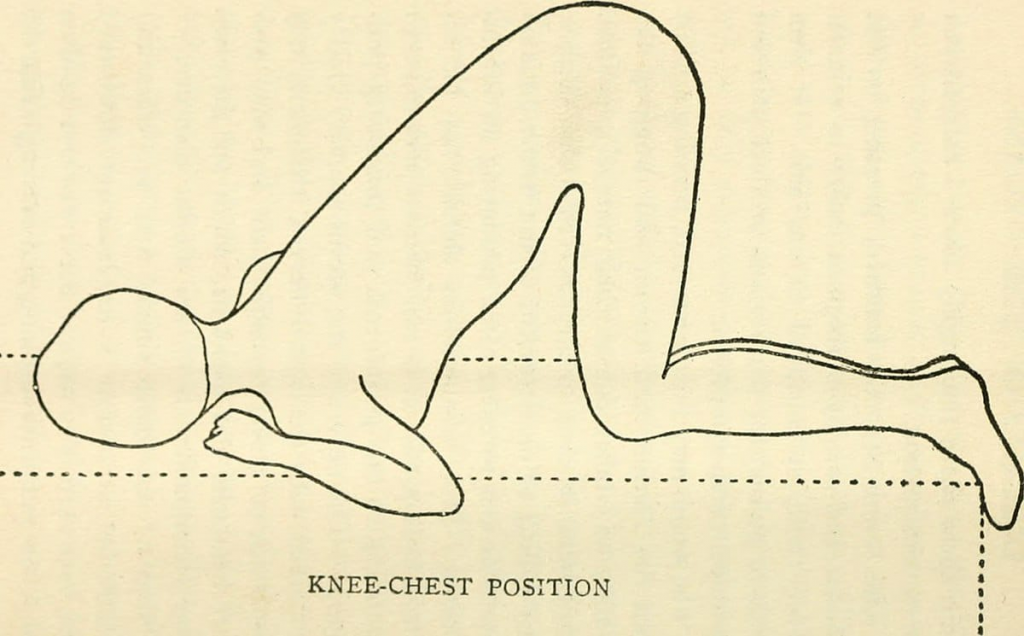
In this position, the patient is in a prone position with the knees and chest down. The knees are flexed, meaning they are at right angles to the legs. The patient’s head should be turned to one side and a pillow is provided under the cheek for support. A small pillow is also placed under the chest for support. The arms should be above the head with the arms flexed at the elbow. Uses: For rectal and vaginal examinations. For sigmoidoscopy. For the client.
Contraindications ( Contraindications ) :
- In patients with cardiovascular and respiratory problems.
Check for :
Check whether the client has arthritis or joint deformity.
Check whether the patient has pressure damage.
11) Orthopneic position or tripod position:
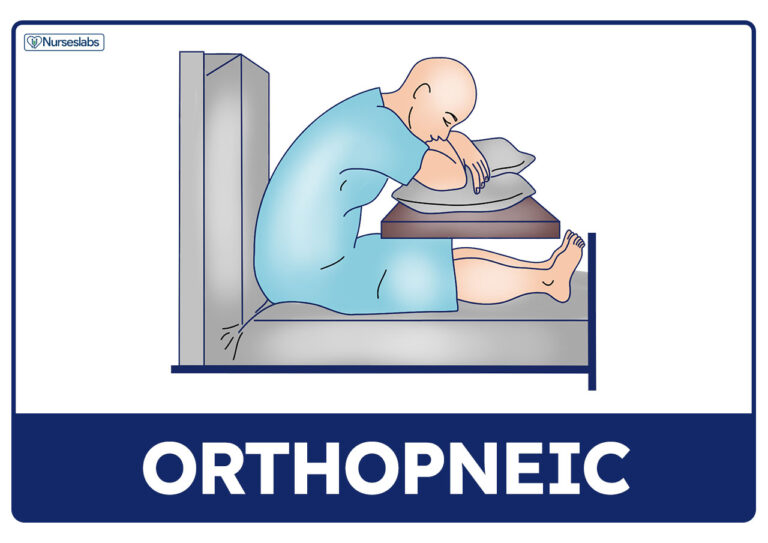
In this position, the patient is seated upright and placed on a table or bed facing forward with a pillow or support under the head and the head is pushed forward.
Use ( Use ) :
- For maximum lung expansion.
- To improve the overall ventilation of the patient.
12) Jackknife position:
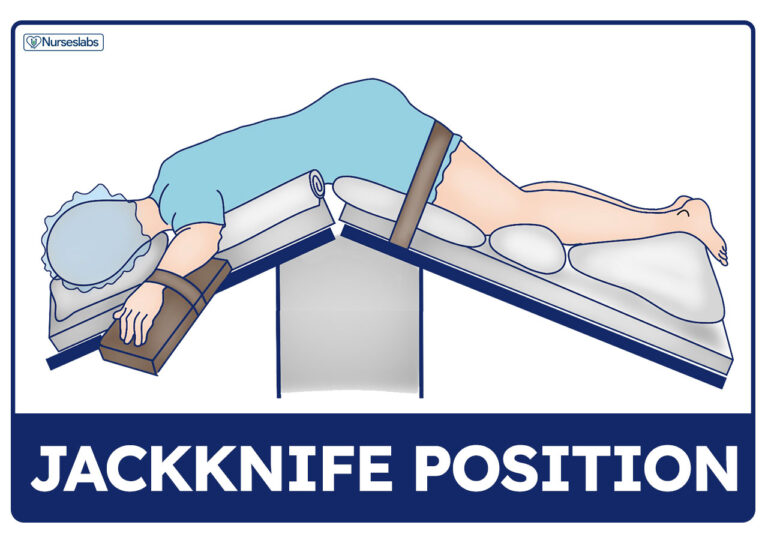
This position is called the crash position in which The patient is made to lie flat on the bed and the bed is raised from the middle part so that the patient’s hips are raised and the patient’s legs and head are facing downwards.
Uses:
This position is used in the anus, rectum, coccyx and some types of back surgery and adrenal surgery.
13) Kidney position:
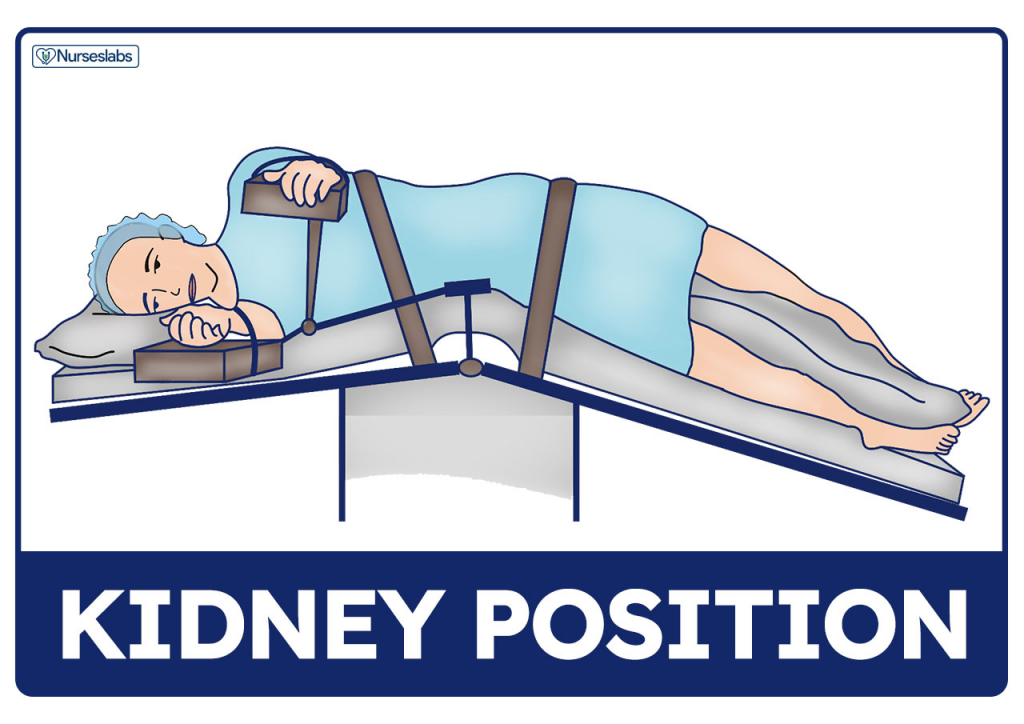
This position is also called the modified lateral position but this position is slightly modified. In this position, the abdomen is lifted towards the operating body.
Uses:
To examine the retroperitoneal area.
comfort devices (Comfort Device):
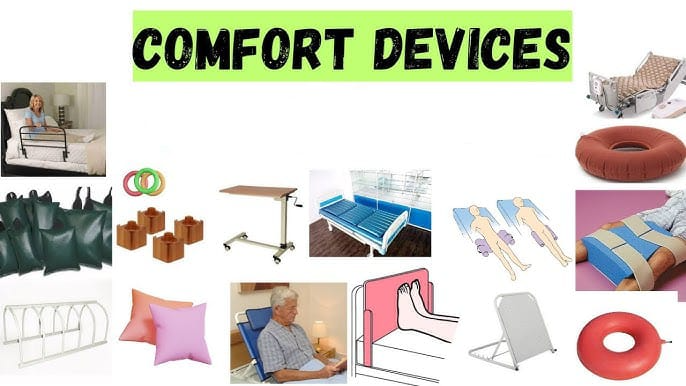
- A comfort device is a mechanical device that Provides optimal comfort to the individual.
- A comfort device is a type of article that is used to provide comfort to the patient and relieve discomfort. Apart from this, it is used to maintain correct posture.
- Many types of devices are used to provide patient comfort, which are as follows:
Enlist comfort device
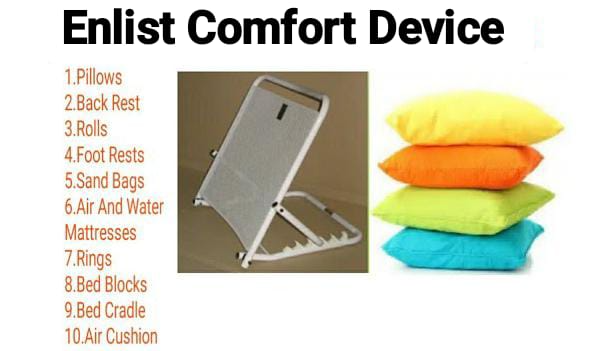
- Pillow
- Back rest (back rest)
- Bed cradle (bed cradle)
- Bed blocks
- Rubber and cotton ring
- Mattress
- Cardiac table
- Air cushion
- Sand bag
- Foot board
- Knee rest
- Hand roll
- Trapeze bar
- Trochanter rolls
- Side rails
Write purpose of comfort device
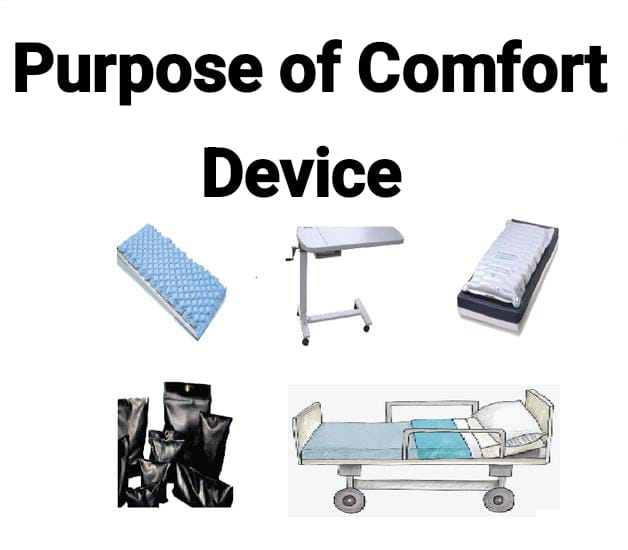
- To promote comfort.
- Relieve discomfort.
- Relieve pressure on a body part.
- Prevent bedsores.
- Immobilize a body part.
- Maintain correct posture.
- Prevent falls and accidents.
Pillow
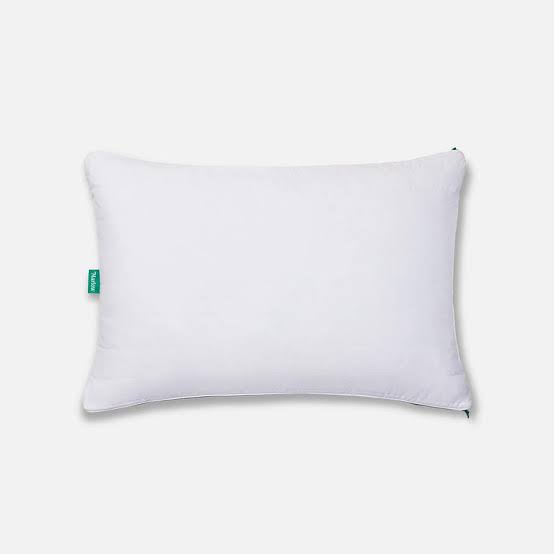
- A pillow is a type of comfort device that is useful for providing a comfortable position to the patient.
- A pillow is also used to support various parts of the body.
- A pillow can be folded, rolled, and tucked, so it can be used to maintain position.
- A pillow is also used to support the head, neck, arms, legs, and back.
- Also, the pillow relieves pain in the abdominal muscles and knee tendons.
Purpose:
- To maintain proper body alignment.
- To support body parts in good alignment
- To reduce pressure.
- To relieve pain.
Back rest
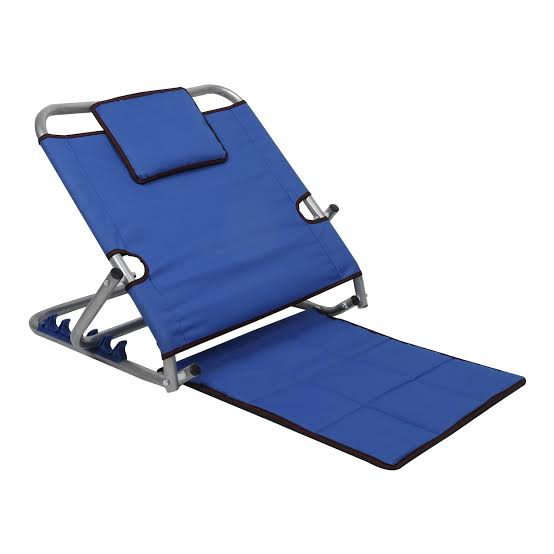
- A back rest is a mechanical device that provides support and rest to the back of a patient in a sitting position.
- The back rest can be adjusted to the desired angle.
- The back rest is used to elevate and support the head and back. is.
- Back rest is used in patients with cardiac and pulmonary diseases.
Purpose :
- To provide back support
- To relieve dyspnea.
- To provide easy breathing facility.
Bed cradle
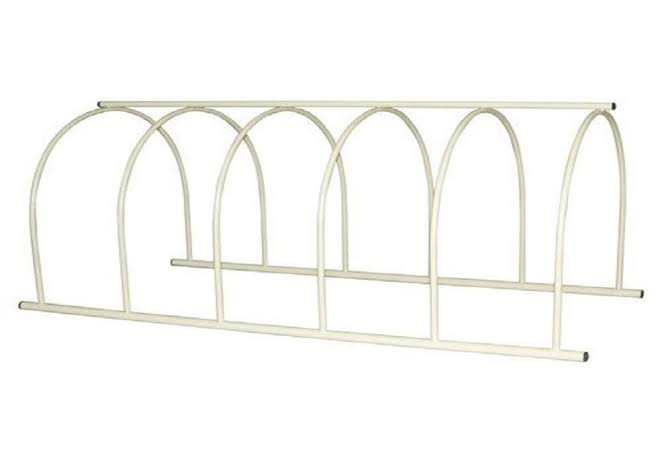
- A bed cradle is a semi-circular shaped comfort device used to take off the weight of bed linen.
- Bed cradles come in different sizes and materials.
- Such as wooden, metal, electronic
- Bed cradles are mainly used in burn patients. Comes.
Purpose:
- To prevent pressure from weight linen
- To prevent bed linen from coming into contact with the patient. Especially in burn patients
- For applying heat to dry plaster casts and other cases.
Bed blocks

- Bed blocks are mostly made of wood. Which is high or low.
- Bed blocks are placed under the foot of the bed.
- Bed blocks are mainly used after spinal anesthesia and tonsillectomy.
Purpose :
- Prevent shock To do
- Provide traction
- Arrest hemorrhage
- Retain enema
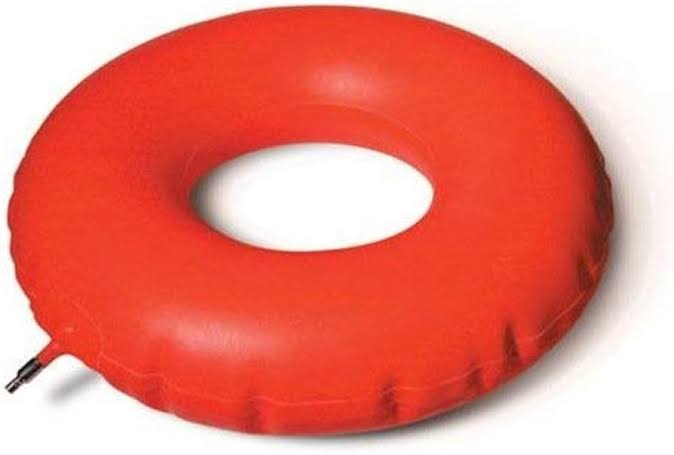
Rings
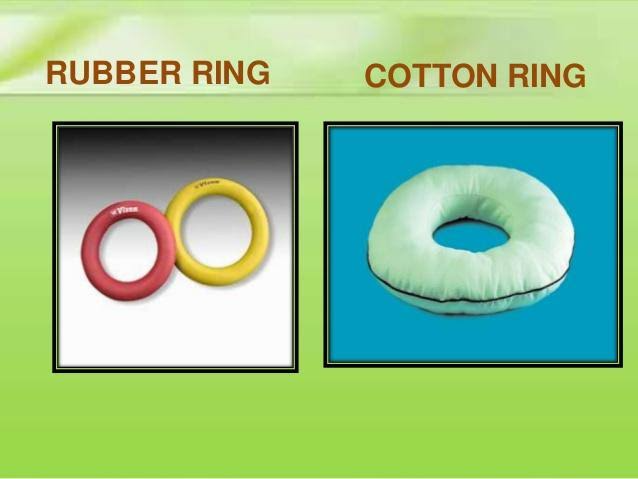
- An air ring is a type of comfort device made of circular rubber and cotton. It is inflated with air. It is also checked for leakage.
- This air ring is placed under the patient’s hip and under the bony prominence area
Purpose :
- To prevent bedsores
- On the bony prominence area To relieve direct pressure
- To improve circulation
Air mattress & water mattress (air mattress and water mattress)
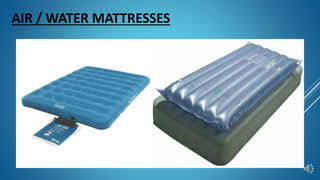
- An air mattress is inflated with air while a water mattress is filled with water. is.
- Air and water mattresses are used in very thin and obese patients who are prone to developing pressure sores.
- These mattresses help distribute the body weight equally in all directions, preventing pressure on any one body part.
- Air and water mattresses are made of plastic with two sets of chambers.
- These mattresses are It is placed on the bed and covered with a light bottom cloth.
Purpose :
- To improve circulation
- To prevent pressure sores
- To provide comfort
Air cushion
- An air cushion is a round-shaped ring-like structure made of rubber, which is inflated with air.
- An air cushion is a round-shaped ring-like structure made of rubber. Which is inflated with air.
- Air cushions are used to take off the weight of the body.
- Air cushions cannot be applied directly in contact with the skin, so they are covered with a cover.
Purpose (Purpose) :
- To take off body weight
- To relieve pressure on some part of the body
Sand bag (Sand bag)
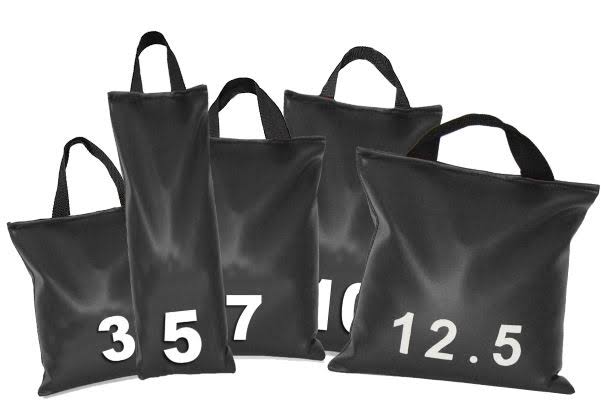
- A sand bag is a sand-filled canvas, rubber or plastic bag.
- A sand bag can be used in place of a trochanter roll.
- Sand bags are available in different weights.
Purpose :
- To provide proper shape and support to the body
- To relieve discomfort
- To immobilize body parts and extremities.
- Maintain proper body alignment.
- Provide support to fractured bones.
Foot board
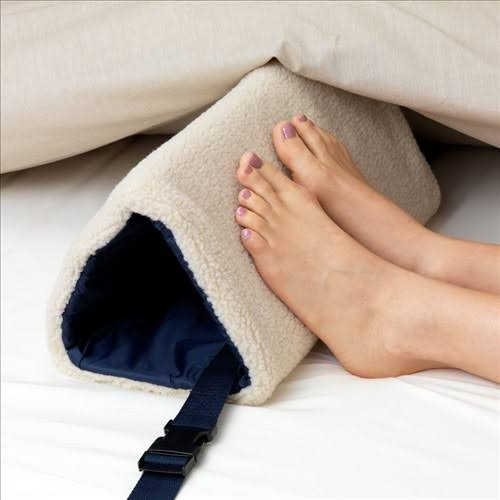
- A foot board is also known as a foot rest.
- A foot board is a flat panel or board made of plastic or wood.
- Which is used to provide a foot rest.
- The foot board is placed parallel to the plantar surface and perpendicular to the mattress as it touches the patient’s foot.
Purpose :
- To maintain the normal position of the foot.
- To prevent plantar flexion of the foot.
- Prevent foot drop.
- Promote comfort.
Knee rest
- A knee rest is used instead of a pillow.
- A knee rest is placed under the knee and provides comfort to the knee.
- A knee rest is used instead of a pillow.
- A knee rest is placed under the knee and provides comfort to the knee.
- Many doctors discourage the use of knee pillows because of the fear of thrombus formation.
Purpose :
- To provide rest to the knee
- To relax the tendons under the knee and relieve knee pain.
Hand rolls
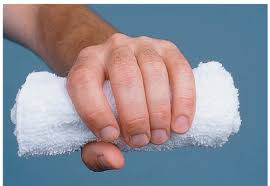
- A hand roll is a cylinder-shaped comfort device made of cloth. Which is 4-5 inches long and has a diameter of 2-3 inches.
- A hand roll is a cloth rolled and folded and stiffened firmly.
- This roll is placed against the palmar surface.
- A hand roll is mainly used to keep the thumb and fingers in a slightly flexed position.
Purpose:
- Used to keep the thumb slightly adducted and opposite the finger.
- Maintain the finger in a slightly flexed position
Trapeze bar
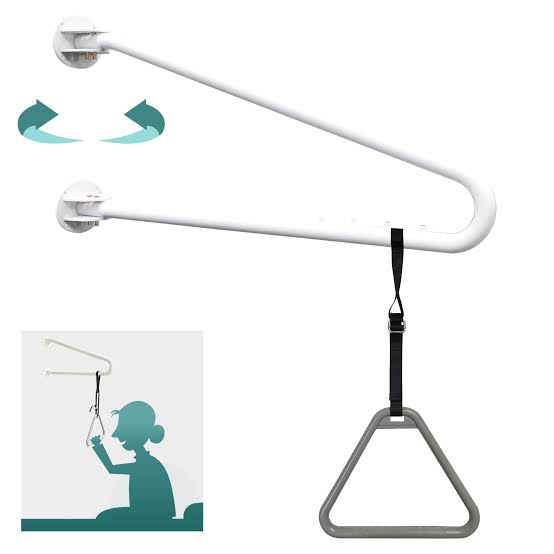
- An overhead trapeze bar is a metal bar in the shape of a triangle. Which is connected to a metal frame that is attached to the headboard and footboard of the bed.
- This triangular metal part is on the top of the bed and is used to move the patient and to support the weight while changing the patient’s position.
Side rails
Side rails are a type of bar (side). Which is installed on either side of the bed. Which is the length of the bed. Fall down can be prevented by using side rails. Also, the side rails assist the patient in moving easily.
Purpose:
- To prevent fall down
- To provide safety to the patient
- To increase mobility
- Assist in rolling from side to side and sitting up from bed
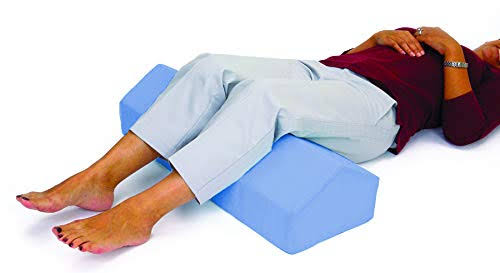
Wedge / abductor pillow
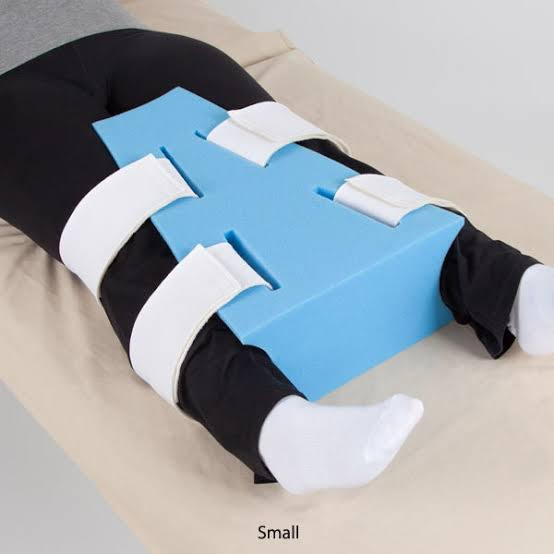
This is a triangular shaped pillow. Which is made of heavy foam.
Purpose:
To maintain the leg in the abduction position after hip replacement surgery
Cardiac table
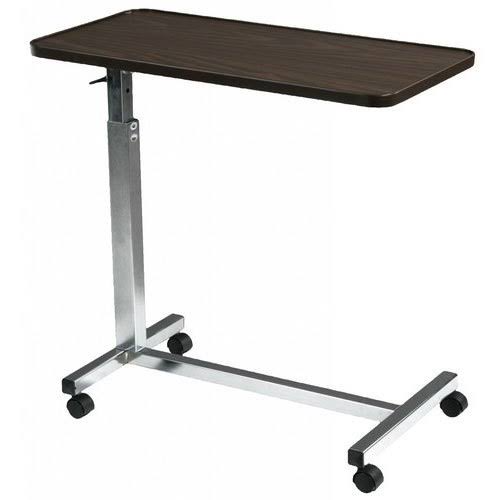
This is a kind of table-like structure. Which is placed in front of the patient on the bed. On which pillows are kept so that the patient can rest and lean forward. Without pillows, this table is used for meals and writing. This table is mainly used in cardiac patients and asthma patients.
Purpose :
- The patient can rest on this table with the help of a pillow.
- It helps the patient in eating and writing.
Bed Making:
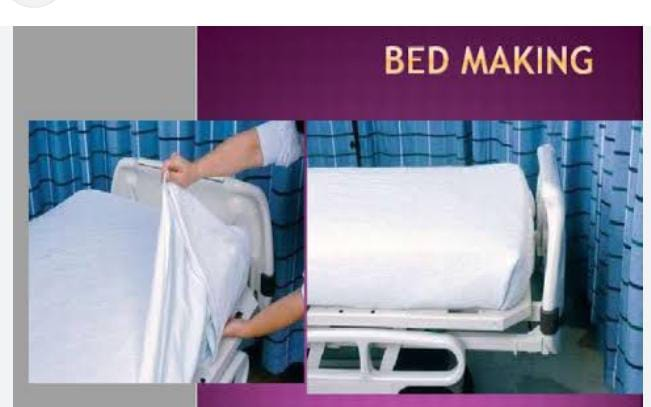
- Bed Making is the process of making a clean and neat bed for a patient in a hospital. The procedure of making is.
- Bed making is a procedure or technique in which various types of beds are prepared to make the patient comfortable according to the situation and procedure.
- In health care facilities, the patient is partially or completely confined to the bed.
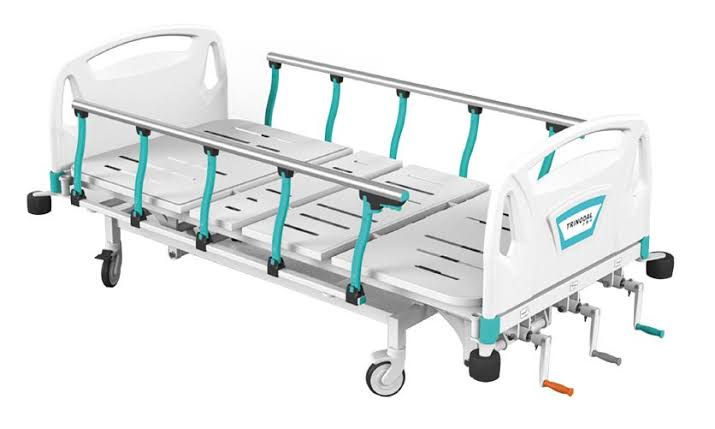
- The bed helps provide comfort and correct posture to the patient. It also provides the right height and accessibility for caregivers. The ideal bed is durable, lightweight, easy to move And it is easy to clean.
- The most commonly used bed in healthcare facilities is one that adjusts to a different position. (This is called a gurney bed). This bed is equipped with an electric mechanism that lowers the entire bed so that the patient can easily get in and out and the caregiver can raise the bed for easy caregiving. The mechanism can also lower and raise the head and foot of the bed. Often, both the patient and caregiver can use the controls to adjust the bed as desired. Typically, controls for the TV, reading light, and nurse call are involved in the bed controls. (In some areas, the gach adjustment can be operated using a hand crank.)
Definition:
- A hospital bed is a piece of equipment used by hospitalized patients in a hospital.
- A hospital bed is a long-term care facility and patient It is also found in the home.
- The ideal hospital bed should be selected for its effect on the patient’s comfort, safety, medical condition and ability to change position.
Bed Making:

Bed making is an important nursing technique for preparing different types of beds for patients to ensure comfort and a useful position for the patient’s particular condition. The bed should be adaptable to different positions as per the needs of the patient as they spend various time in the bed.
Bed making is the procedure of making a neat and clean bed for the patient in the hospital.
Purposes of Bed Making:

- The main purpose of bed making is to prevent complications by providing safety, security and comfort to the patient.
- To provide the patient with a safe and comfortable bed for rest and sleep.
- To provide a neat and clean appearance of the ward or unit to the patient.
- To prevent complications by providing physical and psychological comfort to the patient.
- To adapt to the needs of the patient and to be ready during any emergency or critical condition of the patient’s illness.
- To provide a neat appearance of the patient’s unit.
- To economize time, materials and effort.
- To form an effective nurse-patient relationship.
- To prevent bedsores.
- To provide active and passive exercises to the patient.
- To observe the patient for: the presence of bedsores, oral hygiene, the patient’s ability to self-care, and the ability to observe during bed-making. Can be done.
- To promote freshness and cleanliness.
- To promote cleanliness.
- To establish an effective nurse-patient relationship.
- To provide active and passive exercises to the patient.
- To help relatives understand how to care for a sick patient at home. For.
- To maintain proper posture/body alignment of nurses during bed making.
- To observe, prevent and identify patient complications.
- To accommodate patient needs.
- To reduce patient exertion through bed making.
- Patient’s body To remove skin irritation from.
- To properly dispose of soiled and dirty linen.
- Another purpose of bed making is to save time, effort and materials properly.
Principles of bed making:
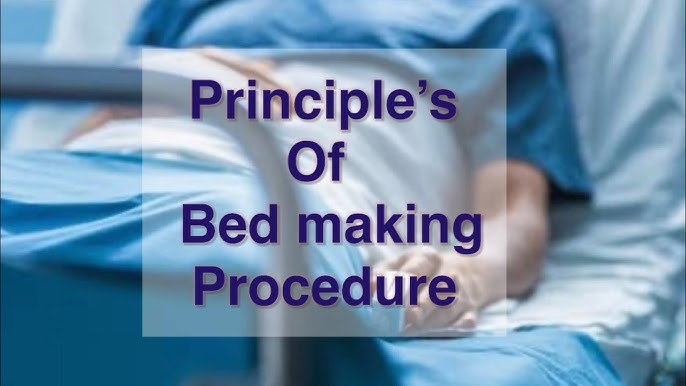
- To prepare all the beds in the nursing unit the same for uniformity of appearance.
- Microorganisms are the articles on the skin of the patient To prevent the transfer of microorganisms, which are present everywhere in the environment and in the environment, through direct or indirect contact, and to prevent the multiplication of microorganisms
- અપીરિયન્સ ની યુનીફોર્મીટી માટે નર્સિંગ યુનિટમા બધા બેડ એકસરખા પ્રીપેર કરવા માટે.
- માઇક્રોઓર્ગેનિઝમ એ સ્કીન પર પેશન્ટ જે આર્ટીકલ્સ નો યુઝ કરે છે તેમાં તથા એન્વાયરમેન્ટમા બધી જ જગ્યાએ પ્રેઝન્ટ હોય છે તે માઇક્રોઓર્ગેનીઝમ્સ એ ડાયરેક્ટ અથવા તો ઇનડાયરેક્ટ કોન્ટેક્ટ દ્વારા ટ્રાન્સફર થતા પ્રિવેન્ટ કરવા તથા માઇક્રોઓર્ગેનિઝમ્સ નું મલ્ટિપ્લિકેશન થતું પ્રિવેન્ટ કરવું
- પ્રોપર્લી રીતે બનાવેલો બેડ એ કમ્ફર્ટેબલ, તેમા વ્રિંકલ્સ ના હોવી જોઇએ, પેશન્ટની કોઇ પણ સ્પેસિફિક નીડ હોય તો તે રેડીલી અવેઇલેબલ હોવી જોઇએ.
- એક સેફ અને કમ્ફર્ટેબલ બેડ એ પેશન્ટ ને રેસ્ટ, સ્લીપ પ્રોવાઇડ કરશે અને પ્રોપર્લી પ્રીપેર કરેલ બેડ એ પેશન્ટ ને ઘણી કોમ્પ્લીકેશન્સ ને પ્રિવેન્ટ કરે છે.જેમ કે, બેડ સોર, ફુટ ડ્રોપ્સ વગેરે.
- જ્યારે બેડ મેકિંગ કરતા હોય ત્યારે ગુડ બોડી મિકેનિક્સ યુઝ કરવી તથા દરેક મુવમેન્ટ પર્પઝ ફૂલ કરવી જોઇએ.
- પ્રોપર બોડી મિકેનિક્સ મેઇન્ટેઇન કરવાથી બોડી અલાઇમેન્ટ મેઇન્ટેન રહે છે અને ફટીગ ને પ્રિવેન્ટ કરી શકાય છે.
- સિસ્ટેમેટીક વે મા ફંકશન કરવાથી ટાઇમ, એનર્જી અને મટીરીયલ એ સેવ થાય છે.
- બધા લીનન ને પ્રોપર્લી ઓર્ડર મા હેન્ડલ કરવા જોઇએ જેથી માઇક્રોઓર્ગેનિઝમ્સ ને સ્પ્રેડ થતા પ્રિવેન્ટ કરી શકાય.
- ક્લીન અથવા સોઇલ થયેલા લીનન ને શેક કરવા નહીં અથવા કાઢશો નહીં.
- સોઇલ્ડ લિનન ને તમારા યુનિફોર્મ થી દૂર રાખવુ અને તેને લોન્ડ્રી હેમ્પરમા મૂકવા.
- હોસ્પિટલના દરેક નવા પેશન્ટ ને ક્લીન બ્લેન્કેટ પ્રોવાઇડ કરવું.
- લોન્ડરિંગ ની સેફ્ટી અને ઇકોનોમીક માટે કોટના લીનન નો યુઝ કરવો.
- આર્મી મેડિકલ ડિપાર્ટમેન્ટ ની નીતિ ને પોલીસી ને, બધા મેટ્રસ અને પીલો પર પ્લાસ્ટિકના પ્રોટેક્ટીવ કવર નો યુઝ કરવો(જરૂર મુજબ બોટમ અથવા ફાઉન્ડેશન શીટ ને પ્રોટેક્ટ રાખવા માટે રબર અથવા લેમિનેટેડ કોટન ડ્રો શીટ નો યુઝ કરવો).
- જ્યારે સ્ટાન્ડર્ડ કોટન બેડસ્પ્રેડ ઉપલબ્ધ ન હોય, ત્યારે બ્લેન્કેટ કવર તરીકે ટોચની શીટનો યુઝ કરવો.
બેડ ના ટાઇપ્સ (Types of beds) :

1.ઓપન બેડ (Open bed)
2.ક્લોઝ બેડ/અનઓક્યુપાઇડ બેડ (Close bed/unoccupied bed)
3.એડમીશન બેડ (Admission bed)
4.ઓક્યુપાઇડ બેડ (Occupied bed)
5.કાર્ડિયાક બેડ (Cardiac bed)
6.ફ્રેક્ચર બેડ (Fracture bed)
7.પોસ્ટ ઓપરેટિવ બેડ (Postoperative bed)
8.એમ્પ્યુટેશન બેડ/ સ્ટમ્પ બેડ (Amputation bed/stump bed)
9.ઓર્થોપેડિક બેડ (Orthopedic bed)
10.બર્ન બેડ (Burn Bed)
→
1.ઓપન બેડ (Open bed)
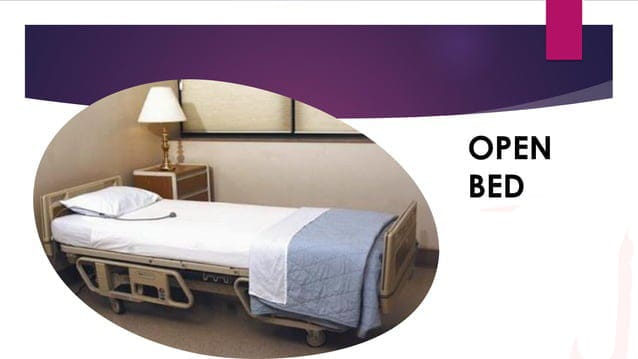
ઓપન બેડ શબ્દનો યુઝ એ હોસ્પિટલના બેડ ને સૂચવવા માટે થાય છે જ્યારે બેડ એ પેશન્ટ દ્વારા ઓક્યુપાઇડ કરવામાં આવે છે. જ્યારે ન્યુ પેશન્ટ અથવા એમ્બ્યુલેટરી પેશન્ટ દ્વારા બેડ ઓક્યુપાઇ કરવામાં આવે ત્યારે બનાવવામાં આવેલ બેડ હોય તેને ઓપન બેડ કહેવાય છે.ઓપન બેડ શબ્દનો યુઝ એ હોસ્પિટલના બેડ ને ડિઝાઇન કરવા માટે થાય છે જ્યારે તે ક્લાયન્ટ દ્વારા ઓક્યુપાઇ કરવામાં આવે છે.
2.ક્લોઝ બેડ/અનઓક્યુપાઇડ બેડ (Close bed/unoccupied bed)
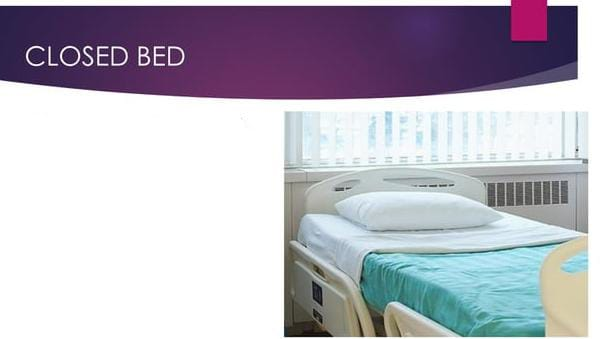
A closed bed/unoccupied bed is an empty bed in which the top covers are arranged in such a way that all linen under the spread is completely protected from dust and dirt while the patient is waiting. A closed bed that remains empty until another patient is admitted. On admission of the patient, the closed bed is converted into an open bed.
3.Admission bed
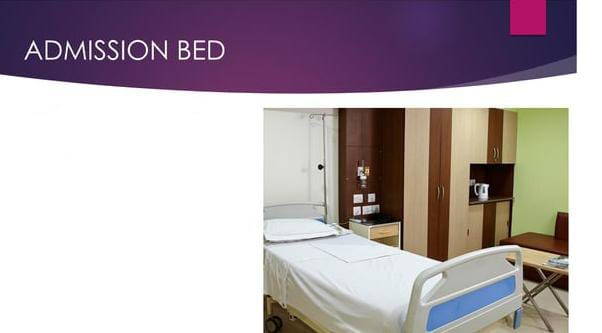
This is a bed that is prepared to receive newly admitted patients.
Admission bed is a bed specially made for patients who are admitted to the ward. It is made in such a way that the patient or client is admitted without delay.
4. Occupied bed
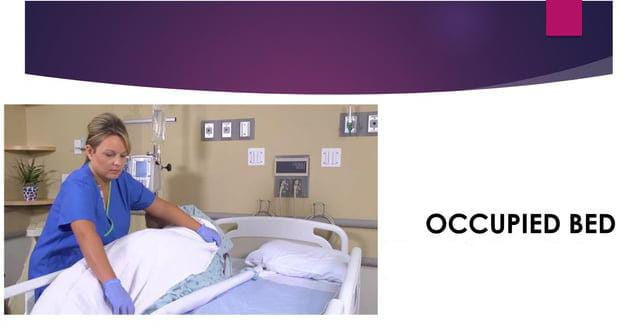
An occupied bed is a bed that is made as if the patient is on the bed. An occupied bed is one where the patient is physically available in the bed or the bed is retained for the patient. An occupied bed is made while the patient is still in the bed.
This is to make the bed with the patient (this bed is made for a patient who is unable to get out of bed.).
Purpose:
- Make the bed with the least possible discomfort to the patient.
- Provide a clean and tidy appearance.
- Prevent skin breakdown due to soiled linen.
- Handle bed linen skillfully while the patient is in bed.
- Form an active nurse-patient relationship For.
5. Cardiac bed
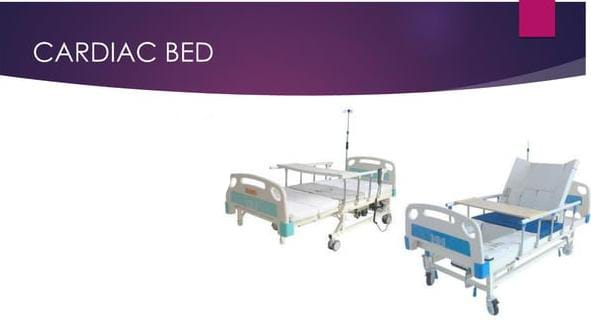
Cardiac beds are made for patients with cardiac disease. The cardiac bed is prepared in such a way that the patient can remain in a sitting position on the bed with the support of a pillow or table.
- Extra equipment required in a cardiac bed:
- Back rest,
- Cardiac table,
- Extra pillow,
- Foot board.
6. Fracture bed

A fracture bed is made for patients with fractured bones, diseased bones, or deformities. Fracture beds are used to provide firm support to patients with fractures of the legs or extremities by resting on a fracture board or bed board using a firm mattress.
Purpose:
- To immobilize the fractured part.
- To prevent sudden jerky movements.
- To maintain traction in proper position For.
- To prevent improper sagging of the mattress.
- Extra Equipment:
- Fracture board,
- Cover with sand bag,
- Bed Cradle,
- Extra puppy.
7. Postoperative bed
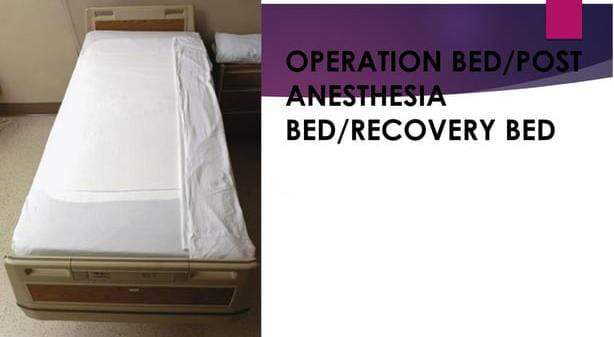
A post-operative bed is prepared for a patient who is recovering from the effects of anesthesia after a surgical operation. A post-operative bed or surgical bed is a special type of bed that is made for a patient who is recovering from an operation or other procedure in which anesthesia has been administered to the patient.
Additional Articles:
- Large Macintosh with towel,
- Vital sign tray,
- I.v. Stand,
- Oxygen cylinder,
- Compression apparatus,
- Hot water bag.
8. Amputation bed/stump bed bed)
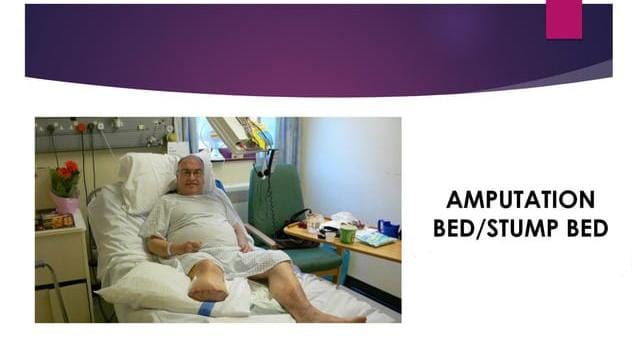
Amputation bed is prepared for a patient in which the body part of the patient that has been amputated can be properly visualized.
Purpose:
- To assess whether there is any hemorrhage in the stump.
- To maintain the stump in proper position.
9. Orthopedic Bed (Orthopedic bed)
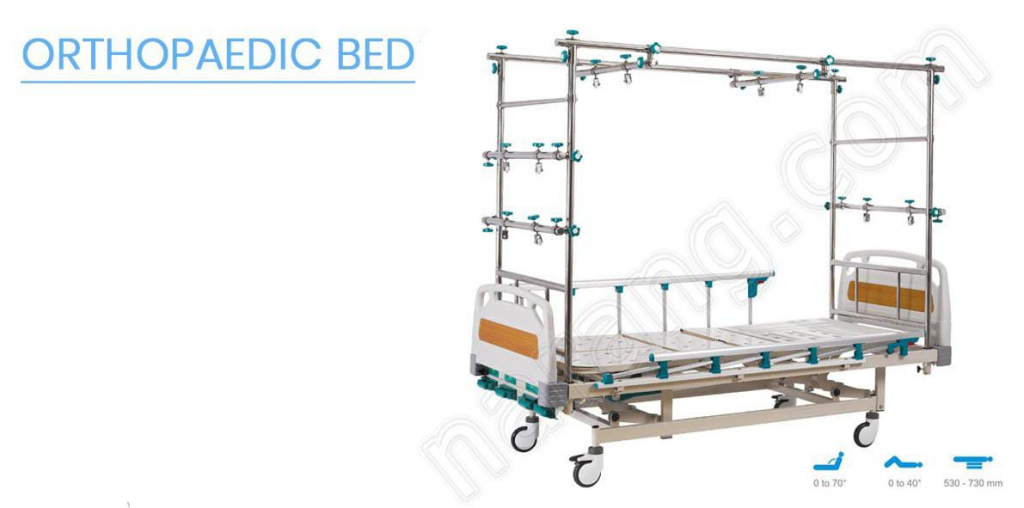
Orthopedic beds These types of beds are designed to provide support to the body in a way that helps with musculoskeletal health, especially for people with joint or back pain. Orthopedic beds usually have firm or medium-firm support to ensure proper alignment of the spinal cord while sleeping.
10. Burn Bed
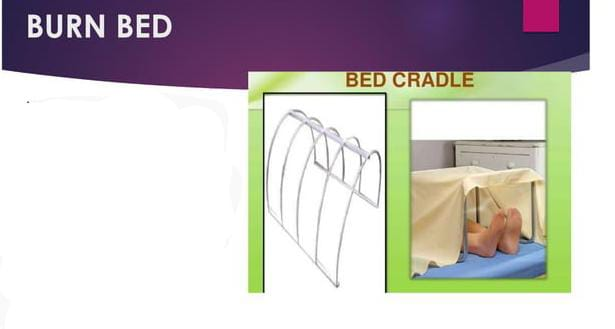
A burn bed is a special type of bed that is prepared for patients whose body is burned to a large extent.
Purpose:
- To provide comfort to the patient.
- To relieve pain.
- To prevent infection.
- To ensure that the weight of the top sheet is properly distributed over the bed cradle and that the top sheet does not touch the patient’s body.
General instructions During bed making:
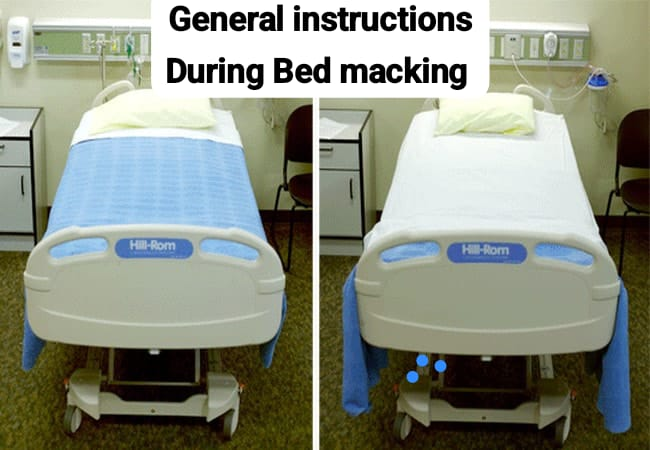
- Put the bed covering in proper order according to its use.
- Handle the patient’s bed linen Wash your hands properly after doing this. Secretions and excreta on linen and equipment provide a place for microorganisms to multiply and grow, which can be transmitted directly or indirectly through hands/uniforms. Keep soiled linen away from uniforms.
- Linens used for one patient should never be placed on another patient’s bed (even temporarily).
- Soiled linen is placed directly in a portable linen hamper or pillowcase before being collected for disposal.
- Soiled linen is never shaken in the air because shaking can transmit secretions and excrements in the linen and microorganisms present in it.
- When making a bed, save time and energy by preparing the bed as completely as possible on one side before working on the other.
- To avoid unnecessary trips to the linen supply area, collect all necessary linen before starting bed making.
- To provide additional space for the patient’s fit, make vertical or horizontal toe (toe) creases in the sheet. ) pleat.
- Vertical fold 5-10cm from 1 to 10 feet in the sheet.
- Horizontal – fold 5-10cm in the sheet around the bed near the legs.
- When tucking under the mattress while bedding, the palm of the hand should be facing down to protect your nails.
Bed making procedure:
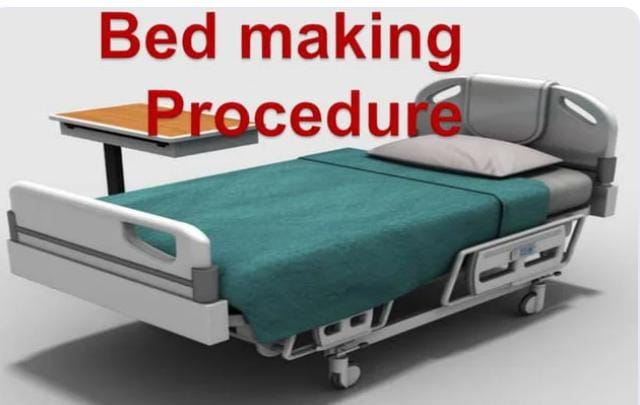
Order Bed Cover:
- Mattress cover,
- Bottom sheet,
- Rubber sheet
- Cotton (cloth) draw sheet
- Top sheet
- Blanket
- Pillowcase
- Bedspread
Note:
Children should not use pillows.
Procedure for Making a Closed Bed:

Close Bed/Unoccupied Bed:
Close Bed/Unoccupied Bed is a An empty bed is one in which the top cover is arranged in such a way that all the linen under the spread is completely protected from dust and dirt while the patient is waiting. A closed bed is one which remains empty until another patient is admitted. On admission of the patient, the closed bed is converted into an open bed.
Essential Equipment:
- Two large sheets,
- Rubber draw sheet,
- Draw sheet,
- Pillowcases,
- Bedspread.
- Wash hands and collect necessary materials.
- Place materials to be used on chairs.
- Turn mattress and make bed Arrange the bottom sheet correctly on the bed.
- Place the bottom sheet right side up, centering the sheet in the center of the bed, and then at the head of the bed.
- Tuck the sheet under the mattress at the head of the bed and miter the corners.
- Stay on one side of the bed until you have completed making the bed on that side.
- Tuck the sheet at the sides and foot of the bed, mitering the corners.
- Tuck the sheets smoothly under the mattress, there should be no wrinkles.
- Place a rubber draw sheet in the center of the bed and then tuck it smoothly and tightly.
- Place a cotton draw sheet over the rubber draw sheet and tuck it properly. The rubber draw sheet should be completely covered.
- Fold the top sheet wrong side out, center the sheet in the center of the bed, and place the wide end at the head of the bed.
- Tuck the sheet at the foot of the bed, mitering the corners.
- Place the blanket in the center of the bed, tuck it at the foot of the bed, and miter the corners.
- Place the top sheet over the blanket. Folding.
- Keep the bedspread right side up and tuck it in.
- Miter the corners at the foot of the bed.
- Go to the other side of the bed and tuck in the bottom sheet, draw the sheet, miter the corners and smooth out all the wrinkles, place the pillow on the pillowcase and place it on the bed.
- The bed should be neat and smooth.
- Make the bed and keep the furniture in order.
- To wash hands properly.
- A closed bed is an unoccupied bed.
- When a closed bed is “opened”, the top sheet, blanket, and bedspread are folded down to the foot of the bed for easy entry by the client.
Mitred corner :
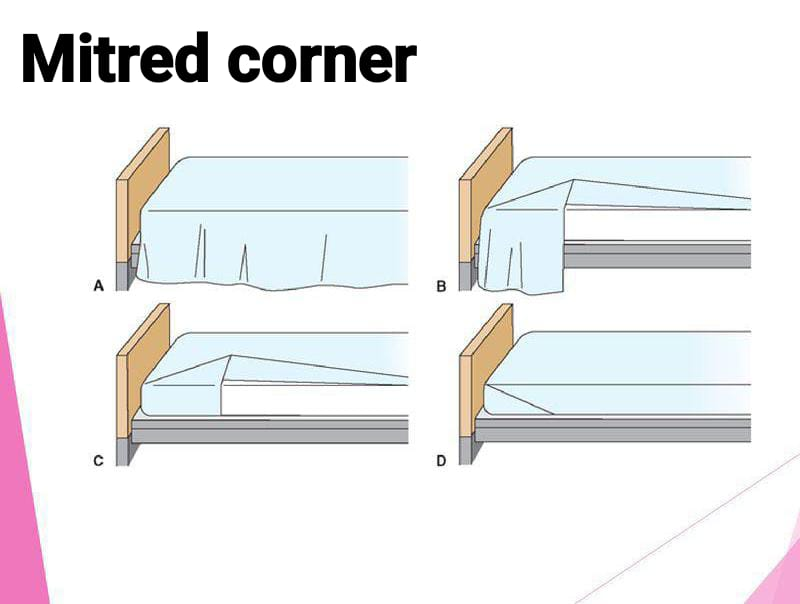
- The sheet is hanging on the side of the bed.
- Grab the edge of the sheet about 12 inches from the foot of the bed and fold it up to form a triangle. Place the triangle fold on top of the bed, and smooth the hanging part of the sheet against the side of the mattress.
- Hold the triangle fold against the top of the bed and tuck the hanging part of the sheet under the mattress.
- Bring the triangle fold under the edge of the mattress and tuck it down. This procedure is the same for the upper corner of the bed and the top linen.
Procedure for making open bed:
Open bed:
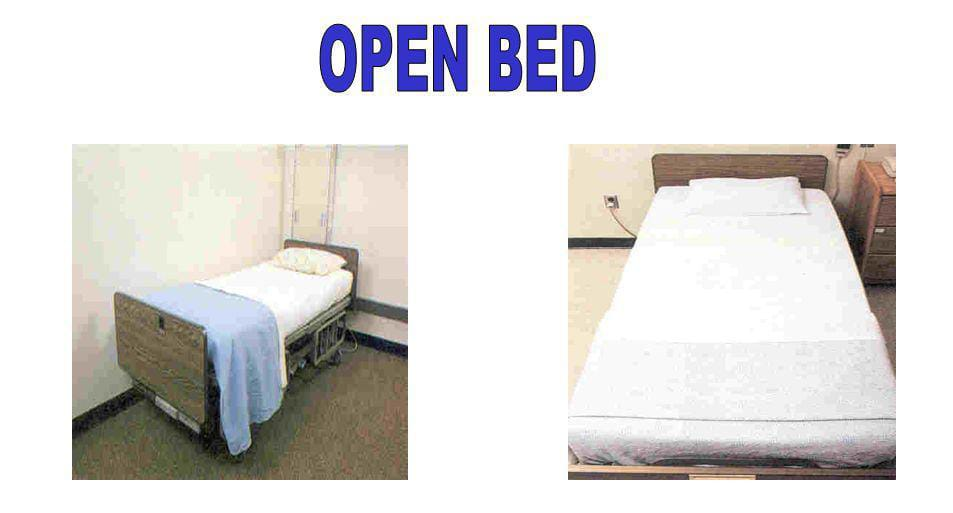
The term open bed is used to refer to a hospital bed when the bed is occupied by a patient. A bed that is made when a new patient or ambulatory patient occupies the bed is called an open bed. The term open bed is used to describe a hospital bed that is designed to be occupied by a client.
Essential Equipment:
- Bottom sheet.
- 36 inch Macintosh.
- 36 inch draw sheet.
- Top sheet.
- Blanket.
- Bed spread.
- Pillow case.
- Duster – 2.
- Wash hands and collect necessary linen.
- Arrange linen on chair in order in which it will be used.
- Explain procedure to patient and relatives.
- If necessary, screen patient and loosen top sheet.
- Elevate patient’s head and remove extra pillow.
- Loosen the bottom bedding and remove the top sheet by pulling it down from under the cover.
- Brush the Macintosh and loosely roll it back under the patient’s back.
- Roll the bottom sheet under the patient as far as possible.
- Place a clean sheet on the mattress with a lengthwise fold in the center of the bed.
- The sheet Adjust and tuck the top at an angle. Then tuck it to the side.
- Place the Macintosh on the bed.
- Place a clean draw sheet in the center of the bed.
- Pull and tighten the bottom sheet and tuck it to the top by making a corner.
- Pull and tighten the Macintosh and draw sheet and tuck it well.
- Place the top of the counter pan and the top sheet on the blanket Turn back.
- Return to the other side, fold and tuck in the top bed as on the first side.
- Change the pillow and place it under the patient’s head and ankles.
- Remove soiled linen to the dirty box.
- Make the patient comfortable and wash hands.
Occupied bed:
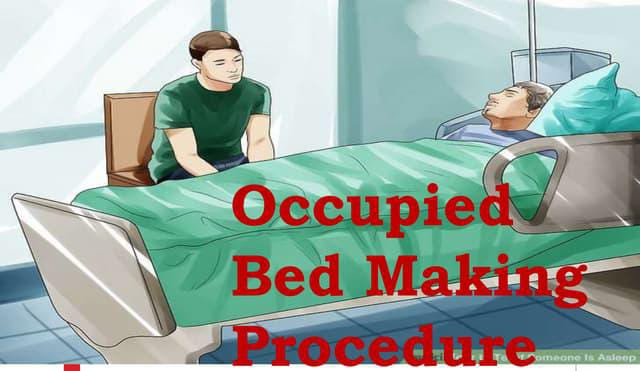
Occupied bed:
An occupied bed is a bed that is made as if the patient is on the bed. An occupied bed is a bed where the patient is physically available in the bed or the bed is retained for the patient. An occupied bed is made when the patient is in the bed.
This is to make the bed with the patient (this bed is made for patients who cannot get out of bed.).
Purpose:
- Make the bed with the least possible discomfort to the patient.
- Provide a clean and tidy appearance.
- Prevent skin breakdown due to soiled linen.
- Handle bed linen skillfully while the patient is in bed.
- Form an active nurse-patient relationship.
- To provide comfort, cleanliness and proper position to the patient.
Essential equipment:
- Two large sheets,
- Draw sheet,
- Pajamas or gowns if necessary.
Procedure for making an occupied bed:
- If the patient is not completely bathed at this time, the patient’s back should be washed and cared for.
- Wash hands and collect equipment.
- Explain the procedure to the patient.
- Take all equipment to the bed and arrange it in the order in which it is to be used.
- Ensure that windows and doors are closed.
- If possible, make the bed flat.
- Starting at the head of the bed, loosen all bedding from the mattress and place dirty pillows on a chair to get dirty linen.
- Bend the patient’s knees or help the patient bend them. With one hand on the patient’s shoulder and one hand on the patient’s knee, turn the patient toward you.
- Never turn a helpless patient away from you, as this may cause him to fall out of bed.
- When you have made the patient as comfortable and safe as possible, take your equipment with you and move to the other side.
- Loosen the bedding on that side.
- Fold the bedspread halfway down the head.
- Fold the bedding neatly over the patient.
- Roll the dirty bottom sheet close to the patient.
- Place the clean bottom sheet on the center of the used top sheet, folded in the center of the bed. Roll the top half close to the patient, tucking the top and bottom ends tightly and mitering the angles.
- Place the rubber sheet and draw sheet if necessary.
- Turn the patient towards you on clean sheets and make him comfortable on the edge of the bed.
- Go to the opposite side of the bed, take a basin and washcloth with you and give the patient back care.
- Gently remove the dirty sheet and place it on a dirty pillowcase, but not on the floor.
- Remove the dirty bottom sheet and unroll the clean linen.
- Tuck the ends and miter corners tightly.
- Turn the patient and make the position comfortable.
- The patient should be given a back rub before being turned onto his back.
- Place the clean sheet on the top sheet and ask the patient to hold it if he is conscious.
- Go to the foot of the bed and remove the dirty top sheet.
- Change blanket and bedspread.
- Miter corners.
- Tuck sides together in low beds.
- Leave sides hanging on high beds.
- Turn top of bedspread under blanket.
- Turn topsheet back over blanket and bedspread.
- Change pillow, lift patient’s head to change pillow.
- Loosen topsheet over patient’s toes and chest.
- Ensure patient is comfortable.
- Clean bedside table.
- Remove dirty linen.
- Wash hands.
- Provide patient with comfortable position.
Post operative bed:

A post-operative bed is prepared for a patient who is recovering from the effects of anesthesia after a surgical operation. A post-operative bed or surgical bed is a special type of bed made for a patient who is recovering from an operation or other procedure in which the patient has been administered anesthesia.
Objectives of Bed Making:
- To make a bed that makes the patient feel safe and comfortable.
- To be prepared during an emergency.
- To protect the mattress and pillow.
- To quickly transfer the patient from the bed to the trolley and take care of the patient without losing any time.
Articles:
- Large Macintosh with Towel,
- Infusion Stand,
- Linen,
- Topsheet,
- Tongue Depressor,
- Pillow,
- Goose piece,
- Hot water bottle,
- Compression apparatus,
- Oxygen cylinder,
- Artery forceps,
- Airway,
- Vital sign tray,
- I.v. Stand,
- Oxygen Cylinder,
- Hot Water Bag,
- Bed Blocks.
Procedure:
The foundation of the bed is made to place extra Macintosh and towels so that the bed A towel is placed at the head end to prevent soiling by vomit. The foot end of the toplinen remains untucked. They are also folded back with the mattress. Standing at one side of the bed, the toplinen is fanfolded to the opposite side.
All other necessary items for the immediate care of the patient such as infusion stands, bed blocks should be ready to hand. No pillow is kept at the head end or it may be used to protect the patient from injury.
Extra macintosh and drawsheets may be used according to the site of the operation to prevent the bed from getting wet with blood. If a pillow is used to support the operated area, it should be protected with a waterproof cover.
Fracture bed:
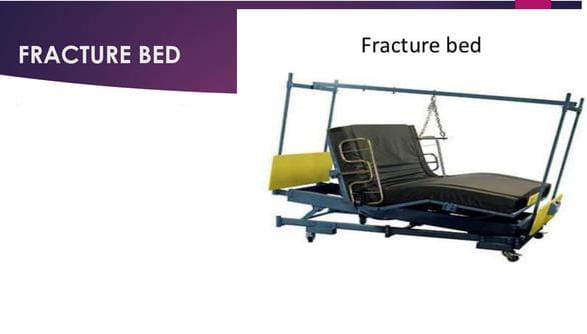
A fracture bed is made for patients with fractured bones, diseased bones, or deformities. Fracture beds are used to provide firm support to patients with fractures of the legs or extremities by resting on a fracture board or bed board using a firm mattress.
Purpose:
- To immobilize the fractured body part.
- To prevent sudden jerky movements.
- To keep the traction in the proper position.
- To immobilize a fractured body part.
- To prevent sudden jerky movements.
- To keep traction in proper position.
- To prevent improper sagging of the mattress.
Extra equipment:
- Fracture board,
- Cover with sand bag,
- Bed cradle,
- Extra pillow.
Procedure:
- Hand wash properly.
- Prepare articles and keep all articles at the bedside.
- This bed is prepared in the same way as an open bed. And an additional fracture board is kept.
- The fracture board is placed directly on the bed spring.
- If necessary, place an extra pillow.
- If a fracture board is not available, place a sand bag.
- If necessary, place a bed cradle on the bed and place the top sheet on the bed cradle.
- Then ensure that the patient is in a comfortable position.
- Replace all equipment.
- Dispose of waste properly
- Then wash hands.
Amputation bed/Stump bed:
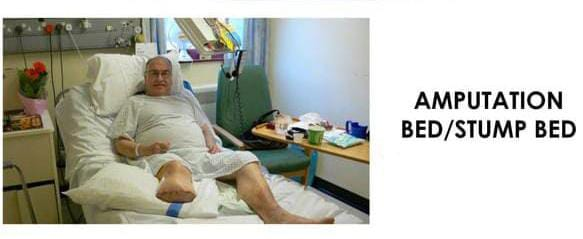
Amputation bed is prepared for the patient in which the body part of the patient that has been amputated/cut off can be properly visualized.
Top of the amputation bed Leelan is divided into two parts. Due to which the amputated part of the extremities can be visualized without disturbing the patient.
Purpose:
- To assess whether there is any hemorrhage in the stump.
- Used to maintain the stump in the proper position.
- Bed The weight of the cloth is not felt by the patient or to take off the weight of the patient’s bed cloth.
Articles:
- All articles of open bed,
- Waterproof cover with pillow,
- Bed Cradle,
- Hot water bag to warm the bed
- Extra top sheet or sheet (top sheet or blanket),
- Extra draw sheet,
- Sand bag and towel to prevent jerky movement.
Procedure:
- Wash hands properly.
- Prepare all the articles in a tray and bring them to the bed site.
- Then prepare the bed in the same way as an open bed.
- Then tuck the top linen at the foot end of the bed and then raise it 18-20 cm above the stump level. Fold the top linen towards the foot end. Due to which the stump can be properly visualized and the patient can get a comfortable position.
- Then spread the second top linen and fold it at the head site and fold it like an occupied bed and then fold the top linen again from the side where the stump is. In this way, the two sets of linen overlap and the stump can be properly covered. Due to which the patient can be properly covered and the stump can be visualized if needed.
- Then if there is a need to provide support to the stump, place a sand bag on the bed.
- Then provide a comfortable position to the patient.
- Discard any equipment that has been used or put it in a sterilizer after use.
- Then wash your hands to prevent infection. Spread can be prevented.
Cardiac bed:
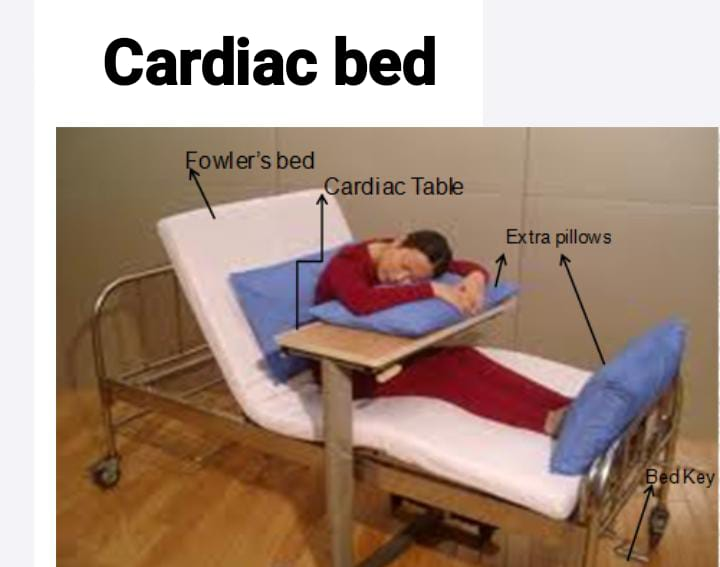
Cardiac beds are made for patients with diseases of the cardiovascular system and patients with diseases of the respiratory system. The cardiac bed is prepared in such a way that the patient can remain in a sitting position on the bed with the support of a pillow or table and can breathe properly, so if there is breathing difficulty, it can be relieved and if there is chest pain, it can also be released.
Purpose of making cardiac bed:
- To relieve the condition of dyspnea.
- To provide a comfortable position to patients who have cardiovascular system related and respiratory system related diseases.
Extra equipment required in cardiac bed :
- Back rest,
- Cardiac table,
- Extra chick,
- Foot board.
Procedure :
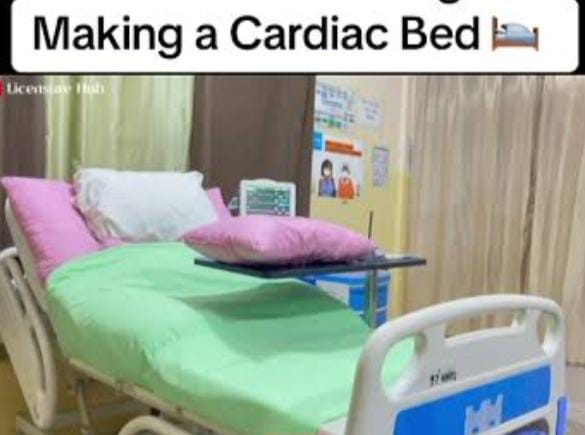
- Wash hands properly.
- Then prepare whatever articles are there properly and bring them to the bed site.
- Then prepare the bed in the same way as an open bed is prepared.
- Then place the backrest on the bed and slightly elevate the bed from the head side. Then slightly elevate the patient’s head so that the patient gets a low Fowler, semi Fowler or high Fowler position. And by providing this Fowler position, the lungs get adequate space to expand so that the patient can breathe properly and if the patient has a condition of dyspnea, it is relieved.
- Then adjust the cardiac table properly on the bed as per the patient’s need.
- Even after placing the cardiac table, if the patient needs extra pillows, then provide them.
- Provide support to the patient’s feet through the footboard so that the patient’s feet get proper support and foot drop can be prevented.
- Provide the patient with a comfortable position.
- Then, properly discard any equipment that needs to be discarded and send any equipment that needs to be sterilized to be properly sterilized.
- Proper hand washing can prevent the spread of infection.
Burn bed:

A burn bed is a specialized bed that is prepared for a patient admitted to a hospital who has a large amount of skin burn on his body, the patient is in a very severe case and a large portion of his body is damaged, i.e. a large portion of his body is burned, then a burn bed is used in this case.
Purpose:
- Provide comfort to the patient To do.
- To relieve the patient’s pain.
- To prevent infection in the patient’s body.
- To ensure that the weight of the top sheet is properly distributed over the bed cradle and that the top sheet does not touch the patient’s body.
Extra equipment ):
- Bed cradle
Procedure ( Procedure ) :
- Wash your hands properly to prevent the spread of infection.
- Then burn the bed Prepare the articles properly and bring them to the bed site.
- Then prepare the bed in the same way as an open bed is prepared. Do not keep blankets on the bed and use sterile sheets, which can prevent the spread of infection.
- Then adjust the bed cradle properly on the bed according to the patient’s need, so that the weight of the top sheet does not fall on the body and the top sheet does not touch the patient’s body.
- Properly spread the top sheet on the bed cradle Due to which the top seat cannot touch the patient’s skin.
- Provide a comfortable position to the patient.
- Then properly discard the equipment that needs to be discarded and send any equipment that needs to be sterilized to be properly sterilized.
- Proper hand washing can prevent the spread of infection.
Restraints
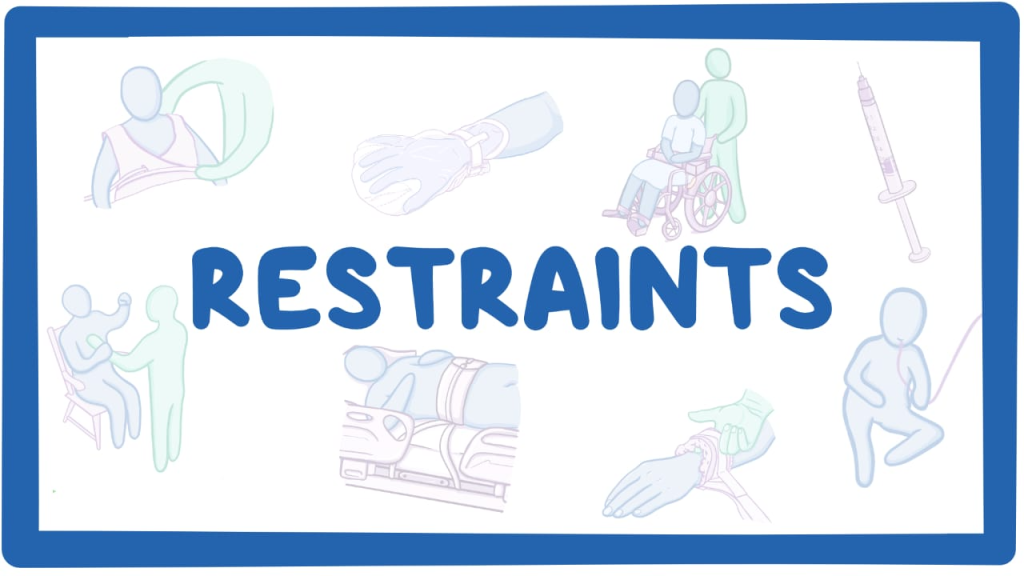
- Restrain a type A protective device that limits the movement and freedom of an individual, i.e., a restraint is used to immobilize any body part, i.e., to restrict the movement of any body part.
- Physical restraint is primarily used in healthcare settings. In which the movement or mobility of a body part is restricted using a physical device or technique.
- Restraints are used in health care, psychiatric, and correctional settings.
Write down purpose of restraints
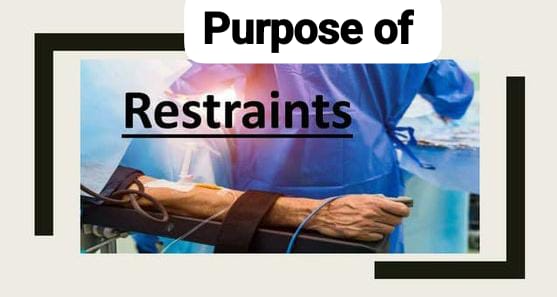
- To prevent the patient from falling down
- To provide safety to the child
- To protect the client from injury
- To maintain the child in the prescribed position.
- To limit the child’s movement during the procedure
- To provide constant immobilization
Write down indication of restraint
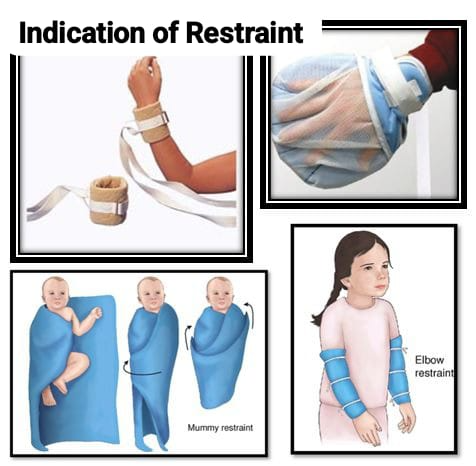
- Agitation or aggression
- Seizures or tremors
- Medical procedure
- Alter mental state
- Suicidal behavior
Write down contraindication of restraint
- Osteoporosis
- Respiratory Disease
- Cardiovascular Disease
- Pregnancy
- Childbirth
- Mental condition (PTSD, anxiety)
Write types of physical restraints
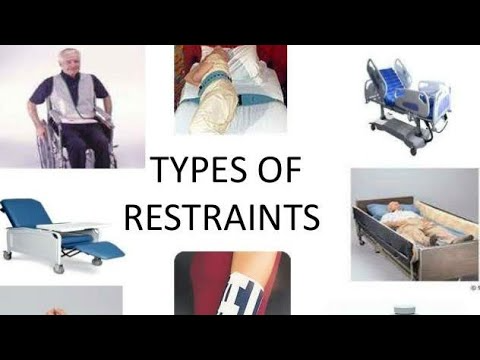
1) Mummy restraints
2) Elbow & knee restraints
3) Extremity restraints
4) Abdominal restraints
5) Jacket restraints
6) Mitten or finger restraints
7) Crib net restraints
8) Safety belt
1) Mummy restraints:

- Mommy restraints are a type of physical restraint used on infants and small children.
- Mommy restraints are primarily used to perform head and neck examinations, treatments, and procedures. To perform procedures such as eye irrigation, gastric lavage.
- In addition, maternal restraints are used to restrict limb movement and immobilize the limb.
Purpose:
- To immobilize the infant’s arms and legs.
- To examine the child’s head and neck.
- To perform the procedure
- To puncture the jugular vein
- To pass a Riles tube
Procedure (Procedure) :
- First spread the blanket or the drop sheet on the entire table or bed and fold the drop sheet from the top in such a way that a triangle is formed on its upper part.
- Then place the baby in such a way that the baby’s back side comes on the blanket or the drop sheet.
- Keep one of the baby’s hands close to the body, then cover the baby’s body by holding the corner of the blanket or the drop sheet and tuck it under the body on the opposite side.
- Now keep the other hand close to the body and wrap the baby’s body and tuck the other corner of the drop seat.
- Now take this round sheet at the bottom near the feet and fold it towards the chest and tuck it at the top of the sheet or it can also be pinned at the bottom of the sheet
2) Elbow restraints:
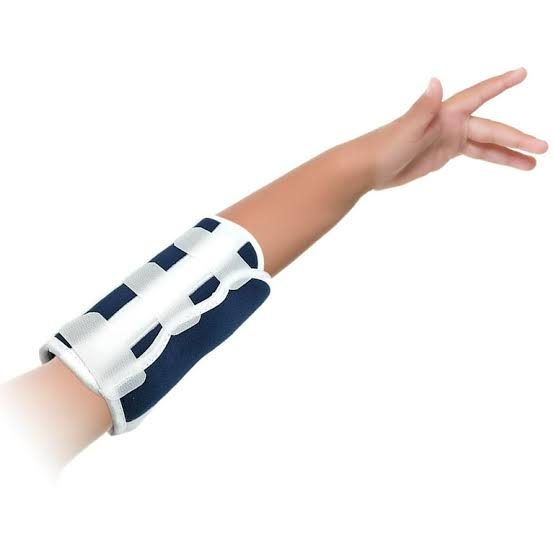
- An elbow restraint is a type of physical restraint.
- An elbow restraint is primarily used to hold the elbow in an extended position. So that it cannot reach the face.
- Elbow restraints are used to prevent and control flexion of the elbow.
- Elbow restraints are used in infants receiving scalp vein infusions and in infants who have undergone cleft lip repair surgery.
- Elbow restraints are made of a double piece of cloth or other strong material.
Purpose :
- When surgery has been performed on the head or face
- When eczema or other skin disorders are present on the head or face
- When a scalp vein needle has been placed
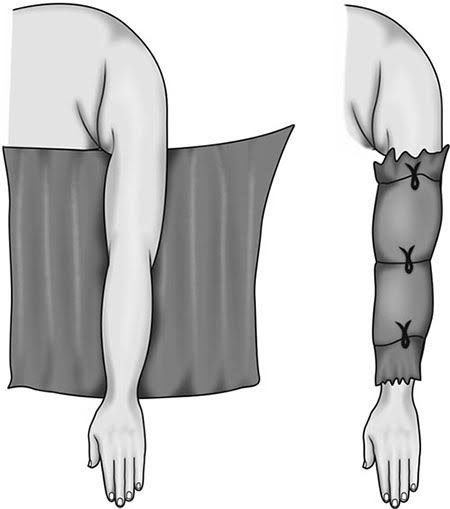
Extremity restraint (Extremity Restraint)
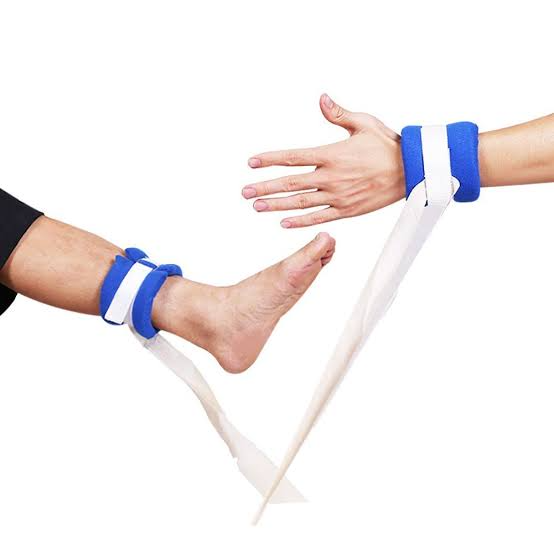
- Extremity restraints are used to limit the movement of the extremities (legs and arms).
- Wrist in extremity restraints Restraints include ankle restraints and elbow restraints.
- These restraints are used during medical procedures, aggressive behavior, and post-operative care.
Purpose :
- Prevent harm to self and others
- Ensure Safety
- During Medical Procedures
Abdominal Restraint
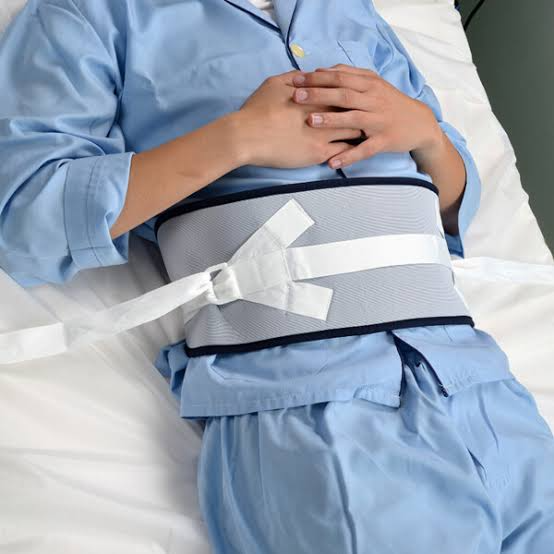
- Abdominal restraints are used to limit the movement of the torso or abdomen.
- Abdominal binders, abdominal straps, and torso restraints are used as abdominal restraints.
- Abdominal Restraints are used during post-operative care, medical procedures, and trauma care.
Purpose :
- Prevent abdominal movement
- Stabilize abdomen
- Prevent further Injury
Body jacket
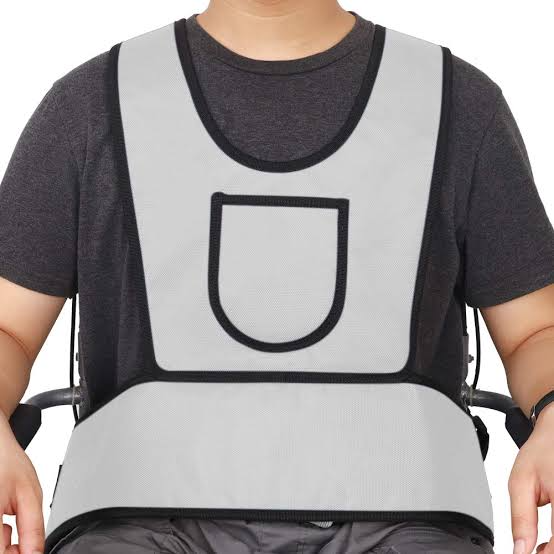
- A body jacket is also known as a waist restraint.
- A body jacket is wrapped around the torso and minimizes movement of the arms, chest, and abdomen.
- This restraint is attached to the bed.
Purpose :
- Prevent Self Harm
- Ensure Safety
- Reduce Agitation
- During Medical Procedures
Mitt restraint (meat restraint)
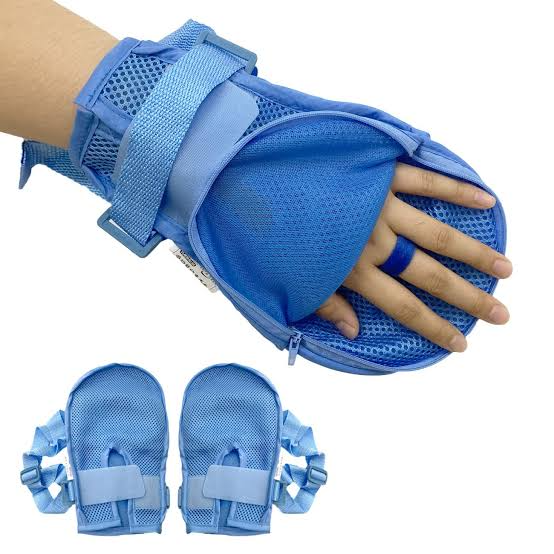
- Meat restraint is also known as finger restraint.
- A hand restraint is a type of restraint used to limit the movement of the hand.
- A hand restraint prevents the use of the hand.
- Therefore, this restraint is used in children and psychiatric conditions. So that the patient can be prevented from removing dressings, tubes, cannulas.
Purporse (Purpose) :
- Prevent removal of medical devices
- Prevent self-injury
- Protect skin
Saftey belt (safety belt)
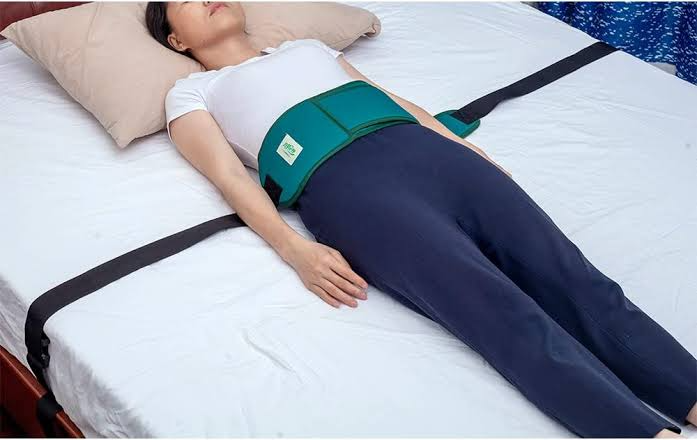
- A safety belt is also known as a restraint belt.
- A safety belt restraint is made of an electrically non-conductive material.
- A safety belt is mainly used to prevent the patient from stretching and falling down from the operating table.
- A safety belt also prevents the patient from leaving the bed.
Crib net restraint
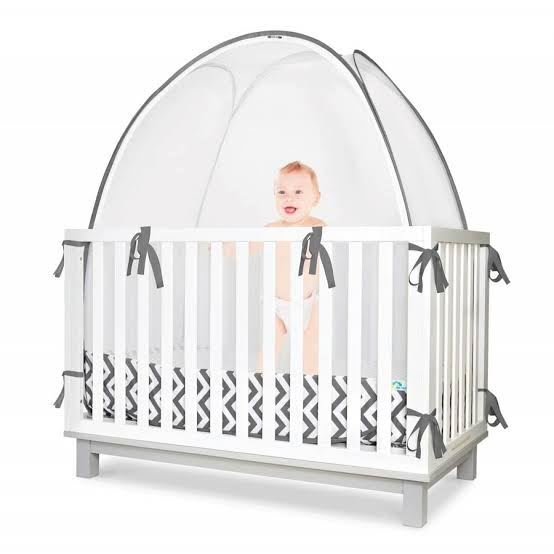
- Crib net restraints are also called bed nets.
- This restraint prevents infants and young children from climbing out of beds and cribs.
- This restraint is made of mesh and net, can be easily installed and can be adjusted to any bed or crib.
Purpose
- Prevent falldown
- Ensure safety
- Reduce risk of injury
Write down hazards and risk of restraints
- Tissue Damage
- Development of Pressure Sore
- Sore and Gangrene
- Injury to Brachial Plexus
- Damage and Injury to the Other Part of the Body
- Ischemia and Nerve Damage
- Loss of muscle tone
- Foot drop and wrist drop
- Reduces body mass
- Constipation
- Psychological hazards (frustration, loss of dignity, depression)
Write down nursing responsibility during use of restraints
- Assess the client’s behavior and assess their need for restraints.
- Check the doctor’s order for restraints.
- Consult the client’s family members and friends as per hospital policy.
- Provide the client’s family members and friends with complete information about the need for restraints, their type and their procedure.
- Follow the institute’s policy and guidelines for restraints.
- Use adequate assistant staff while applying restraints.
- Use the least restrictive, reasonable and appropriate restraints.
- Ensure that the patient can move freely.
- Take special care to ensure that the restraints do not cause circulatory arrest.
- Do not use restraints in place of IV sites.
- Before applying restraints, pad the bony prominence area.
- Take care of the patient’s safety, comfort, privacy, and dignity during restraints.
- Be aware of any wrinkles in the restraints.
- Keep the patient in a place where they can be easily, closely, and regularly monitored.
- Visit the restrained patient every 30 to 60 minutes and review them regularly.
- Avoid using restraints until both are in place and use other practices, interventions, and alternate techniques instead.
- When removing restraints, remove only one restraint at a time.
- Document the restraints used.
Splints
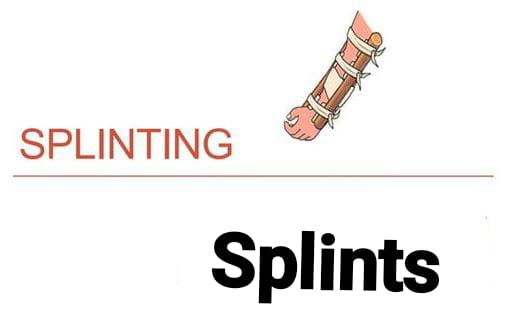
- Splints are a type of support device made of hard material. They are used to immobilize an injured body part.
- Different splints are used for different musculoskeletal conditions.
- A splint is made of plastic, metal, plaster, or fiberglass. Which is made of a specific size and shape.
Write down uses of splints
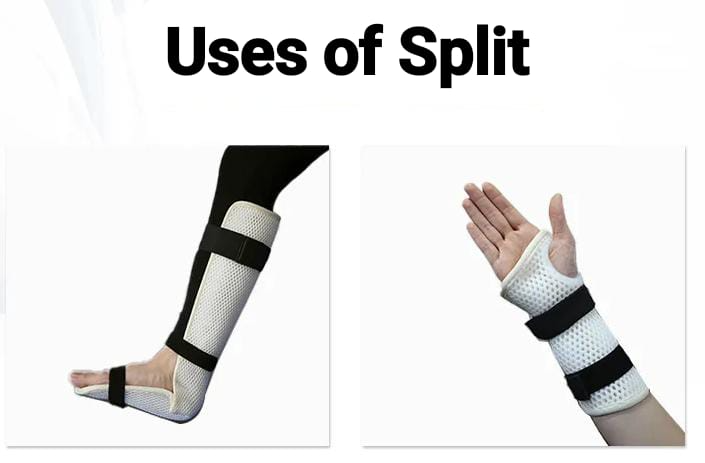
- To immobilize and protect the injured extremity.
- To reduce swelling and relieve pain.
- To maintain good anatomical fracture alignment.
Write down types of splints
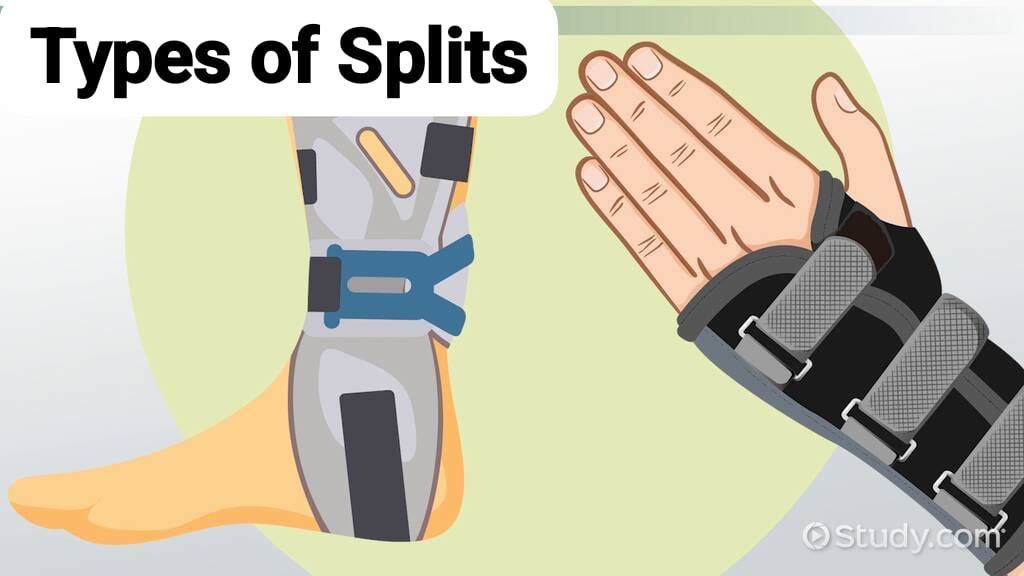
Hand / finger splints
- Ulnar gutter splint
- Radial gutter splint
- Thumb spica
- Finger splints
Forearm / Wrist splints
- Volar short arm splint
- Dorsal short arm splint
- Single sugar tong
Elbow / forearm splints
- Long arm posterior splint
- Double sugar tong
- Long arm splint
Knee Splints
- Posterior knee splint
- Long leg splint
Tibia / Fibula splints
- Long leg splint
- Short leg shaft & distal
Foot
- Posterior ankle splint
- High top walking boot
Ulnar gutter splint splint)
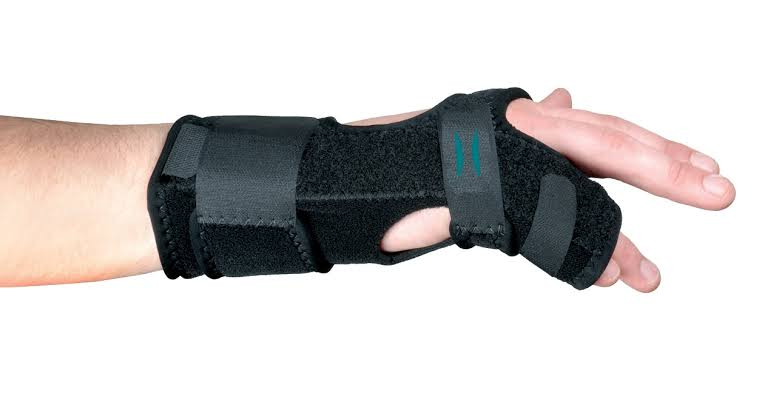
- The ulnar gutter splint extends from the proximal forearm to the distal interphalangeal joint.
- This splint is used to support and immobilize the ulnar side of the hand and wrist.
- The ulnar gutter splint is also used for soft tissue injuries of the proximal and middle phalanx and the fourth and fifth fingers. (That is, this splint is used during fractures in the 4th & 5th metacarpal.)
- While applying this splint, the wrist is kept slightly extended and the metacarpophalangeal joint is flexed 70-90 degrees and the proximal interphalangeal and distal interphalangeal joints are flexed 5-10 degrees.
Radial gutter splint (Radial gutter splint) Splint)
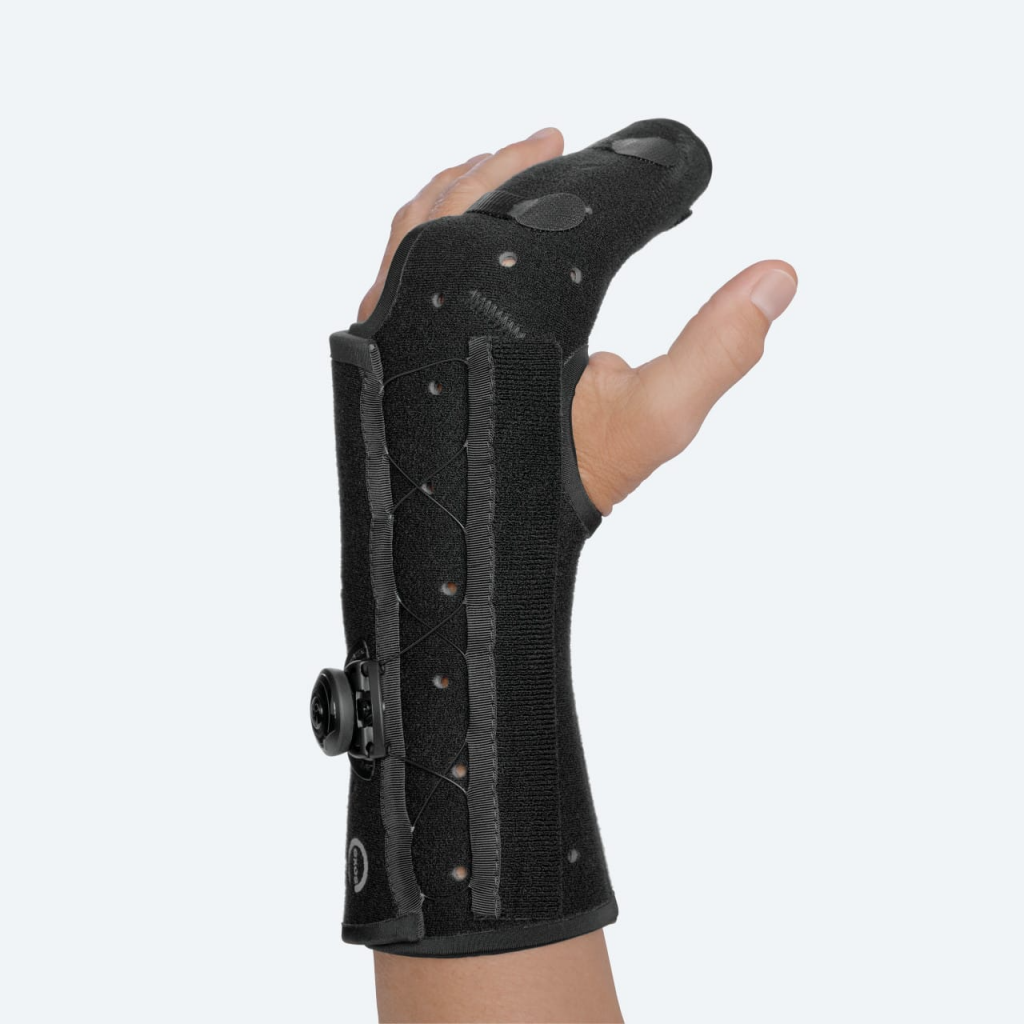
- This splint is a splint that extends from the lateral aspect of the forearm to the distal interphalangeal joint of the index finger. It is extended to. In which the thumb remains free.
- The radial gutter splint is used to support and immobilize the radial side of the hand and wrist.
- This splint is mainly used during fractures of the 2nd & 3rd metacarpal.
- In addition, this splint is mainly used to treat injuries to the radial nerve and thumb. Such as radial nerve injury, thumb strain or sprain, scaphoid fracture
- While applying this splint, the wrist is kept slightly extended and the metacarpophalangeal joint is kept flexed 70-90 degrees and the interphalangeal joint is flexed 5-10 degrees.
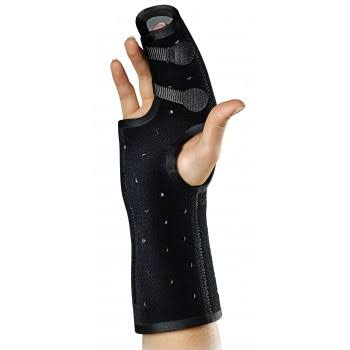
Buddy taping
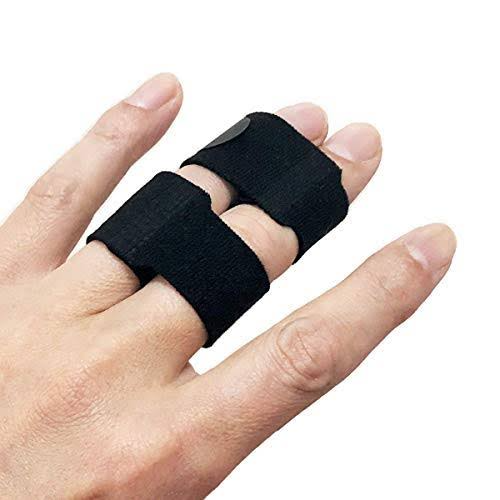
- Buddy taping is also known as dynamic splinting.
- Buddy taping is mainly used to treat minor finger injuries. Such as minor finger sprain, undisplaced shaft fracture of proximal and middle phalanx, finger ligaments injury.
- This taping provides support and stability to the adjacent finger as well as allows movement of the finger and protects it from further injury.
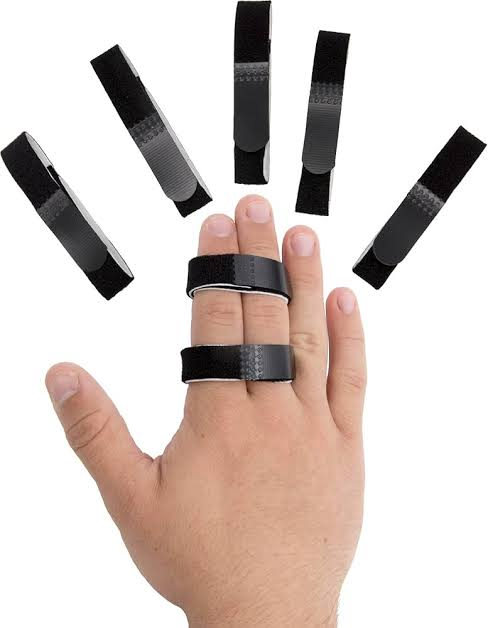
Thumb spica splint
- The thumb spica splint is used to immobilize the thumb and wrist.
- The thumb spica splint is mainly used to treat thumb injuries such as thumb fractures, thumb sprains, gamekeeper thumb, thumb arthritis
- The wrist is extended 25 degrees with the forearm in a neutral position and the thumb is held in a functional position. For example, holding anything in the hand is called the functional position of the thumb.
Volar short arm splint
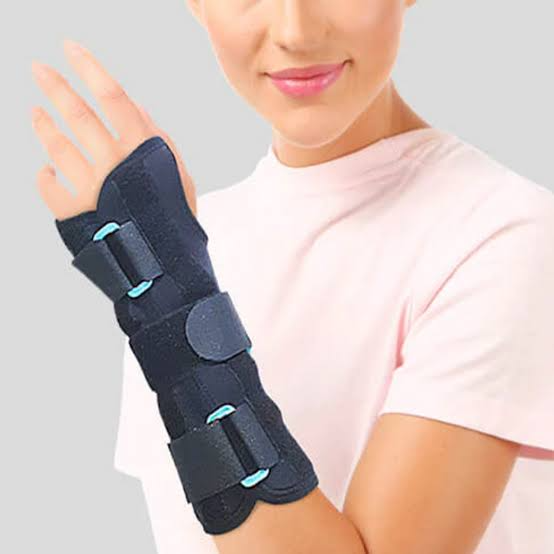
- Volar Short Arm Splint is used to treat soft tissue injuries in the hand and wrist.
- This splint is used for temporary immobilization of the carpal bone.
- This splint extends from the volar mid-forearm to the distal palmar crease. In which the wrist is kept slightly extended.
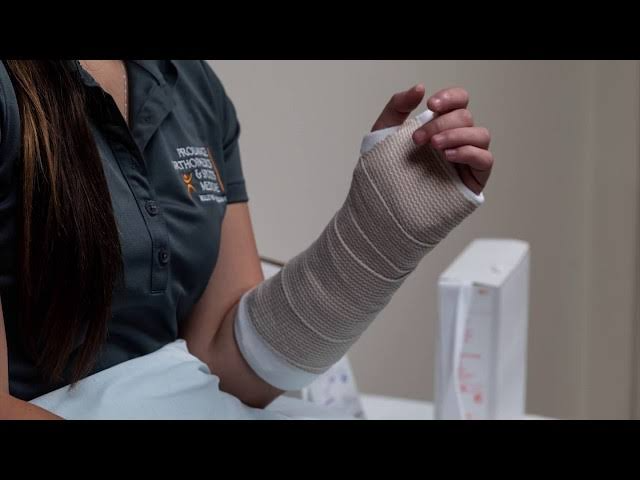
Single sugar tong splint Splint)
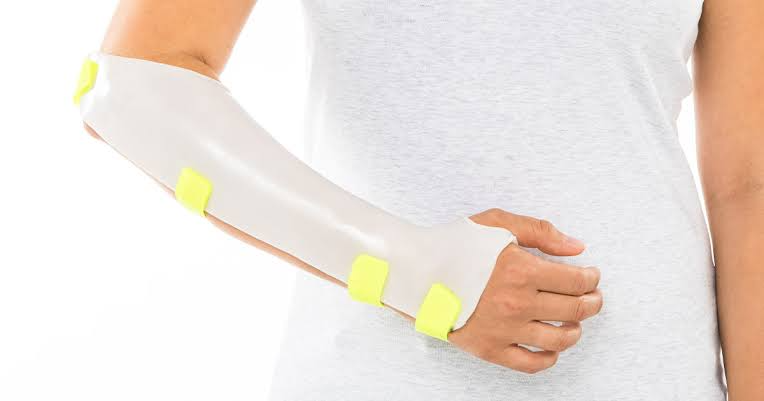
- A single sugar tongue splint is used to immobilize and support the thumb and wrist.
- The single sugar tongue splint is mainly used in conditions like distal radial and ulnar fractures.
- In addition, it is also used in conditions like thumb sprain, wrist sprain.
- This splint covers the proximal palmar crease, volar forearm as well as around the elbow and the dorsum area of the MCP joint.
- In this, the forearm is kept in a neutral position and the wrist is kept in a slightly extended position is.
Double sugar tong splint
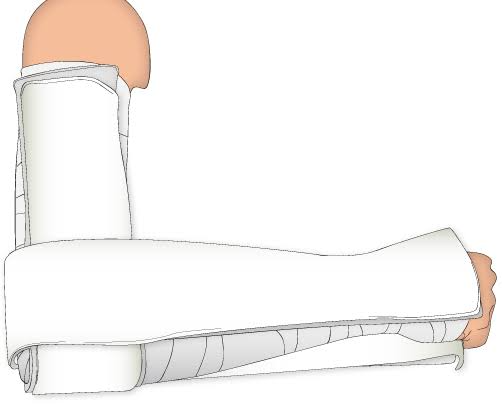
- A double tongue splint is used to immobilize and support the forearm, wrist, elbow, and hand.
- A single sugar tongue splint is applied first. Then a second sugar tongue splint is applied.
- This second sugar tongue splint extends from the elbow to 3 inches proximal to the axilla.
U shaped aluminium splint
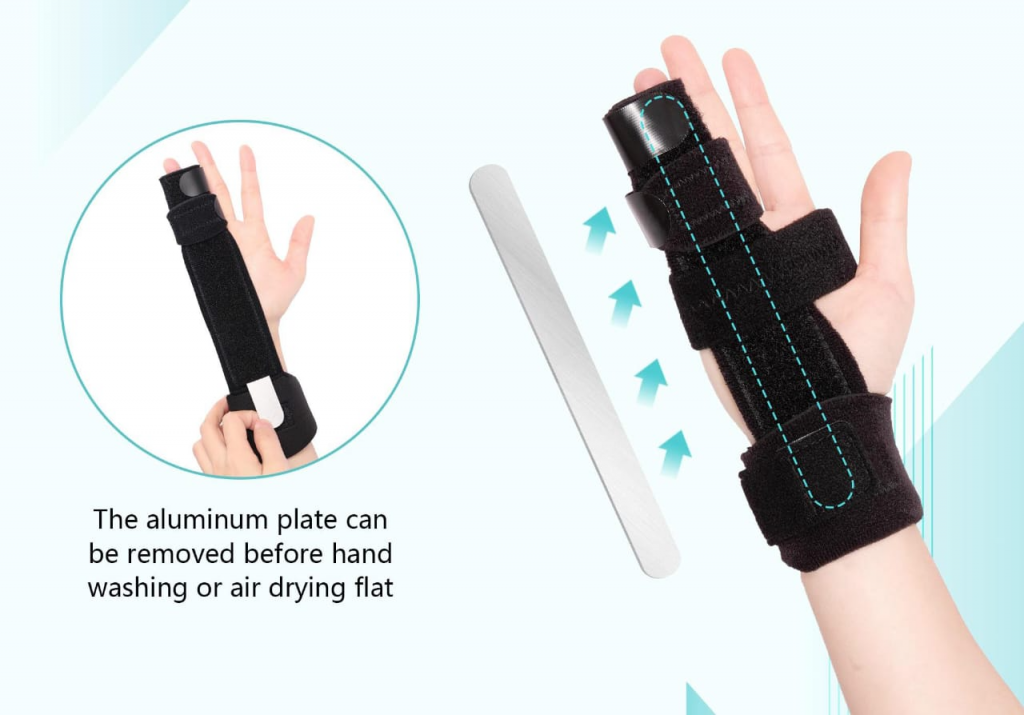
- U Shape Aluminum Splint is used to immobilize and support the finger and toe.
- U Shape Aluminum Splint is mainly used in distal phalangeal fractures. It is also used in finger or toe fractures and conditions such as finger or toe sprains.
- This splint is wrapped around the dorsal finger tip and the volar finger tip. Also, the distal interphalangeal is immobilized in the extension position.
Mallet finger splint
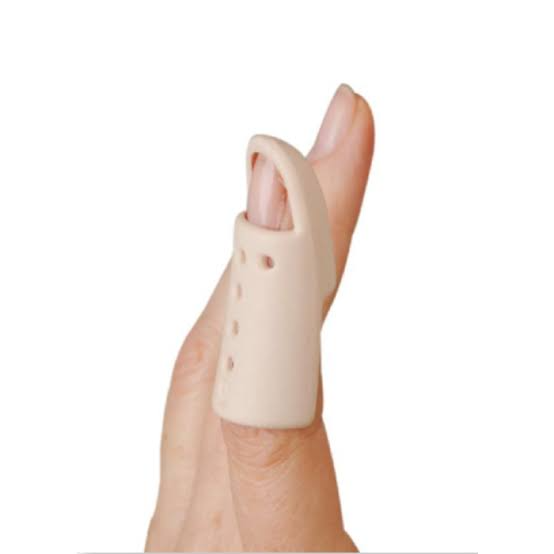
Mallet finger splints are primarily used to treat mallet finger. This is a type of condition in which the extensor tendons are damaged, due to which the tip of the finger remains bent and cannot be straightened.
Long arm posterior splint

- The Long Arm Posterior Splint is used to immobilize and support the arm, forearm, and wrist.
- This splint is used in the management of elbow, proximal, and mid-shaft forearm, and wrist injuries. Such as distal radial or ulnar fractures (children), elbow/forearm fractures, elbow dislocation
- This splint extends from the axilla to the proximal palmar surface. In which the elbow is kept flexed at 90 degrees. Also, the thumb is kept free.
Posterior knee splint
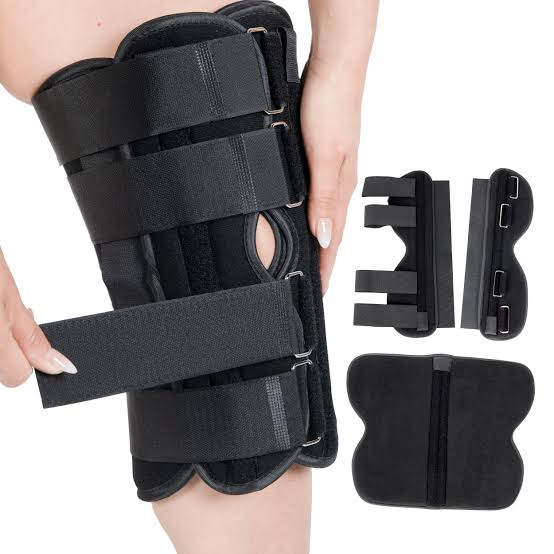
- A posterior knee splint is used to immobilize and support the knee joint.
- This splint is used to treat conditions affecting the knee and injuries related to the knee. Such as knee fracture, knee dislocation, post-operative knee surgery
- This splint extends from the gluteal crease to the proximal malleolus and the knee is kept slightly flexed.
- This splint is also known as a cylinder splint.
Long leg splint
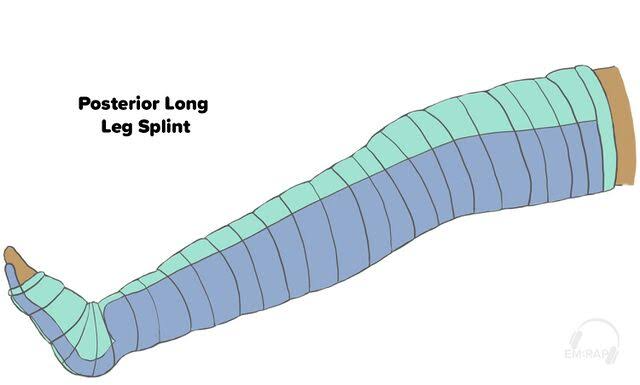
- A long leg splint is a type of orthotic device used to support and immobilize the leg.
- A long leg splint is one that extends from the thigh to the ankle.
- This splint is mainly used to treat conditions related to the leg. Such as femur fractures, tibia and fibula fractures, knee ligament sprains
Posterior ankle splint
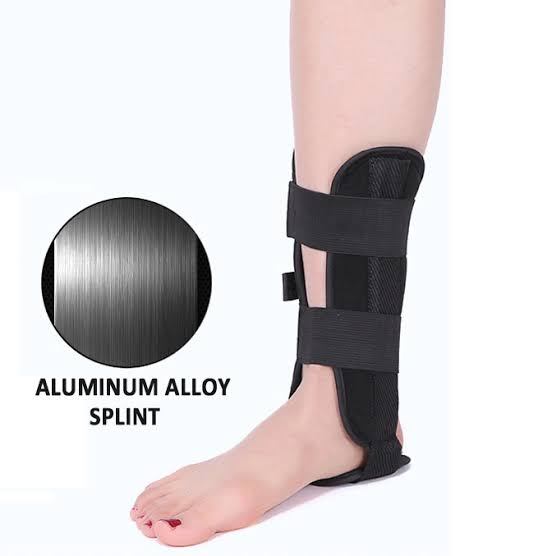
- A posterior ankle splint is used to immobilize and support the ankle.
- This splint is used to treat conditions associated with the ankle. Such as ankle sprains, Achilles tendonitis, foot fractures.
- This splint extends from the plantar surface of the great toe to 2 inches distal to the fibular head. That is, in this case, the splint is seen only from the fibular head down.
Toe plate extension splint
- Toe plate extension splint is used to support and protect the toe.
- This splint is mainly used in the immobilization of the great toe.
- In addition, this splint is used in cases such as distal metatarsal and phalangeal fractures.
- This splint prohibits plantar flexion and limits dorsiflexion.
Stirrup splint
- A stirrup splint is used to immobilize and support the ankle.
- This splint is used in conditions such as ankle sprains, ankle fractures, and foot injuries.
- A stirrup splint extends from the lateral mid-calf around the heel to the medial mid-calf. In this, the ankle is kept flexed at 90 degrees.