ENGLISH – ARTICLES/EQUIPMENT-VIVA TABLE GNM.SY
ARTICLES / EQUIPMENTS.
♥ 1.Thermometer:
Thermometer is used to measure body temperature during physical examination.
There are 2 types of temperature.
Surface temperature
Core body temperature
1.Surface temperature:
In this temperature can be taken in skin, subcutaneous tissue and fat.
Eg. Axillary temperature
- Core body temperature:
In this temperature is taken from deep tissue like abdominal cavity, pelvic cavity.
Eg. Temporal
Tympanic
Oral
Urinary bladder
Rectal
pulmonary
Normal value of temperature (normal body temperature):-
Oral temperature: 37°C / 98.6°F
Rectal temperature:
37.5°C/ 99.5°F (oral temperature greater than 0.5°C)
Axillary temperature:
36.5°C/ 97.7°F (less than oral temperature)
Conversion Formula for temperature:-
°F=(°C× 9/5) + 32
°C=(°F- 32) ×5/9
♦There are many types of thermometer which are as follows.
Clinical thermometer or glass thermometer or mercury thermometer
electronic thermometer
digital thermometer
tympanic thermometer
Non contact digital infrared thermometer or forehead thermometer
Disposable thermometer strip
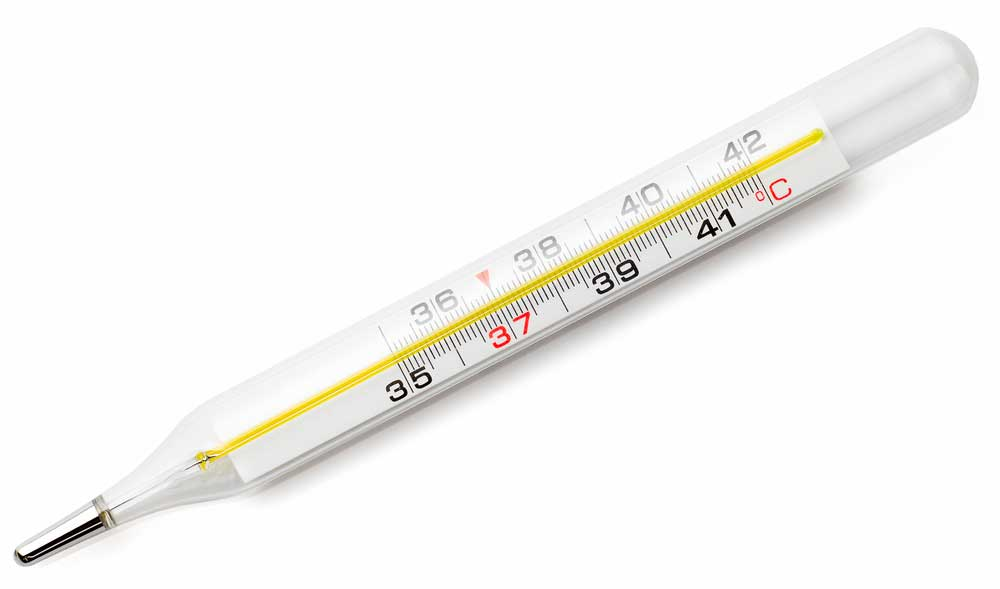
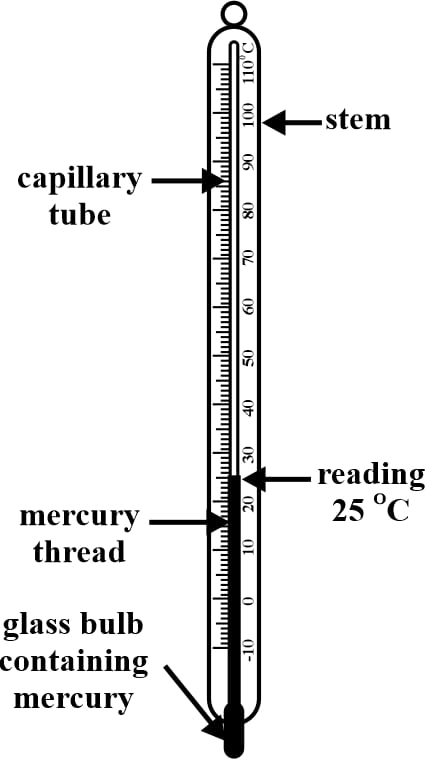
Clinical thermometer:
Clinical thermometer is used to take body temperature. Clinical thermometer is made of a glass tube shape which is filled with mercury through which body temperature can be measured.
Oral, axillary etc. temperature can be taken from this thermometer.
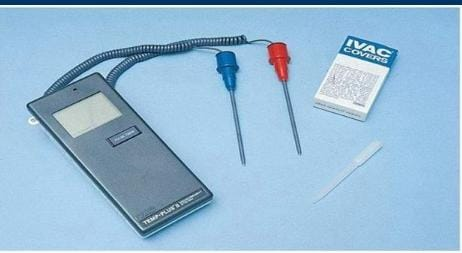
Electronic thermometer:
This thermometer is used to take oral and rectal temperature.
which for blue tipp Oral temperature and
Red tip is used for rectal temperature.
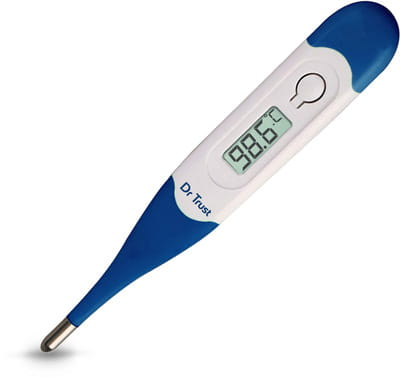
Digital thermometer:
Digital thermometer is used to take body temperature during physical examination.
Digital thermometer can take oral, axillary, rectal, etc. body temperature.
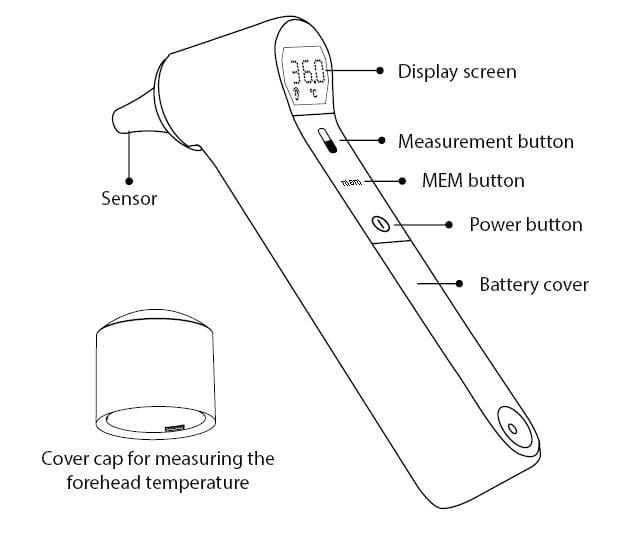
Tympanic thermometer:
This thermometer is used to take temperature from the ear during physical examination.
If there is ceruman (ear wax) in the ear, there may be a change in temperature
This thermometer is kept in the ear up to the tympanic membrane and the temperature is measured.
The temperature is measured by infrared rays in this thermometer.
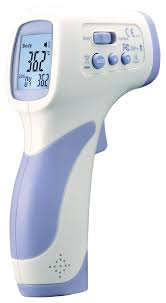
Non-contact digital infrared thermometer:
This thermometer is measured on the upper part of the person’s head and body temperature without touching the head.
Body temperature is taken by this thermometer without touching the person’s body.
This thermometer was used excessively during the corona period.
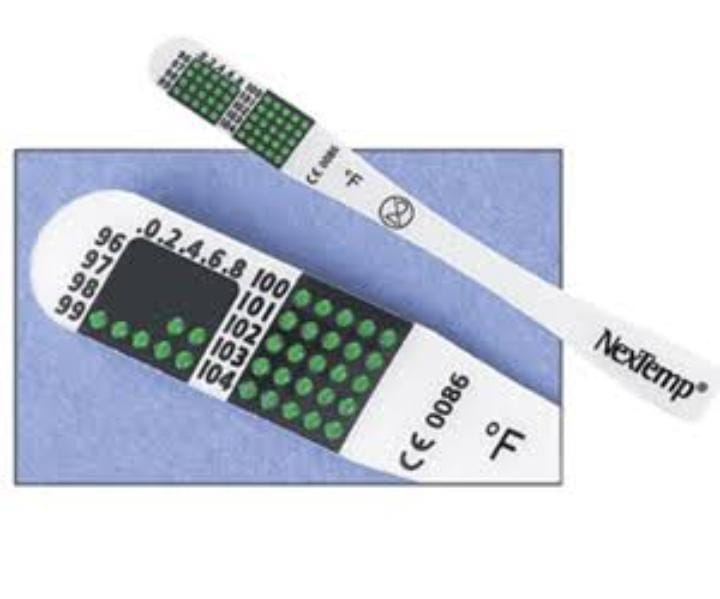
Disposable thermometer strips:
In this, this strip is placed in the person’s mouth under the tongue and after 60 seconds it is removed from the mouth and the temperature is observed.
How to clean the thermometer..?
The thermometer is cleaned with cotton swab through normal saline or spirit.
In it digital and clinical thermometer…
Bulb to stem is cleaned before using the thermometer.
And after use, stem to bulb is cleaned.
NOTE:
During the procedure, the thermometer is kept with savlon solution and cotton swab.
The main goal of keeping a cotton swab in it is that if there is a cotton swab, when the thermometer is kept in a bowl with savlon during the procedure, the tip (bulb) of the thermometer does not break and the mercury does not fall.
(More usage explained in PROCEDURE)
Bp mercury instruments
Introduction
Another name of BP mercury instrument is sphagmomanometer.
It is called the gold standard.
Where sphingomanometer is the Greek word ‘sphagmus’ meaning heartbeat, and ‘manometer’ means an instrument for measuring pressure using dimensional analysis.
It was invented in 1881 by Samuel Seyfried curl fighter von Besch.
A sphygmomanometer is a type of instrument that can be used to measure blood pressure.
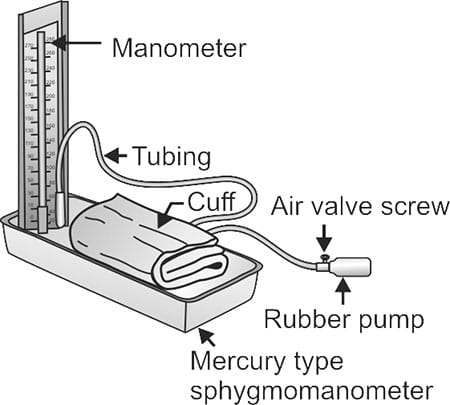
Mercury sphagmomanometer is the most commonly used sphagmomanometer.
It consists of a graduated tube containing mercury that measures the pressure applied by an inflatable rubber on the upper arm.
The instrument is placed on a flat surface for proper measurement.
They measure BP directly by observing the height of the column of mercury so there can be no measurement errors.
There are three types of sphygmomanometers
1.Mercury Sphagmomanometer
- Aneroids sphagmomanometer
- Digital sphygmomanometer
Use
- To measure people’s blood pressure
- To detect any abnormality in blood pressure which may indicate any disease.
- To monitor the effectiveness of drugs that alter blood pressure in people.
- Different techniques can be used to help the suffering patient depending on the blood pressure as first aid in the ambulance.
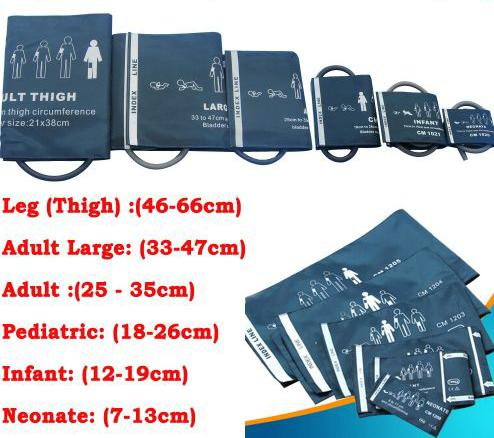
Following are the steps to measure blood pressure by sphygmomanometer
- When the upper arm is tied with an inflatable cuff, keep in mind that at least 80% of the upper arm area is covered and the bottom of the cuff should be two centimeters above the antecubital fossa or elbow.
- If the valve of the BP instrument bulb is loose, tighten it medium tight, do not over tighten.
- Air is pumped into the phlegm bladder to a pressure greater than the systolic and diastolic pressures.
- The stethoscope is then placed over the brachial artery of the arm.
- Then the air is slowly released by loosening the bulb valve little by little and due to this the pressure through the cuff also decreases until the pressure drops to 180 mmHg.
6.A stethoscope is used to listen for the sound when the cuff deflates the pressure is also monitored in the manometer and this sound is the systolic pressure.
Normal systolic pressure is 120 mmHg.
- The pressor inside the cuff is further reduced by releasing the air until no sound is heard through the stethoscope.
The pressure at which the sound of flow in the blood is not heard is the diastolic pressure, it is also seen in the manometer when the sound stops.
Normal diastolic pressure is 90 mmHg.
Principles of Sphagmomanometer
Its main principle is that the pressure in the cuff bladder should be equal to the arterial pressure.
Blood pressure is usually measured from the brachial artery as it is the main blood vessel of the upper arm.
The brachial artery is inflated until it is compressed (narrowed) and blood flow is stopped.
Points to consider for accurate BP measurement
Remove tight clothing.
Do not eat or drink anything and do not exercise for 30 minutes before BP measurement otherwise the BP will be high (increased).
Remove excess air from the cuff before measuring BP otherwise the BP will be inaccurate.
Keeping both feet flat on the ground and not crossing the legs.
Do not talk to the patient while measuring the patient’s BP.
Place the patient in a chair and sit straight back.
Place the patient’s hand on the table at the level of the patient’s heart.
Ask the patient to rest for 5 minutes before measuring BP.
Tie the cuff on the upper arm two centimeters from the elbow.
The cuff should not be too tight on the upper arm, it should easily fit two fingers.
Determining the appropriate cuff age wise for measuring BP.
After care
Use a soft dry cloth or a soft cloth moistened with a mild detergent to clean the cuff of the manometer and wipe with a dry cloth.
Do not wash the cuff and other parts of the BP instrument in water and also do not use gasoline or other components.

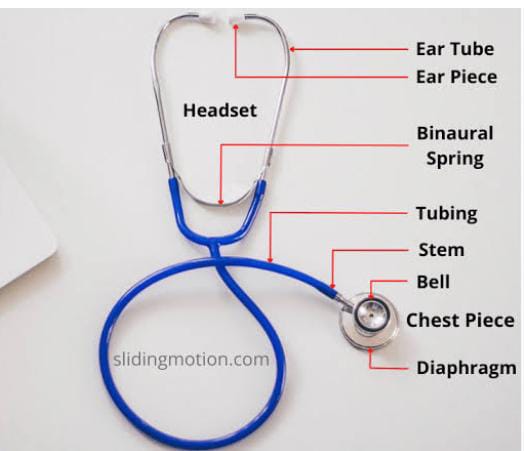
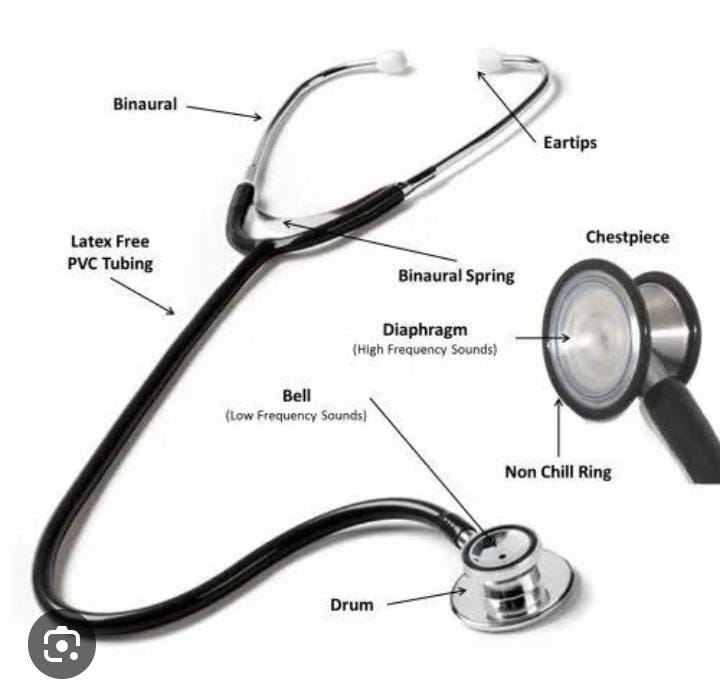
- Stethoscope -સ્ટેથોસ્કોપ:
Usage:
A stethoscope is used to measure blood pressure.
Heart, lung, intestinal track (intestinal movement called peristalsis movement) is done to hear the sound.
After care
Keep away from excessive heat and oil.
Clean with 70% isopropyl alcohol. To remove organic material while cleaning
A stethoscope is a medical instrument used to listen to the sounds inside the human body.
Mainly lung, heart, intestine sound is heard through stethoscope.
Apart from this, it is also used to listen to the fetal na heart sound.
Stethoscope is also used to manually check blood pressure.
Kidney Tray:-
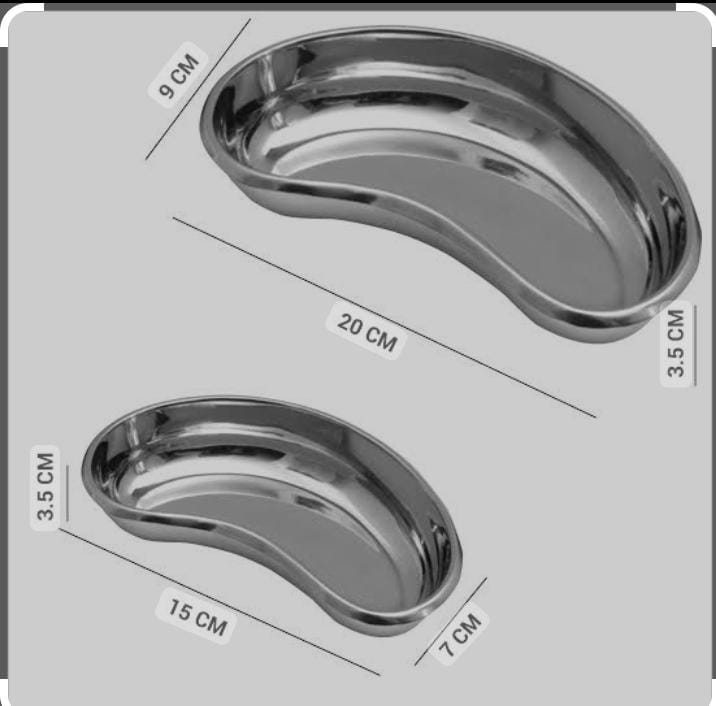
A kidney tray is a kidney-shaped basin. It is mostly used in surgical procedures. In which dressing bandage is done in a small instrument and another medical vest.
Another name for kidney tray is kidney dish or emesis basin.
Use
Wet waste has to be collected. Dressing is done in surgery etc.
It has many functions like holding or transporting drug cotton dressing syringe needle etc.
Collecting medical waste involves collecting human tissue and blood etc. in dental procedures.
Sharp instruments have to be transferred safely.
After care
First clean it with a soft brush or soft cloth.
Clean only a small amount. Do not use metal brushes.
Then sterilize it by autoclave.
Syringe:-
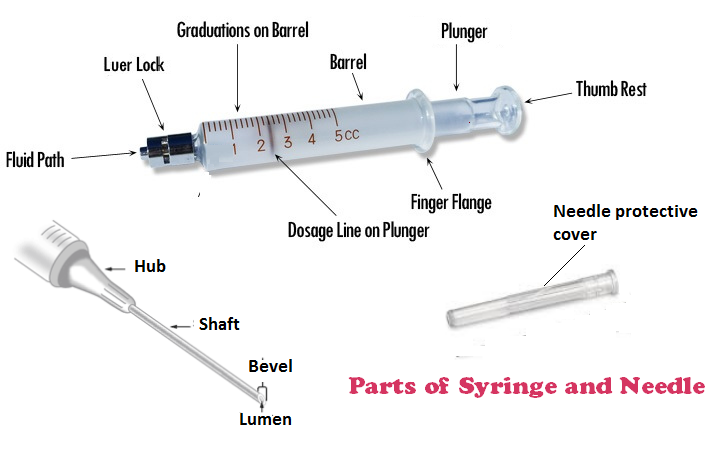
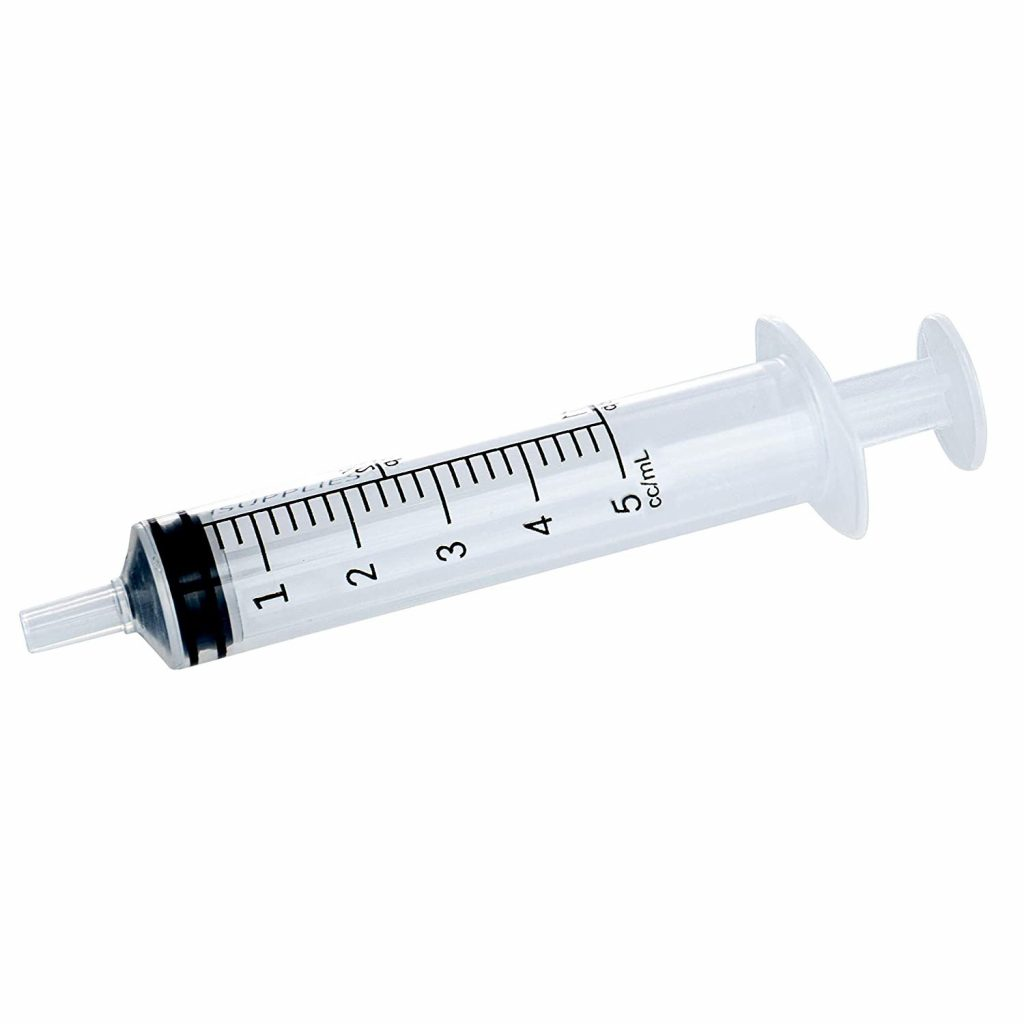
This is a device used to inject medication into the body and withdraw body fluids.
Type of Syringes
Insulin Syringe, Tuberculin Syringe, Oral Syringe, Dental Syringe
Disposable syringe, injection pen
Size: 1, 2, 3, 5, 10, 20, 50, 60 ml
Biggest size: 500 ml
After Care:
Cut the hub in the disposable syringe, remove the plunger, cut. Discard in red bin.
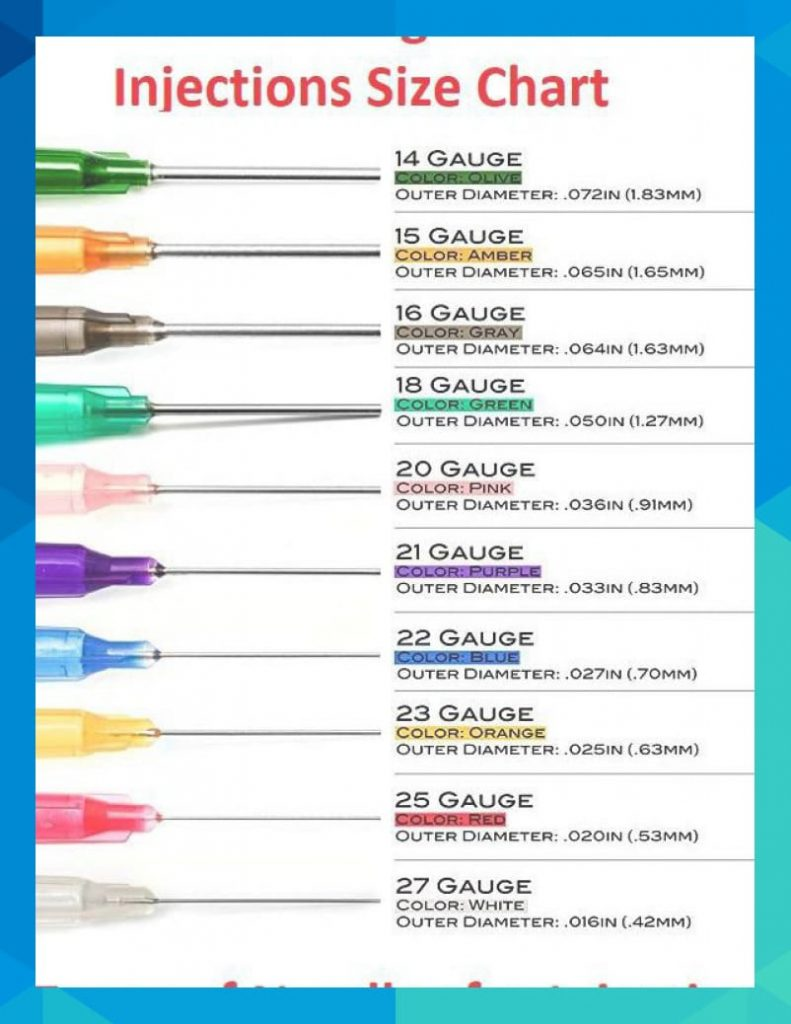
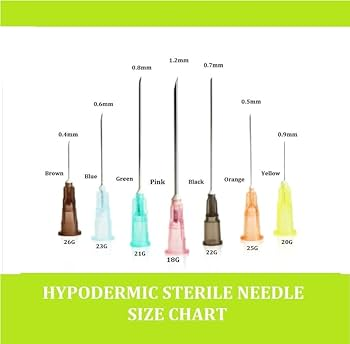
Needle:
This is a single-use needle.
It has been designed in such a way that we can use it once.
Neddle is used to withdraw medication from ampule and vial, to collect blood sample, apart from that, to do one time medication administration, for vaccination,
Used to give im, iv, sc injection.
If the needle is reused, there is a chance of infection.
- IV CANNULA:

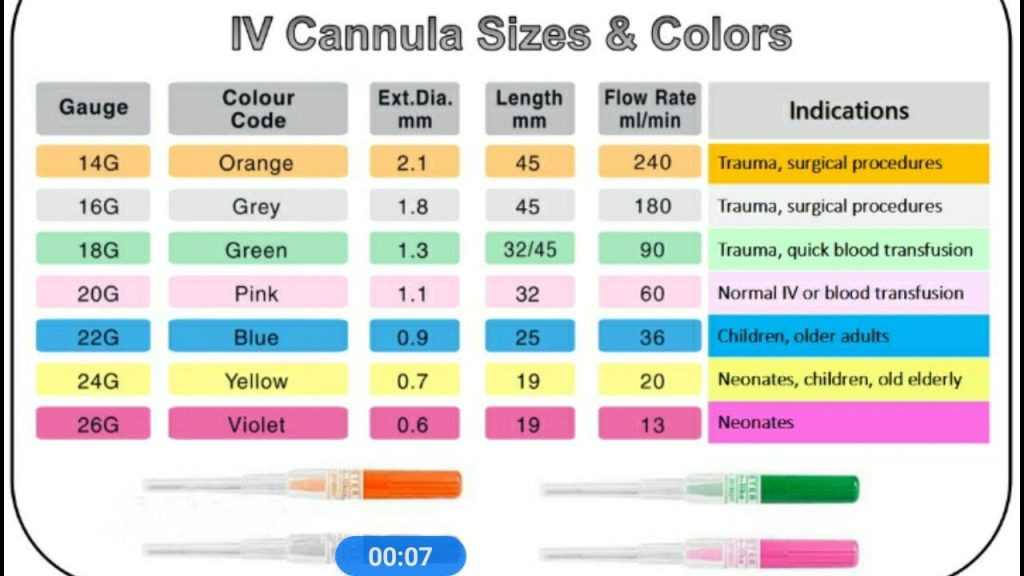
IV cannulation is a technique in which a cannula is placed inside a vein to provide venous access.
Blood sample is taken through venous access.
Apart from that, fluid, medication, parenteral nutrition, chemo therapy and blood transfusion are done.
IV cannula is cannulated in forearm, back of hand and antecubital fossa.
Glucometer:
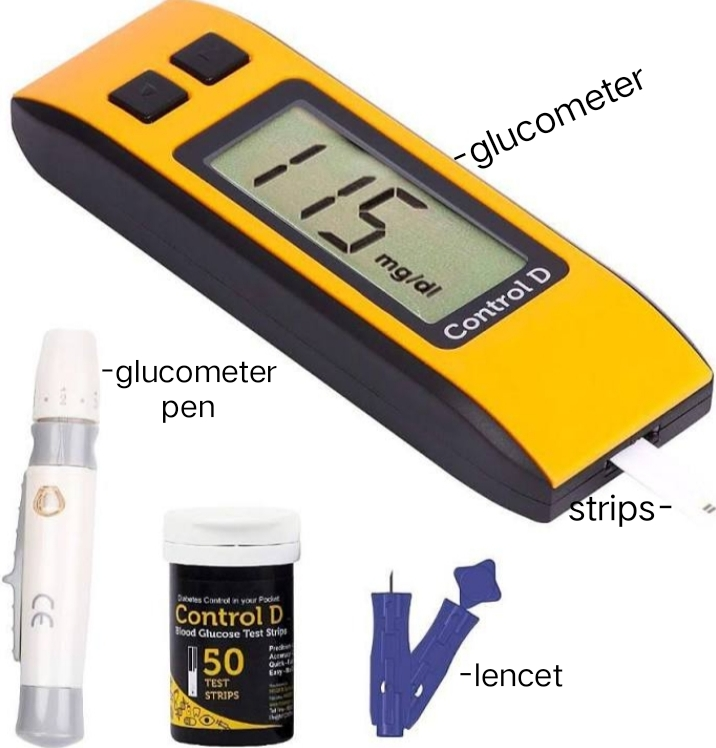
Glucometer is used to check the level of sugar in the blood.
Glucometer measures blood sugar level in 3 ways.
Invasive method
Non-invasive method (manually)
CGM (continuous glucose monitoring)
Mainly at present invasive method is used to check blood sugar level.
In it, a blood sample is taken from the finger tip through a lancet and then blood sugar level is checked through a lancing device and test strips.
regular blood sugar level check karta People use pen-like glucometers which are painless and can be done by oneself.
Normal blood sugar level: 70-130 mg/DL
HYPERGLYSEMIA if blood sugar level is more than 130 mg/DL
is called
Blood sugar level less than 70 mg/dl is called HYPOGLYCEMIA.
Ophthalmoscope:
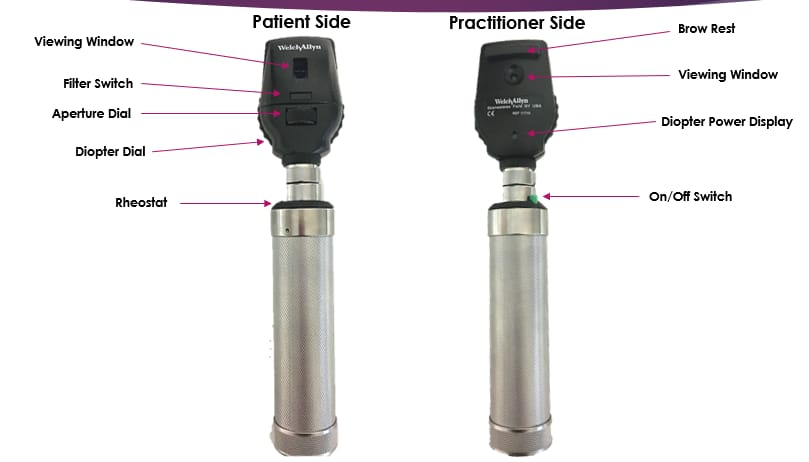
Opthalmoscopy is a clinical examination of the eye in which the examination of the interior eye is done through an opthalmoscope.
The status of the fundus and the opacities of the ocular media can be known through the Opthalmoscope.
The degree of retina can be known through Opthalmoscope.
Opthalmoscope can be used for screening of eye diseases like glaucoma, retinal detachment etc.
Ophthalmoscope was invented by von Helmholtz in 1850.
Pulse oximeter
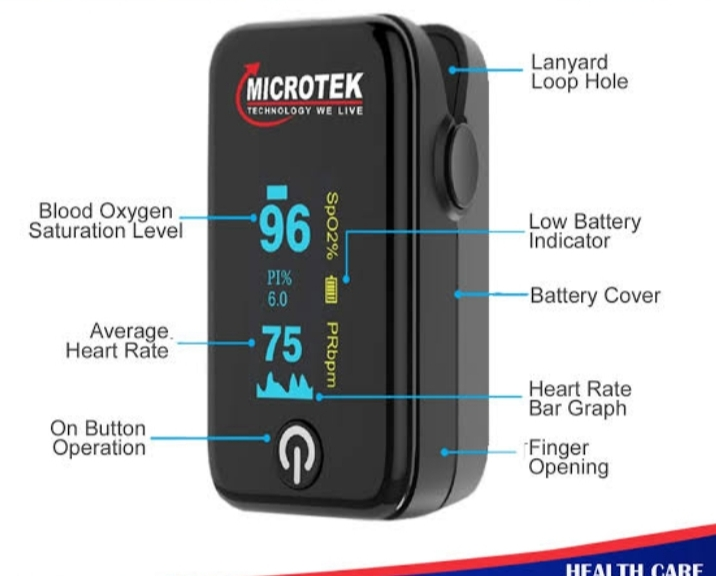
It also shows the saturation of oxygen in the body along with the pulse and respiration
Pulse oximeter is used to check the level of oxygen in the blood.
Pulse oximeter was invented in 1974 by a man named Takuo Aoyagi.
Pulse oximeter has been used more during the corona virus pandemic.
Pulse oximeter is a painless and non-invasive method through which the level of oxygen in the blood can be checked.
RYLE’S TUBE
The method to check that the RYLE’S TUBE is in the stomach is as follows:
Aspirate
Immerse
Ascultate
X-ray
Aspirate:
Attach the syringe to the end of the RYLE’S TUBE, then aspirate a small amount through the syringe and if the content in the stomach in the rule’s tube comes into the tube, then it is confirmed that the tube is in the stomach.
Immerse:
Keep the tip of the rule’s tube in the bowel filled with water.
If air bubbles are seen in the water then it is in the trachea and if no moment is seen then it can be confirmed that it is in the stomach.
Auscultate:
Attach the syringe to the end of Rule’s tube and place the stethoscope on the left hypocondrium of the stomach, and inject 10 ml of air through the syringe and listen for the gassing sound in the stomach through the stethoscope.
If gassing sound is heard then it can be confirmed that it is in stomach.
X-ray
X-ray can determine whether the placement of Ryle’s tube is correct or not.
A Ryle’s tube is necessary for diagnosis or treatment in the gastrointestinal tract, as well as for feeding. Many tubes have been designed so far, but the tube designed by Ryle of Guy’s hospital medical school is the most widely used tube.
PRINCIPAL OF CONSTRUCTION
The tube should be flexible and fine
The tube should be of sufficient length to reach different parts of the upper gastrointestinal track
It should have markings to check the location of the tip within the gastrointestinal track
The tip must be open to allow the material to pass through the tube
Keep the tip slightly weighted so that food is easier to swallow
The tube should not be too uncomfortable.
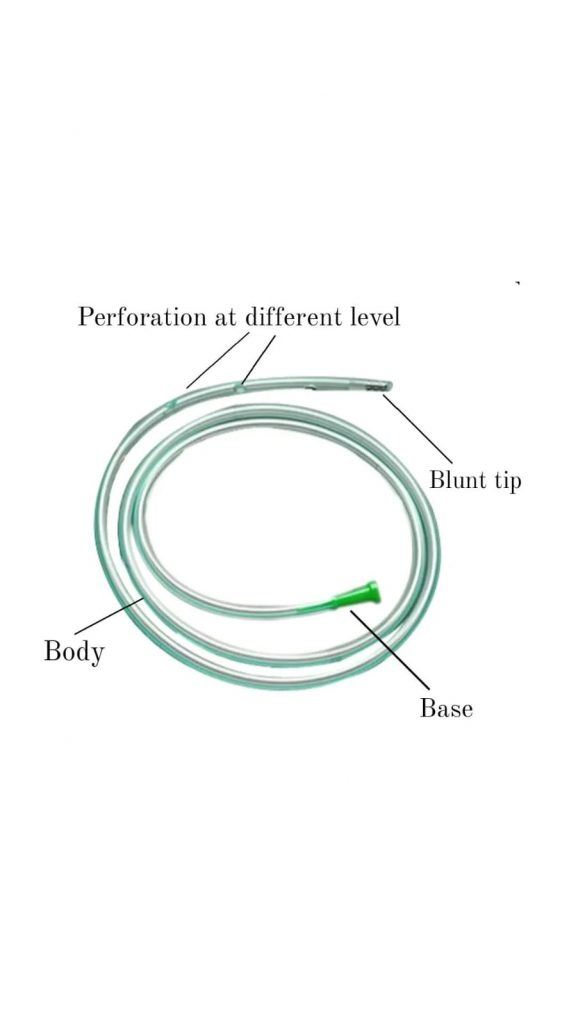
PARTS OF RYLE’S TUBE
Tip, body and base
1 – TIP
~ It is blunt (to prevent internal injury).
~ It has openings at different levels on all sides (to introduce fluid into the gastrointestinal track or to collect material from it)
(If all the holes are at one level, there is a possibility of tearing while inserting the tube)
~ It contains a small piece of lead
(The tip has a piece of metal inside that makes it heavier, making swallowing easier due to gravity)
(The metal is radio-opaque so the position of the tip inside the gastrointestinal track can be seen during radiology)
.2 – Body
It has four markings.
Mark – 1
It is located 40 cm from the tip and is marked by a transport groove. This mark indicates that the tube has reached the cardiac orifice.
Mark – 2
They are spaced 50 cm apart and marked by two transverse grooves. This indicates that the tube has reached the gastric cavity.
Mark – 3
It is at a distance of 57 cm from the tip and is marked by three transverse grooves indicating that the tip is located at the pylorus.
Mark – 4
It is located at a distance of 65 cm from the tip and has four transverse grooves
is marked by It indicates that the tube has reached the duodenum.
3 – Base
It has an opening through which material is injected or withdrawn with a syringe.
How Rails Tubes are laid
This procedure is easy if followed systematically.
Ask the patient to sit up in bed. Placing the tip of the tube on the dorsum part of the tongue (no lubrication required, saliva and other natural secretions act as lubricants.) Ask the patient to swallow the tube until the tube reaches the desired mark inside.
Apart from this, the Riles tube is well lubricated and inserted through the nose to insert it in the supine state, the patient is asked to swallow after it reaches the fairings.
Uses of Ryle’s tube.
1 – To diagnose
To extract gastric juice, to know the process of gastric juice and absorption in the following diseases;
Chronic gastric ulcer
Chronic duodenal ulcer
Pyloric obstruction
In gastric carcinoma
Zollinger-Ellison syndrome
Gastric Achilles
Collection of duodenal contents for bacterial diagnosis
For example: To identify typhoid carriers
The contents are collected to check for the presence of tubercle bacilli in children (which are helpful in the diagnosis of pulmonary tuberculosis) and in patients who cannot clear the throat while sleeping and swallow the material.
To confirm the diagnosis of pernicious anemia associated with achlorhydria (absent hydrochloric acid in the gastric juice).
To distinguish between bleeding above the pylorus and below the pylorus.
If blood is present in all samples aspirated from the stomach, the site of bleeding is above the pyloric sphincter (eg, malaena). If blood is present in the duodenal sample, the site of bleeding is below the pyloric sphincter.
2- Therapeutic (for treatment) use
For gastric lavage procedures
To check drip feeding. For example: Intra gastric milk feeding
To administer intragastric nutrition to unconscious and comatose patients
to contract the stomach ; such as when there is acute gastric dilatation
To perform naso-gastric suction for post-operative comfort (this is very useful to promote post-operative recovery in case of paralytic ileus).
Measurement while inserting Rule’s tube into stomach:
Place one end of the Ryle’s tube at the tip of the nose.
Then take the center part of the Ryle’s tube to the pinna of the ear.
And then take the ryles tube from there to the xiphoid process.
Marking on this part.
Insert the tube into the stomach up to this marking.
Apart from this procedure there is another way. Which are as follows:
Blue color marking is already visible on Ryle’s tube.
Insert the tube up to this marking and keep this extra part of the tube out.
Rubber tube:
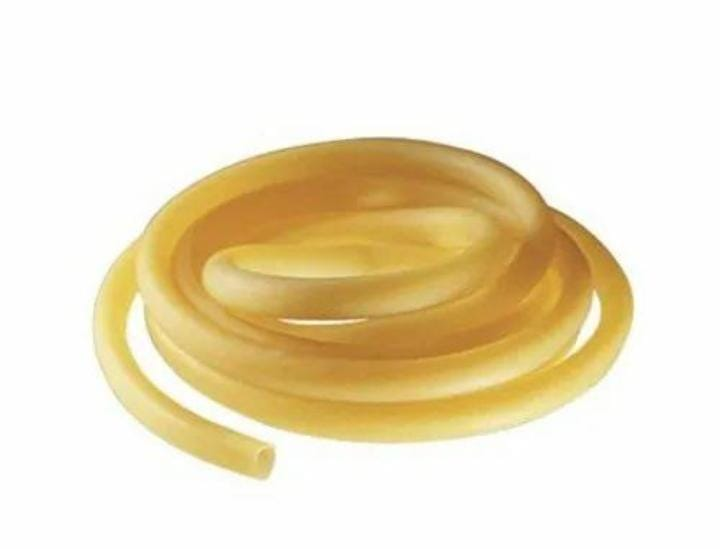
Rubber tube is made of synthetic or natural rubber tube.
Its primary use is for transport and circulation of liquids and gases.
Many rubber tubes are found in it.
Urinary catheter:
For disposal of urine
Suction tube:
To suction
Rubber tube is found in etc.
- Urinary catheter:

Urinary catheter is made of plastic or silicon.
Urinary catheter is a tube through which urine in the bladder (urethra) is used to drain.
Apart from that, when the patient has difficulty in urinating naturally, urinary catheter is done.
Urinary catheter has two way and three way urinary catheter.
Apart from that, it is used to measure continuous urine output in patients with renal failure, post operative patient, stricture, trauma etc.
Two way urinary catheter:
It has 2 tube channels.
In it, the balloon is inflated through which the catheter is fixed in the bladder.
And a urobag is attached through a channel through which urine is collected.
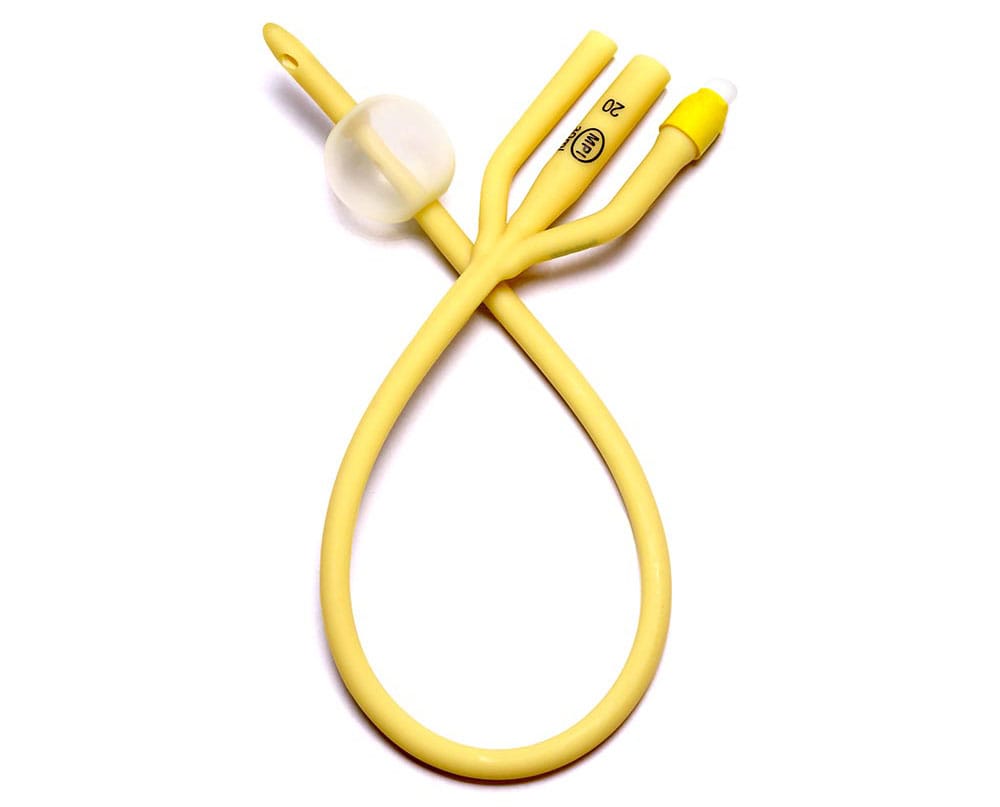
Three way urinary catheter:
It has 3 channels.
In it, the balloon is inflated through which the catheter is fixed in the bladder.
And a urobag is attached through a channel through which urine is collected.
A third channel is used for bladder irrigation through antiseptic solution.
Size:
Children: 8-10 french
Women: 14-16 french
Men: 16 – 18 french
Aftercare:
The cathertet is removed when the patient is discharged or the patient’s urine output is not to be measured.
First, the saline water in the balloon spot is withdrawn through a 10 ml syringe, then it is slowly removed in a round motion.
Then the catheter is separated from the urobag and the catheter is discarded in the red bin
- Urobag:
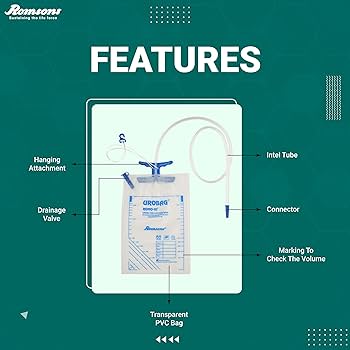
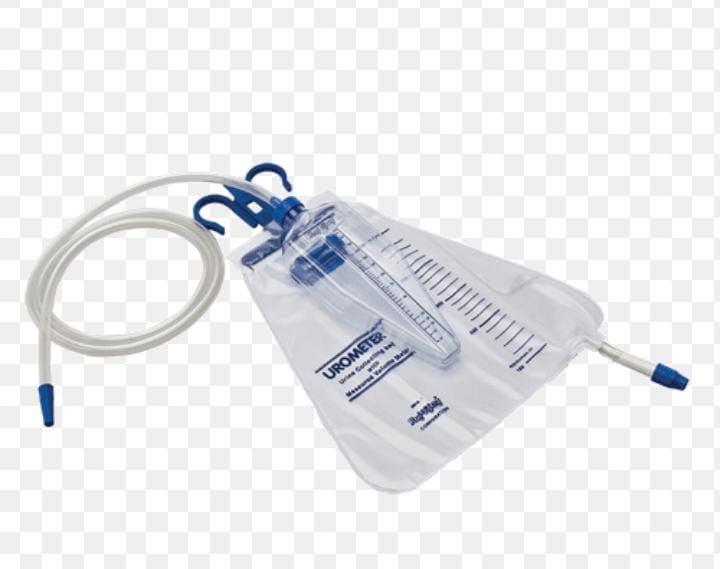
Urobag is used to collect the drained urine when a urinary catheter is in place.
The Urobag is attached to the tubing of the catheter.
Its main use is to measure urine output.
Apart from that, it is used to take urine sample.
Urobag can store urine from 50 ml to 2000 ml.
Apart from this, there is a measuring cup in the upper part of the urobag which can be used to measure the fixed urine output every hour.
Tourniquets:
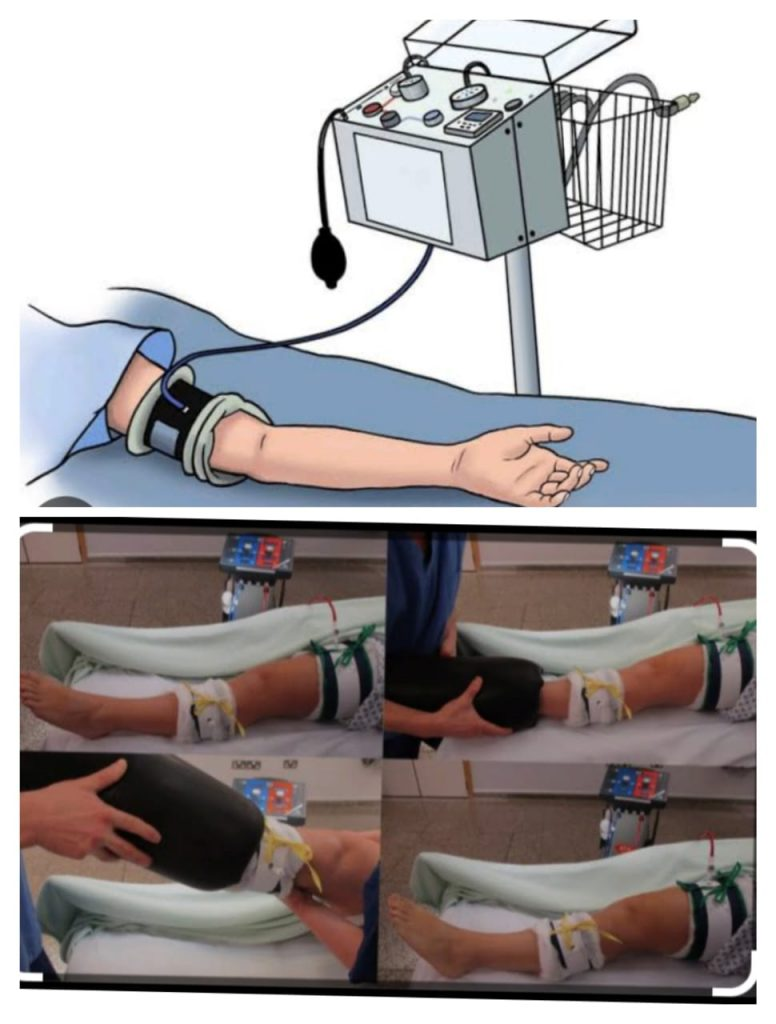
The name was coined by Petit in 1978. Lister first used it in limb surgery.
Usage:
Tourniquet is used in orthopedic and plastic surgery. It is a compressive device. It prevents blood loss and minimizes perioperative blood loss.
Site:
Generally in hand and Thai.
In the finger (digital tourniquet).
Pressure of tourniquet
Upper limb: Systolic pressure: + 50 mmHg
Lower limb: Twice the systolic pressure.
Time:
Applying a tourniquet sort of time. The safest time is 1 hour. It can be extended to one and half hour or 2 hours. Special care should be taken for the elderly, alcoholics, diabetics, and those with atherosclerosis.
Complications
Paralysis: Moldaver (1954) described that paralysis is due to pressure rather than ischemia.
(a) Motor paralysis without atrophy
(b) Loss of touch, pressure, vibration and sense.
(c) Loss of sympathetic function.
(D) Peripheral pulse normal
Nerve block
Skin damage (apply too tightly)
Chemical burns
Subcutaneous nerve damage
6.arterial spasm
Post operative bleeding
Cardiac arrest (when applied to both lower limbs.)
Vessels Damage
Post tourniquet syndrome: Swelling in the tissue, this condition occurs after two hours due to ischemia.
These include swelling of hands and fingers, joint stiffness, numbness without sensation and aesthesia, and weakness without real paralysis.
Contraindication
Peripheral artery disease
Severe cross injury
Sickle cell disease
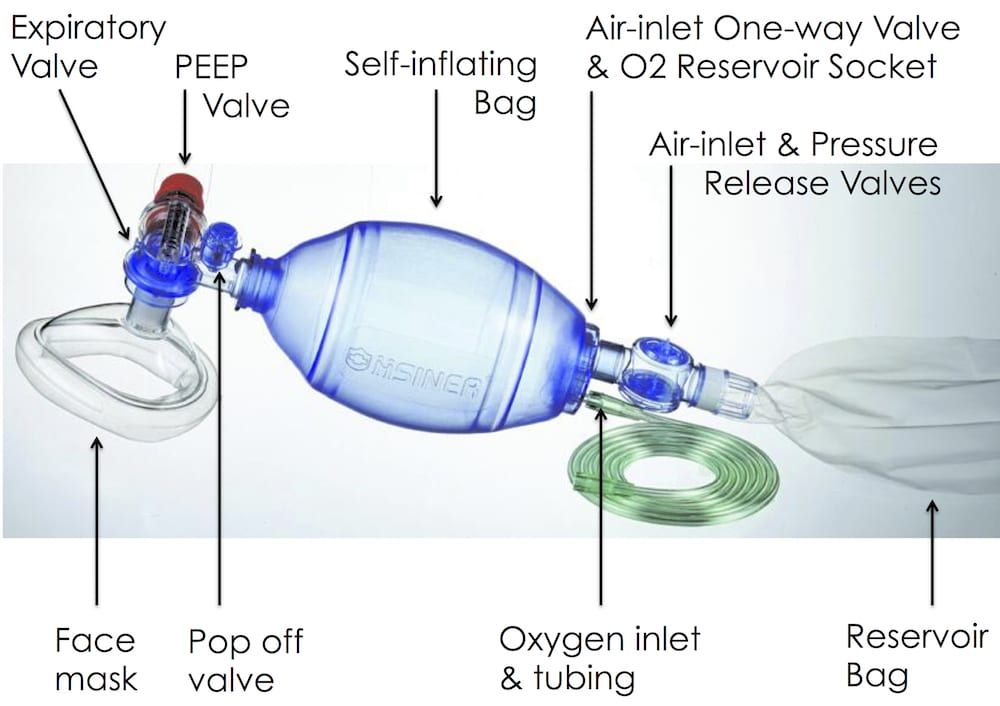
AMBU BAG:
AMBU BAG is used to provide resuscitation or positive airway pressure in emergency conditions like cardiac arrest.
Apart from this, AMBU BAG is used to provide respiratory support to the patient in emergency condition for temporary and short term.
Sterilization method of plastic articles:
After using the articles first, they are cleaned with tap water.
Then it is sterilized in ethylene oxide.
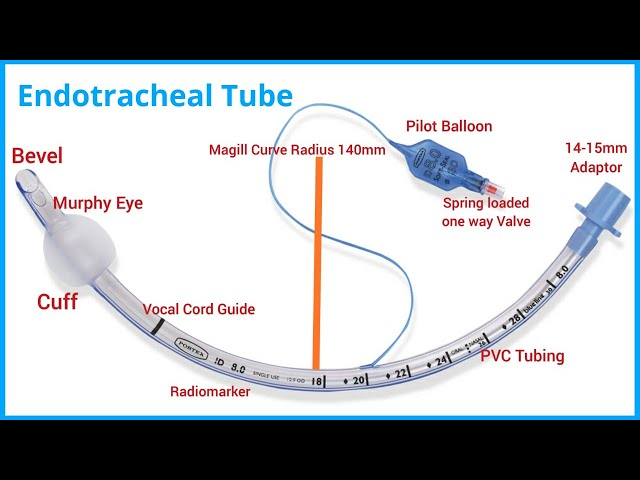
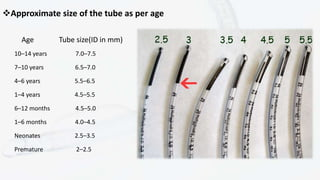
Endotracheal tube:
Et tube is made of plastic.
ET TUBE incubation is done to maintain airway in emergency condition.
Endotracheal incubation is done in conditions like hypoxia, hypercarbia, poor respiratory drive, airway patency etc. and tube incubation.
Apart from that, when there is ventilator failure, when there is oxygenate failure, at tube incubation is done.
- Oropharyngeal airway:
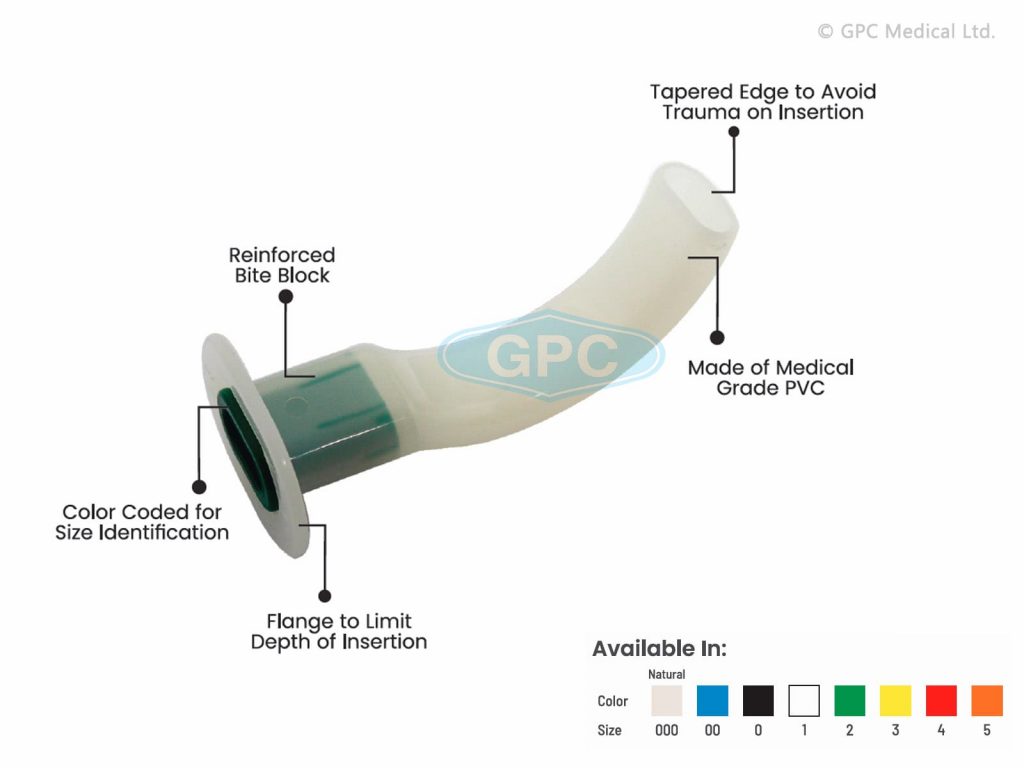
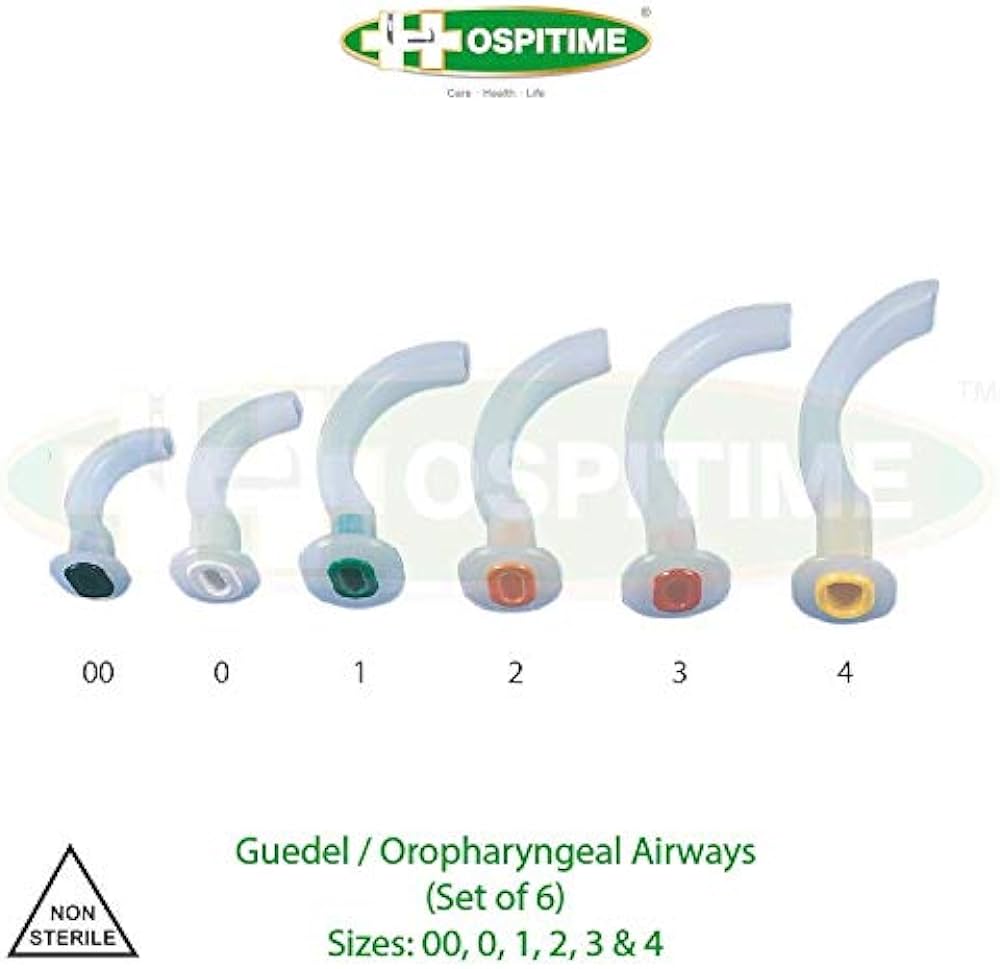
Oropharyngeal airway is made of plastic.
An oropharyngeal airway is placed in an unconscious or minimally responsive patient.
Apart from that, it prevents the tongue from dropping.
Airway is useful mainly to prevent aspiration.
Usage:
Keep the airway open
To prevent tongue bite
To perform suction
To prevent occlusion of endoteachal tube (to prevent blood clotting).
- Oxygen mask:
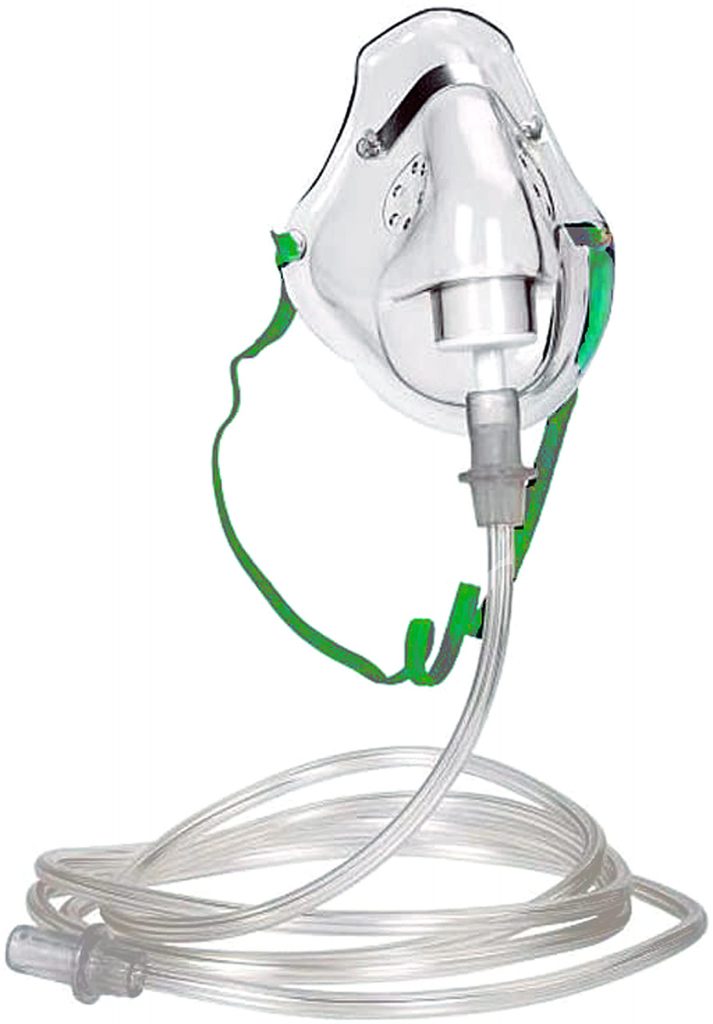
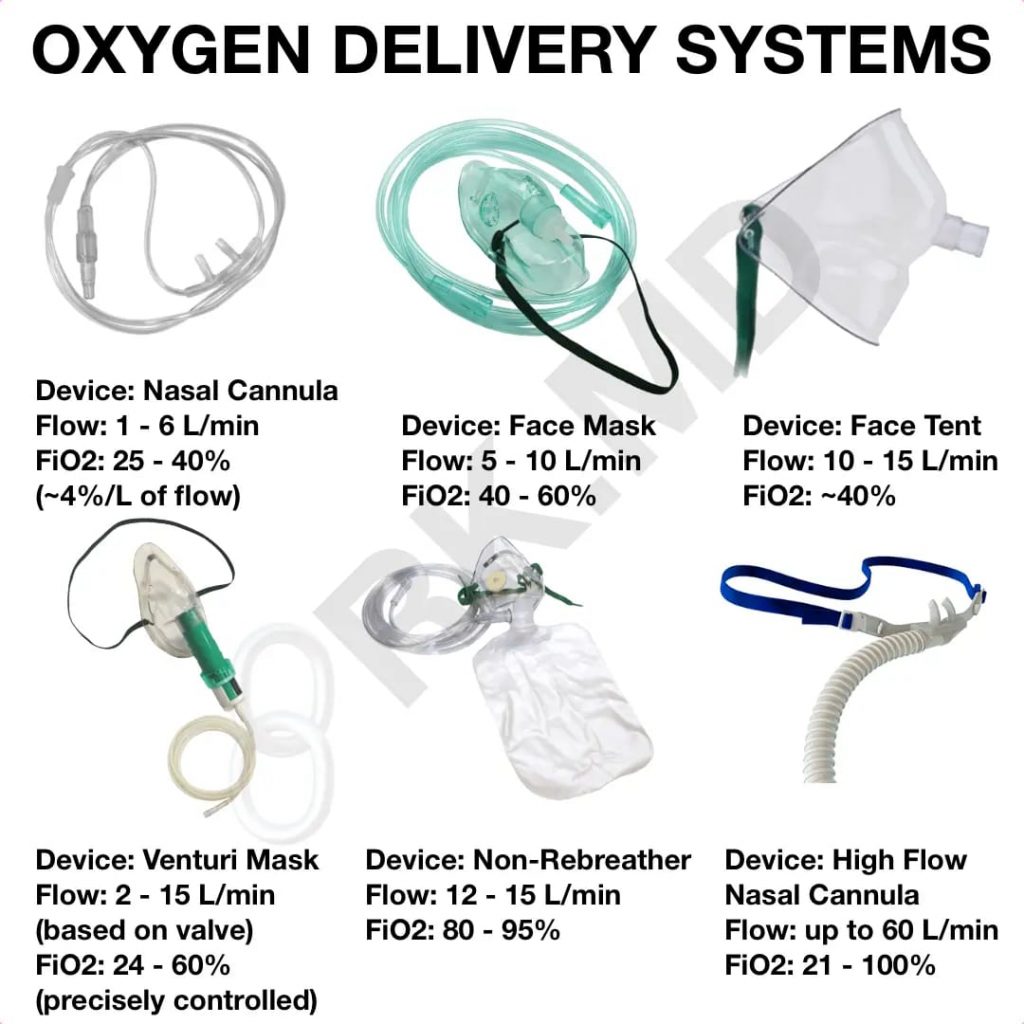
Oxygen mask is used to deliver oxygen to the patient if the patient is not getting proper oxygen.
The oxygen mask is attached to the oxygen cylinder by connecting it through tubing.
- Tracheostomy tube:

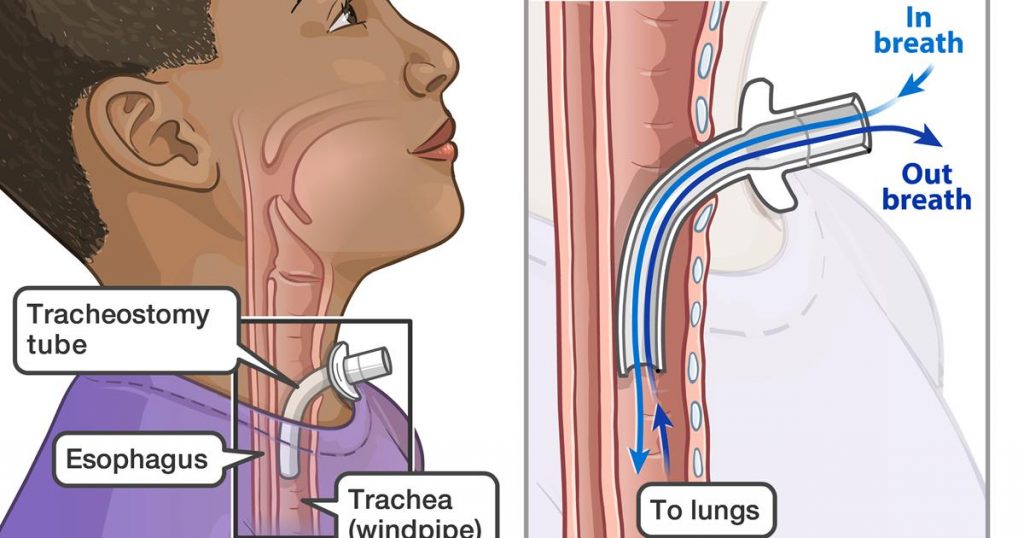
A hole is surgically created in a tracheostomy.
And it is mainly done between the third and fourth cartilage and this opening is called stoma.
Trachiostomy is performed when oral and nasal intubation is insufficient to relieve airway obstruction.
Tracheostomy is a surgical opening in the trachea through which oxygen is properly delivered to the lungs.
Airway is provided through tracheostomy tube
Apart from this, the secretion collected in the lungs is removed.
When the patient has an injury or an accident, the patient’s muscles are weak, then a tracheostomy tube is placed and oxygen is provided.
Tracheostomy is done in conditions like upper neck cancer, chronic aspiration, prolonged ventilator dependent.
- Tuning fork:

Tuning fork is made of metal, stainless steel and aluminum.
It is mainly used for vibratory sensation and hearing assessment (air conduction, bone conduction).
Tuning fork is used to perform Rinne test and Weber test for ear hearing.
- Otoscope-ઓટોસ્કોપ
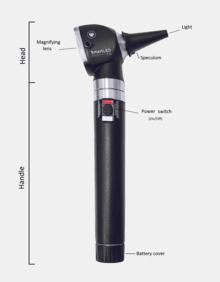
What is an otoscope?
An otoscope is a medical instrument or device. It has a clear and intense light which will help us to examine the ear canal well. Because what it does is show us better images of that area as well as the eardrum. Generally speaking, we can add that with this device you will be able to see both Middle and External Ear, making the study more complete. In the head part, we can find many terminations, which will adapt the cavity. From there the light we mentioned and the magnifying glass will begin to hold images at a much larger size.
What is this for?
An otoscope is used to look closely at both the external and middle ear. So in this way, the doctor will check for any kind of problems or infection. As we mentioned, all this will be seen more clearly thanks to the magnifying glass which will detect with the help of light whether there is a problem in the ear canal.Can diagnose problems or diseases like otitis, ear piercing or wax plug which is one of the most common causes in our ears.
How to use an otoscope
While using the otoscope, the first step we are going to take is to hold it well and for this, we should treat it like a pen or pencil. Although it seems to be something unimportant, it is not that important, as it will help us while conducting the test. You hold it with your thumb and forefinger to support the rest of your hand on the patient’s face. Why is the latter important? Because we will have the necessary stability to control the person if he moves forward.
Now it’s time to, with your free hand, slightly pull the ear both backwards and upwards, so that we can align the canal well and not create any problems with the entrance of the otoscope. If the person to be examined is a child, it is better to stretch backwards and horizontally.
It is important that, if there is any kind of pain or infection in one ear, always start with the other one which is healthy. In addition, when evaluating, it will allow us to better compare what is in one and the other. Now you just have to check whether you see external auditory canal, eardrum etc or not. Always check that the light on our device is correct so that it does not lead to errors.