DEMAND INSTRUMENT
IMPORTANT FORCEPS FOR ALL VIVA TABLE
🔹 Mosquito Forceps
Mosquito forceps are small, fine-tipped hemostatic instruments used to clamp small blood vessels and control bleeding during delicate surgical procedures.
🛠️Parts of Mosquito Forceps:
- Jaws (Tips):
- Serrated or grooved for gripping tissue or clamping vessels.
- Some may be straight or curved.
- Box Lock (Hinge Joint):
- The pivot point allowing the two arms to open and close.
- Provides stability and precision.
- Shanks:
- Long arms connecting the finger rings to the jaws.
- Provide leverage for clamping.
- Ratchet:
- Interlocking teeth near the finger rings.
- Allows the forceps to lock in place at various pressures.
- Finger Rings:
- Loops for thumb and finger for grip and control.
🩺 Uses of Mosquito Forceps:
- Hemostasis:
- Clamping small blood vessels to stop bleeding during surgery.
- Grasping:
- Holding delicate tissue or small surgical items like sutures.
- Dissection:
- Used in blunt dissection of tissues in minor surgeries.
- Holding:
- Temporary holding of structures like catheters or drainage tubes.
🧼 Sterilization of Mosquito Forceps:
- Cleaning:
- Immediately rinse with cold water after use to remove blood and debris.
- Use enzymatic detergent and brush to clean manually or with an ultrasonic cleaner.
- Inspection:
- Check for damage, rust, or debris, especially around the box lock and ratchet.
- Packaging:
- Wrap in sterilization wrap or place in a sterilization tray.
- Sterilization Methods:
- Autoclaving (Steam Sterilization) — Most common and recommended.
- 121–134°C for 15–30 minutes, depending on the autoclave type.
- Chemical Sterilization (for heat-sensitive instruments):
- E.g., Glutaraldehyde or hydrogen peroxide plasma.
- Autoclaving (Steam Sterilization) — Most common and recommended.
🧴 Aftercare and Maintenance:
- Drying:
- Dry thoroughly after sterilization to prevent rusting.
- Lubrication:
- Use instrument milk (surgical lubricant) on the joints to maintain smooth motion.
- Storage:
- Store in a clean, dry, and organized manner in a sterile environment.
- Inspection:
- Regularly inspect for:
- Jaw alignment
- Smooth ratchet function
- Rust or corrosion
- Wear and tear
- Regularly inspect for:
- Sharpening/Servicing:
- Occasionally require professional maintenance or replacement if damaged.
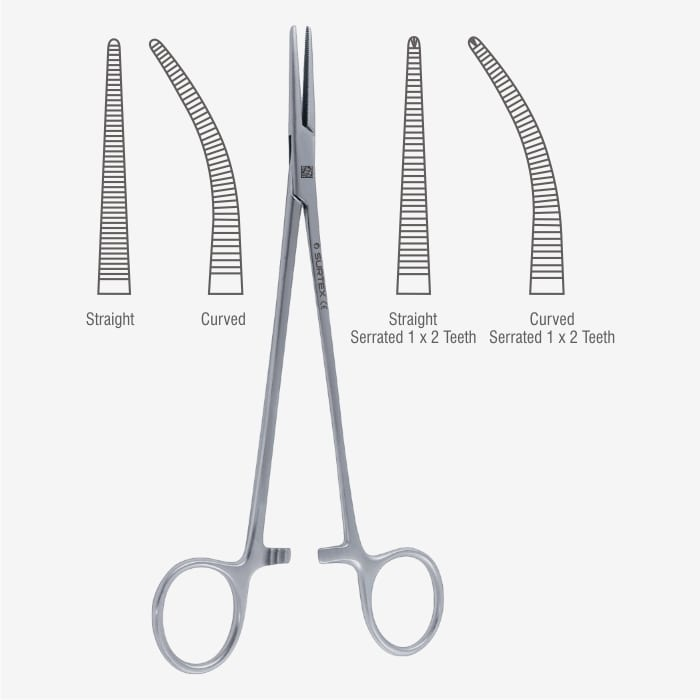
🔹 Kocher Forceps
Kocher forceps, also known as Ochsner forceps, are a type of surgical clamp used for grasping and holding tough tissue. These instruments are known for their distinctive toothed tip, which gives them a powerful grip, making them ideal for procedures requiring firm tissue handling.
🔸 Parts of Kocher Forceps
🦷 Jaws/Blades: These are the working ends of the forceps and are serrated with 1×2 interlocking teeth at the tip. This tooth provides a strong hold on tough tissues like fascia or tendons.
🔗 Box Lock/Joint: This is the pivot mechanism where the two arms meet. It allows smooth opening and closing of the instrument.
🦿 Shanks: The long middle portion between the box lock and the handle. It provides the leverage needed to apply pressure with minimal effort.
🔐 Ratchet Lock: Located near the handles, this locking mechanism enables the forceps to remain tightly closed without constant hand pressure, making it suitable for prolonged clamping.
🔁 Finger Rings: The circular ends where the surgeon places their thumb and ring finger to control the instrument with precision.
🔸 Uses of Kocher Forceps
🧠 Kocher forceps are mainly used in general, gynecological, and orthopedic surgeries. Their primary function is to grasp and hold firm or slippery tissues without slipping.
🧷 They are especially useful when holding fascia, muscle, tendons, or thyroid tissues where a firm grip is necessary.
🩸 The toothed tip helps in controlling bleeding by clamping blood vessels or tissues that require firm pressure.
⚙️ In gynecology, they are used for holding the cervix or uterine edges during procedures like dilation and curettage (D&C).
💪 The forceps are strong enough to hold tissue during traction or dissection, but must be used carefully to avoid crushing delicate tissues.
🔸 Sterilization Process of Kocher Forceps
Proper sterilization of Kocher forceps is critical to ensure infection control and patient safety.
🧼 Step 1: Pre-cleaning
Immediately after use, rinse the forceps under running water to remove any visible blood, body fluids, or tissue particles.
🧽 Step 2: Manual Cleaning
Scrub the instrument with a soft brush and enzymatic detergent, paying attention to the serrations and toothed tips, which may trap organic debris.
💧 Step 3: Rinsing & Drying
After cleaning, rinse thoroughly with distilled or deionized water, and then dry completely using a lint-free cloth or air dryer.
🔍 Step 4: Inspection
Check the instrument for any signs of rust, damage, or malfunction, especially the ratchet lock and tooth alignment.
📦 Step 5: Packaging
Wrap the cleaned forceps in a sterile surgical pouch or autoclave wrap, ensuring it is ready for high-temperature sterilization.
🔥 Step 6: Sterilization (Autoclaving)
Sterilize using a steam autoclave at:
- 121–134°C temperature
- 15–30 psi pressure
- Cycle duration: 15–30 minutes, depending on load and autoclave settings
🏷️ Step 7: Storage
Once sterilized, store the instrument in a sterile, dry, and dust-free environment, preferably in sealed trays or containers until next use.
📝 Important Notes
✔️ Kocher forceps are made from high-grade stainless steel, ensuring durability and resistance to corrosion.
⚠️ Due to the toothed tip, there is a risk of tissue trauma, so proper handling and appropriate use are essential.
🔄 Available in both straight and curved variants, depending on surgical need
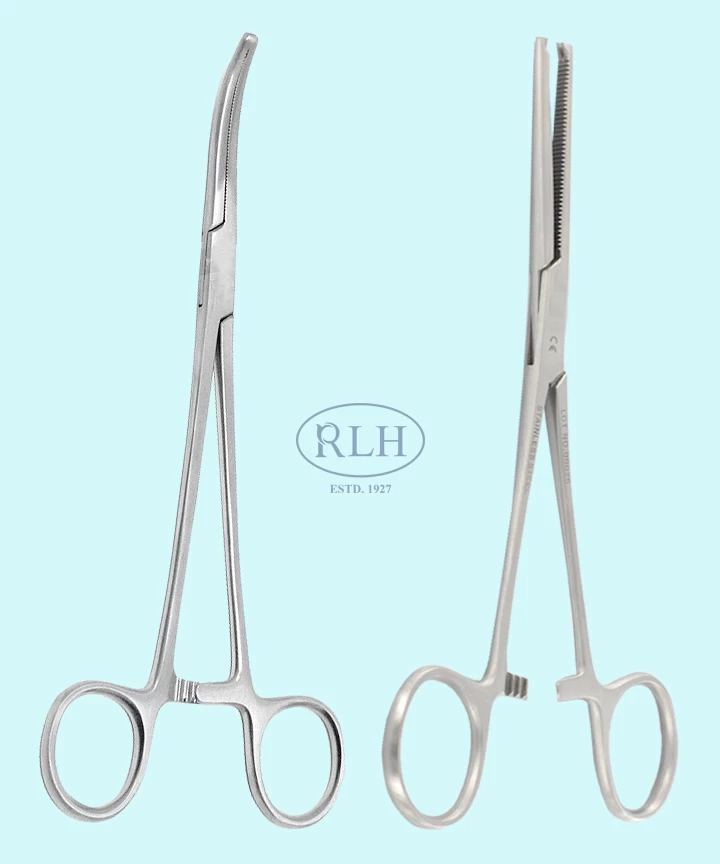
Artery forceps

Artery forceps, also called hemostatic forceps, are essential surgical instruments used to control bleeding by clamping blood vessels during surgery. They are used in nearly all surgical procedures to achieve hemostasis (stoppage of bleeding) and come in various sizes and types (e.g., mosquito, Kelly, Crile, and Rochester forceps).
🔸 Parts of Artery Forceps
🦷 Jaws: These are the serrated, non-toothed parts at the tip that clamp the blood vessel. The transverse serrations help to grip tissues or vessels securely without causing excessive damage.
🔗 Box Lock / Joint: The hinge point where the two arms meet, allowing for smooth opening and closing of the forceps.
🦿 Shanks: The elongated middle part between the joint and the handle, giving leverage for controlled pressure.
🔐 Ratchet Lock: Located near the finger rings, this mechanism locks the forceps in a closed position, allowing the surgeon to maintain pressure on a vessel without constant hand effort.
🔁 Finger Rings: Circular loops at the end of the handles, designed for the thumb and finger to precisely control the instrument during use.
🔸 Uses of Artery Forceps
🩸 Hemostasis (Bleeding Control): Their primary use is to clamp blood vessels during surgery to prevent blood loss.
🧷 Tissue Holding: Used to hold or retract delicate tissue temporarily, especially when other instruments are not suitable.
💉 Guiding Sutures: Artery forceps are often used to guide or hold a suture needle in deep or narrow surgical fields.
🧽 Holding Swabs: They may also be used to hold cotton swabs to clean or absorb blood during surgery.
🪡 Clamping Umbilical Cord: In obstetrics, small artery forceps are used to clamp the umbilical cord during delivery.
🧬 Removing Small Foreign Bodies: Especially in minor surgeries or wound cleaning.
🔸 Sterilization Process of Artery Forceps
Proper cleaning and sterilization are vital for infection control and maintaining the functionality of the instrument.
🧼 1. Pre-cleaning (Immediately After Use)
Rinse the forceps under running cold or lukewarm water immediately after use to remove blood, body fluids, and debris. Avoid hot water initially, as it can cause proteins to stick.
🧽 2. Manual Cleaning
Using a soft-bristle brush and neutral enzymatic detergent, clean all parts thoroughly—especially the jaws and serrations, where blood and tissues can get trapped.
💧 3. Rinsing and Drying
Rinse with distilled water and dry completely using a lint-free cloth or medical-grade air dryer.
🔍 4. Inspection
Carefully examine the instrument for:
- Proper jaw alignment
- Smooth functioning of the ratchet lock
- Any signs of rust, wear, or damage
📦 5. Packaging
Wrap the forceps in sterile surgical wraps or autoclave pouches, ensuring they remain sterile post-process.
🔥 6. Autoclave Sterilization
Use steam sterilization (autoclaving):
- Temperature: 121–134°C
- Pressure: 15–30 psi
- Duration: 15–30 minutes (depending on load and type of autoclave)
🏷️ 7. Storage
Once sterilized, store the artery forceps in a clean, dry, and dust-free environment, preferably in sterile trays or containers, ready for the next use.
📝 Important Tips for Care
✔️ Always keep the ratchet open during cleaning and autoclaving to allow steam penetration.
❌ Avoid using corrosive chemicals or bleach, which can damage the stainless steel.
🛠️ Regular maintenance and timely replacement are key to ensuring functionality and safety during surgical procedures.
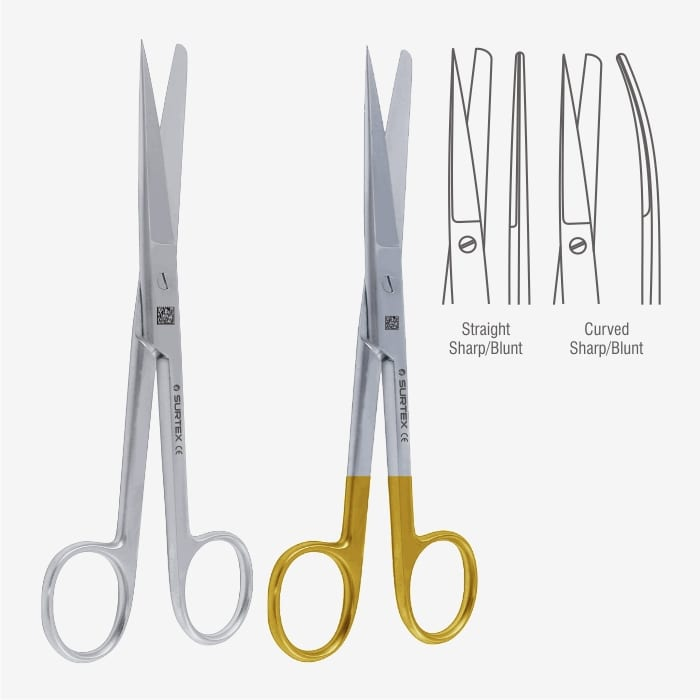
Mayo Scissors
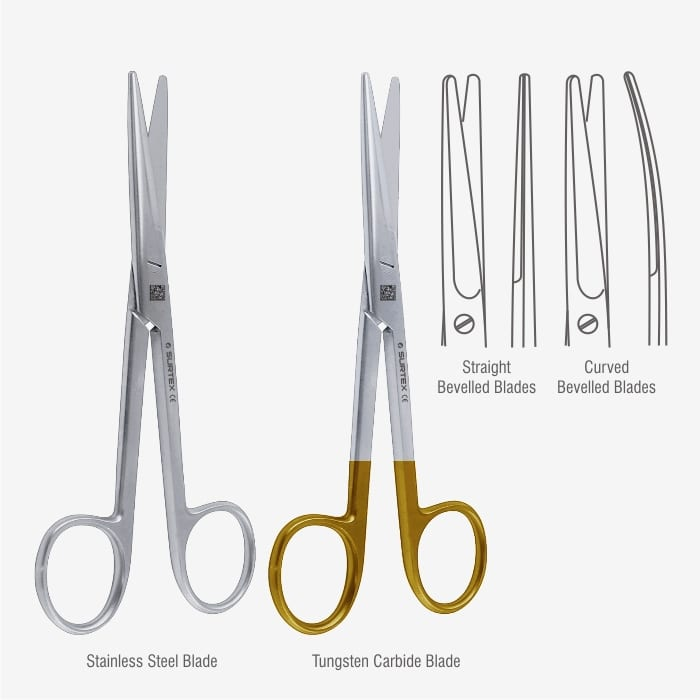
Mayo scissors are strong, stainless-steel surgical scissors commonly used in general surgery for cutting body tissues near the surface of a wound. They are known for their durability, heavy blades, and blunt tips, making them ideal for cutting tough structures like fascia, sutures, and muscles.
They come in two types:
- Straight Mayo Scissors – used for cutting sutures or surface tissues
- Curved Mayo Scissors – used for cutting deep or heavy tissues like fascia, uterus, or muscles
🔸 Parts of Mayo Scissors
🔪 Blades: The cutting portion, available in straight or curved form, depending on the surgical need. The inner edge is sharp to allow precise cutting.
🦷 Blunt Tips: Both blade tips are blunt-rounded for safer dissection and to prevent accidental injury to internal structures.
🔗 Joint (Pivot): The hinge that connects the two arms, allowing the scissor blades to open and close smoothly.
🦿 Shanks: These are the long shafts between the joint and the finger rings, providing leverage and length for deeper access.
🔁 Finger Rings: The loops at the handle ends, one for the thumb and the other for the ring or middle finger, allowing the surgeon to control the scissor’s movement precisely.
🔸 Uses of Mayo Scissors
🧵 Cutting Sutures: Straight Mayo scissors are frequently used to cut sutures during or after surgical procedures.
💪 Dissecting Tough Tissues: Curved Mayo scissors are ideal for dissecting or cutting thick tissues, such as fascia, uterus, or muscles.
🩺 Sharp-Blunt Dissection: Their strong design allows blunt dissection (pushing apart tissues) and sharp dissection (cutting).
🧽 General Surgical Use: Used in abdominal, gynecological, and orthopedic surgeries where controlled, deep cutting is necessary.
🧬 Trimming Tissue Margins: Can be used to trim tissue flaps or excess tissue during surgical procedures.
🔸 Sterilization Process of Mayo Scissors
Proper cleaning and sterilization of surgical scissors are essential to prevent infection and ensure instrument longevity.
🧼 1. Pre-cleaning (Immediately After Use)
Rinse the scissors under lukewarm running water right after use to remove blood, tissue, or fluid. Avoid hot water, which can cause protein coagulation.
🧽 2. Manual Cleaning
Use a soft-bristled brush and enzymatic solution to scrub the blades, joint, and finger rings. Open the scissors while cleaning to access the entire cutting surface.
💧 3. Rinsing & Drying
Rinse thoroughly with distilled water and dry with a lint-free cloth. Make sure the scissors are completely dry before packaging to avoid rust.
🔍 4. Inspection
Examine the scissors for:
- Blade sharpness
- Smooth pivot/joint movement
- Any damage, rust, or misalignment of blades
📦 5. Packaging for Sterilization
Place the open scissors in autoclave pouches or wrap, ensuring they’re in the unlocked position to allow proper steam penetration.
🔥 6. Autoclaving (Steam Sterilization)
Sterilize using a steam autoclave at:
- Temperature: 121°C to 134°C
- Pressure: 15–30 psi
- Time: 15–30 minutes, depending on the load
🏷️ 7. Post-Sterilization Care
After autoclaving:
- Allow instruments to cool before handling
- Store them in dry, sterile trays or closed cabinets
- Perform routine lubrication at the joint if scissors are reused frequently
📝 Important Tips
✔️ Keep scissors in open position during sterilization
✔️ Sharpen blades periodically to maintain cutting efficiency
❌ Never use bleach or corrosive chemicals
🛠️ Handle with care to avoid dulling the blades or damaging the joint
🔹 Metzenbaum Scissors
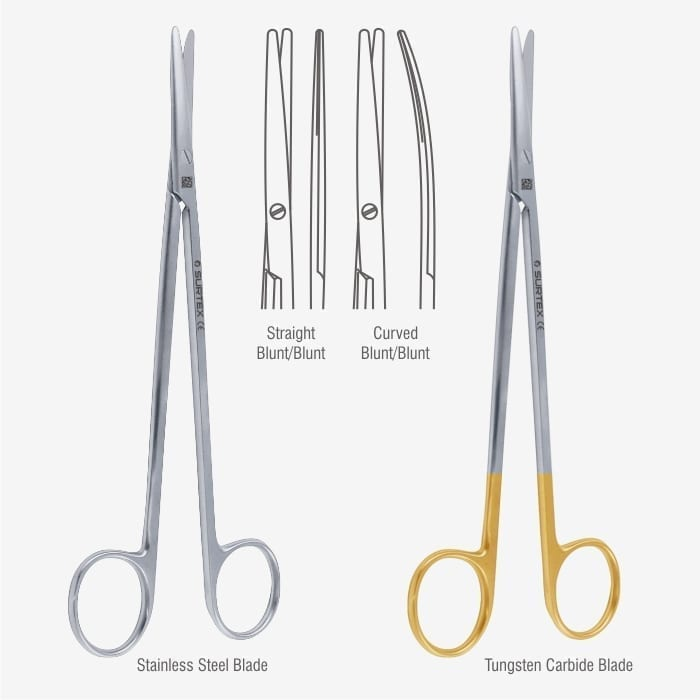
Metzenbaum scissors are delicate, fine surgical scissors designed for cutting and dissecting soft tissues. They are longer and lighter than Mayo scissors, with narrower blades and longer shanks, making them ideal for deep, precise dissection in general, plastic, cardiovascular, and gynecologic surgeries.
🔄 Available in both:
- Straight blades – used for cutting surface tissues
- Curved blades – preferred for deep and precise dissection
🔸 Parts of Metzenbaum Scissors
🔪 Blades: The blades are long, slender, and blunt-tipped, designed for fine cutting of soft tissues without trauma. Curved blades are more common for deep dissection.
🔗 Joint (Pivot/Box Lock): This is the central hinge point that connects the two arms and allows smooth blade movement.
🦿 Shanks: These are longer than the blades, providing extra reach into deeper body cavities while maintaining precision.
🔐 Screw Lock or Rivet: Located at the joint, allowing stable movement of the blades.
🔁 Finger Rings: Circular openings for the thumb and ring finger, providing ergonomic control for delicate tasks.
🔸 Uses of Metzenbaum Scissors
🧬 Dissection of Delicate Soft Tissue: Ideal for cutting muscles, fat, connective tissue, and internal organs with minimal trauma.
🧵 Blunt Dissection: Used to separate tissue planes without cutting, especially in tight or sensitive surgical areas.
🧠 Preferred in Deep Surgeries: The long shank-to-blade ratio allows surgeons to reach deeper structures without stretching incisions.
🫀 Used in Cardiovascular & Plastic Surgery: Frequently used in neurosurgery, cardiovascular procedures, and cosmetic reconstruction due to their gentle cutting action.
🩹 Avoid Cutting Sutures or Tough Tissue: Not recommended for cutting sutures, fascia, or fibrous tissues, as it may dull the blades.
🔸 Sterilization of Metzenbaum Scissors
Due to their precision and delicate nature, proper cleaning and sterilization are essential to preserve their sharpness and avoid contamination.
🧼 1. Pre-cleaning (Immediately After Use)
Rinse thoroughly under lukewarm running water to remove visible blood, tissue, or fluids. Avoid scrubbing with abrasives or using hot water too soon, as this may cause protein fixation.
🧽 2. Manual Cleaning
Gently clean with a soft-bristled brush and neutral pH enzymatic detergent. Pay special attention to the blades, hinge, and rings. Open the blades fully during cleaning to access all surfaces.
💧 3. Rinsing & Drying
Rinse with distilled or deionized water to remove detergent residues. Dry immediately with a lint-free cloth or medical-grade air to prevent rust.
🔍 4. Inspection
Check for:
- Blade alignment and sharpness
- Smooth opening and closing action
- Damage, corrosion, or misalignment
- Clean ratchet or screw lock mechanism
📦 5. Packaging
Place the scissors in autoclave pouches or instrument trays, ensuring they are in the open (unlocked) position to allow full steam penetration.
🔥 6. Autoclave Sterilization
Use steam sterilization:
- Temperature: 121–134°C
- Pressure: 15–30 psi
- Time: 15–30 minutes (based on load)
🏷️ 7. Post-Sterilization Care
- Let the instruments cool down naturally before handling
- Store in sterile containers or trays in a dry, clean environment
- Perform periodic lubrication at the pivot point to maintain smooth movement
- Ensure blade sharpness is maintained—do not use on sutures or hard tissues
📝 Key Tips for Maintenance
✔️ Always sterilize in an open position
✔️ Do not mix with heavy instruments during cleaning to avoid blade damage
❌ Avoid using bleach, saline, or harsh chemicals that may corrode the steel
🛠️ Sharpen periodically by a qualified technician to maintain precision
🔸 Operating Scissors
Operating scissors, also known as surgical scissors, are a type of general-purpose scissors used in almost every surgical procedure. These scissors are designed for cutting tissues, sutures, dressings, and other surgical materials. They are available in various shapes, including straight or curved blades and sharp-sharp, blunt-blunt, or sharp-blunt tips, depending on the surgical requirement.
🔸 Parts of Operating Scissors
🔪 Blades
- The cutting ends of the scissors.
- May be straight (for surface use) or curved (for deeper or more precise cutting).
- The tips can be:
- Sharp-sharp: for fine tissue dissection
- Blunt-blunt: for dull dissection or dressing
- Sharp-blunt: for versatile surgical use
🔗 Joint (Pivot/Box Lock)
- The hinge point that allows the two blades to move.
- Ensures smooth opening and closing of the scissors.
🦿 Shanks
- The long middle portion between the joint and the finger rings.
- Provide leverage and control during cutting.
🔁 Finger Rings
- Circular loops for the thumb and ring finger, offering precise grip and maneuverability during surgery.
🔸 Uses of Operating Scissors
🧵 Cutting Sutures: Commonly used for cutting and removing sutures post-surgery or during operations.
🩹 Trimming Tissue or Skin: Used for cutting soft tissues, especially skin edges or flaps during minor procedures.
🧽 Dressing Materials: Ideal for cutting gauze, bandages, and dressings during wound care.
🔬 Blunt Dissection: Blunt-tipped scissors can be used for dissecting tissue layers gently without trauma.
🧠 General Surgical Use: Used across all surgical disciplines (general, orthopedic, gynecology, ENT, etc.) for routine cutting tasks.
🔸 Sterilization of Operating Scissors
Due to their frequent use and direct contact with body tissues, proper cleaning and sterilization are essential to prevent cross-contamination and maintain function.
🧼 1. Pre-cleaning (Immediately After Use)
Rinse under lukewarm running water to remove blood, tissue, or body fluids. Avoid hot water, as it can fix proteins onto the instrument.
🧽 2. Manual Cleaning
Clean thoroughly with a soft brush and enzymatic detergent, focusing on:
- Blades (especially at the tip)
- Pivot area
- Open the scissors fully to ensure all surfaces are reached.
💧 3. Rinsing and Drying
Rinse with distilled or deionized water to remove detergent residue.
Dry with a lint-free cloth or air-dry to prevent rust and stains.
🔍 4. Inspection
Before sterilizing, inspect the scissors for:
- Blade sharpness
- Tip alignment
- Smooth joint movement
- Any signs of rust or wear
📦 5. Packaging for Sterilization
Place the scissors in open position into autoclave-safe pouches or wraps. This ensures proper steam contact during sterilization.
🔥 6. Autoclaving (Steam Sterilization)
Use a steam sterilizer at:
- Temperature: 121°C–134°C
- Pressure: 15–30 psi
- Cycle Time: 15–30 minutes (depending on autoclave and load)
🏷️ 7. Post-Sterilization Care
- Let scissors cool naturally before handling.
- Store in dry, sterile trays or surgical kits.
- Avoid storing in damp or closed containers without drying.
- Apply instrument-grade lubricant at the joint if scissors are reused frequently.
📝 Important Tips for Maintenance
✔️ Always open scissors before autoclaving
✔️ Use only on intended materials – using tissue scissors on sutures or dressings can dull the blades
❌ Avoid bleach, saline, or harsh cleaning agents
🛠️ Have the blades sharpened periodically by a qualified technician
🔹 Cuticle Scissors
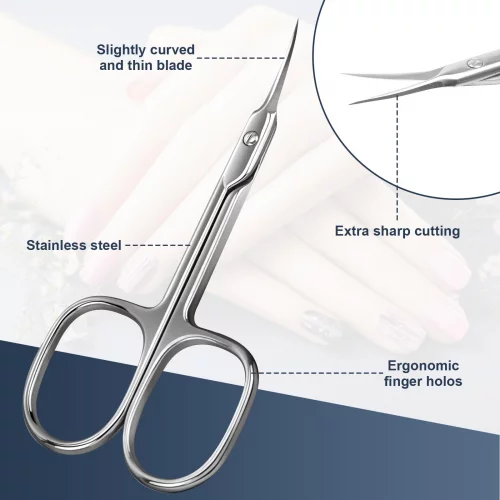
Cuticle scissors are fine, precision scissors designed to trim and shape cuticles — the thin layer of skin at the base of fingernails and toenails. They are primarily used in manicures, pedicures, and personal grooming, but are also found in dermatology and podiatry setups.
They feature slender, curved blades and sharp, pointed tips that allow for delicate, accurate cutting of thin tissue without damaging the surrounding nail or skin.
🔸 Parts of Cuticle Scissors
🔪 Blades
- The most important part — narrow, curved, and razor-sharp, ideal for detailed trimming around the nail.
- Often made of stainless steel for sharpness and rust resistance.
🔗 Joint (Pivot or Box Lock)
- This is the hinge where both arms of the scissors are joined.
- Allows smooth and controlled blade movement.
🦿 Shanks
- The slim, elongated portions between the joint and the finger rings.
- Provide leverage and keep the hand away from the nail area for better visibility.
🔁 Finger Rings
- Two circular loops at the handle ends for the thumb and finger, offering a secure grip and control during precise movements.
🔸 Uses of Cuticle Scissors
💅 Trimming Cuticles
- The primary function is to neatly remove dead or overgrown cuticle skin around the base of fingernails and toenails.
🧤 Maintaining Nail Hygiene
- Helps prevent infection and hangnails, especially in people with diabetes or immunosuppression, where hygiene is critical.
🔬 Minor Skin Trimming
- Occasionally used to trim dry skin, hangnails, or small skin flaps without using larger tools.
🩺 In Clinical or Spa Settings
- Widely used in cosmetology, salons, and dermatology clinics for nail care and minor skin maintenance.
🔸 Sterilization of Cuticle Scissors
Because cuticle scissors come in contact with skin and sometimes blood, especially during accidental nicks, sterilization is mandatory to prevent infections such as bacterial, fungal, or viral contamination.
🧼 1. Pre-cleaning (Immediately After Use)
Rinse under lukewarm running water to remove visible skin debris or tissue. Avoid using hot water immediately as it may set protein residues.
🧽 2. Manual Cleaning
Gently scrub with a soft-bristle brush and pH-neutral enzymatic detergent, especially at the blade tips and pivot area, where debris may lodge. Keep the blades open during cleaning.
💧 3. Rinsing & Drying
Rinse thoroughly with distilled water, and dry with a lint-free cloth or air-dryer. Ensure complete drying to prevent corrosion.
🔍 4. Inspection
Examine for:
- Blade sharpness and alignment
- Smooth movement of the pivot
- No rust, chips, or signs of dulling
📦 5. Packaging
Place the scissors in a sterile pouch or instrument tray, ensuring they remain in an open (unlocked) position for sterilization.
🔥 6. Sterilization Methods
🧪 Steam Autoclaving (Preferred in clinical settings):
- Temperature: 121–134°C
- Pressure: 15–30 psi
- Duration: 15–30 minutes
- Ensures elimination of bacteria, fungi, and viruses
🧴 Chemical Sterilization (Salon/Personal use):
- Use 70–90% isopropyl alcohol, glutaraldehyde, or quaternary ammonium solutions
- Soak for 10–30 minutes, depending on agent used
- Rinse and dry thoroughly after soaking
🏷️ 7. Post-Sterilization Care
- Let the scissors cool and dry completely before storing
- Store in sterile pouches or sealed containers
- Lubricate the joint occasionally to maintain smooth function
- Avoid dropping or dulling the tips by mishandling
📝 Key Tips
✔️ Always clean before sterilizing
✔️ Sharpen by a professional if blades become dull
✔️ Never use on hard materials like nails (that’s for nail clippers, not cuticle scissors!)
❌ Avoid bleach or highly corrosive agents unless specially formulated for instruments
🔹 Bandage Scissors
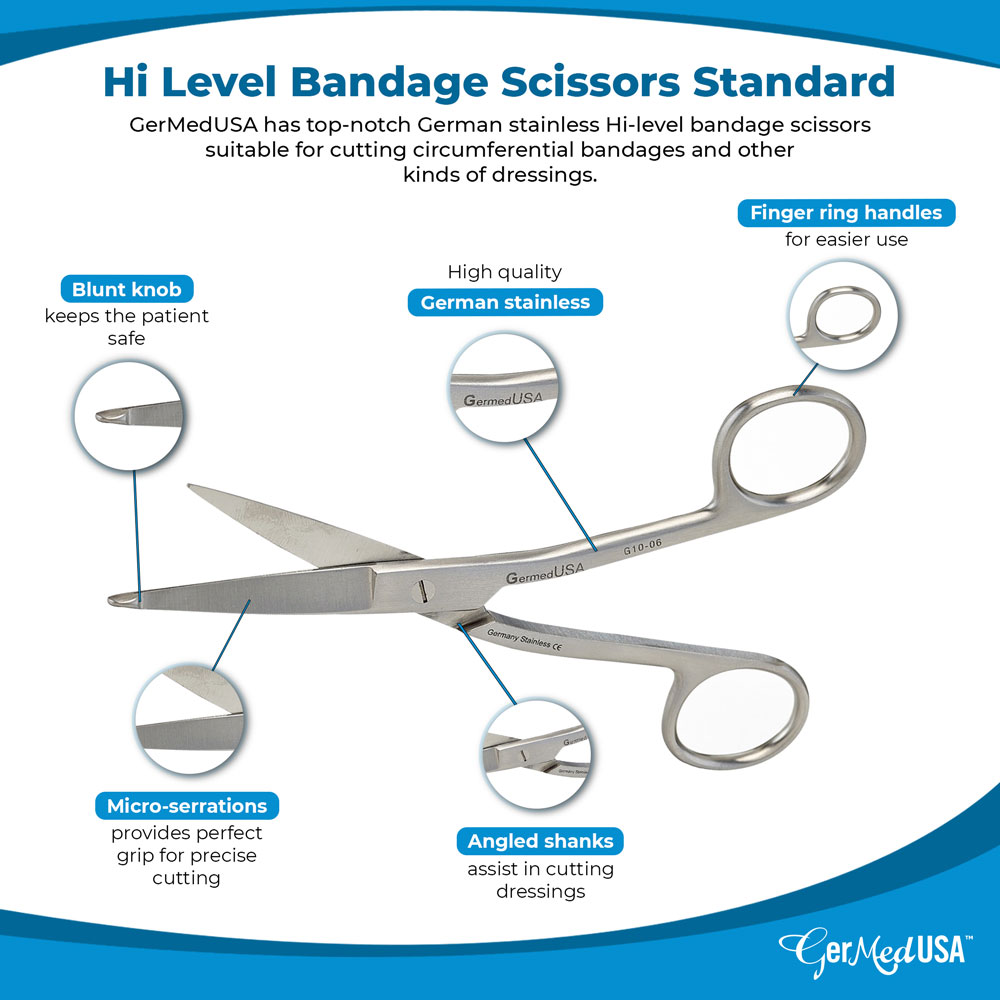
Bandage scissors are specially designed scissors used to cut and remove bandages, dressings, and medical tapes without injuring the skin. They are also known as Lister bandage scissors, named after Joseph Lister. Their unique shape — especially the angled blades and blunt tip — makes them safe and efficient for removing dressings from delicate areas.
🔸 Parts of Bandage Scissors
🔪 Blades
- One blunt-tipped blade: prevents injury to the skin during cutting.
- One sharp blade: ensures smooth, quick cutting of dressings or bandages.
- The blades are often angled (typically 45°) to improve accessibility under bandages.
🔗 Joint (Pivot or Box Lock)
- The central hinge that connects the blades and allows scissor action.
- Ensures smooth opening and closing.
🦿 Shanks
- The length between the joint and the handle.
- Provides leverage and distance between the user’s hand and the patient.
🔁 Finger Rings
- Circular loops at the handle ends for grip and control.
- Designed ergonomically for comfortable handling, even during extended use.
🔸 Uses of Bandage Scissors
🩹 Cutting Dressings and Bandages
- Primary use is for safely removing gauze, adhesive bandages, or compression wraps without cutting the skin.
👶 Ideal for Sensitive Patients
- Used on infants, elderly, burn victims, or surgical wounds where skin injury must be avoided.
🩺 In First Aid and Emergency Kits
- An essential tool in ambulances, clinics, and hospitals for quick access to wounds.
🧤 Removing Tight Clothing
- Can be used to cut away tight clothing or elastic garments in trauma or emergency situations.
🔸 Sterilization of Bandage Scissors
Since bandage scissors often come into contact with body fluids, blood, or infected dressings, proper sterilization is crucial to prevent cross-contamination and infection.
🧼 1. Pre-cleaning (Immediately After Use)
- Rinse under lukewarm running water to remove visible dirt or organic matter.
- Do not soak in hot water if blood is present (to avoid protein coagulation).
🧽 2. Manual Cleaning
- Clean with a soft brush and enzymatic detergent.
- Focus on the blade edges, tips, and joint area.
- Open the blades during cleaning for full access.
💧 3. Rinsing & Drying
- Rinse with distilled water to remove all detergent.
- Dry completely with a lint-free cloth or medical-grade air dryer.
🔍 4. Inspection
- Check for:
- Blade sharpness and alignment
- Smooth joint function
- Absence of rust, cracks, or nicks
📦 5. Packaging for Sterilization
- Place scissors in open position inside autoclave pouch or wrap.
- Ensure the blades are not pressing against other instruments.
🔥 6. Steam Sterilization (Autoclaving)
- Temperature: 121°C to 134°C
- Pressure: 15–30 psi
- Time: 15–30 minutes depending on load and sterilizer type
📌 Note: For home or non-clinical use, disinfect with 70% isopropyl alcohol or chemical sterilants approved for instruments.
🔸 Aftercare and Storage
🧊 Cooling
- Let instruments cool before handling post-autoclave.
📦 Storage
- Store in sterile, dry, and dust-free conditions.
- Use instrument trays or pouches to protect blade edges.
❄️ Avoid Moisture
- Moisture promotes rusting — never store when damp.
🔸 Maintenance Tips
🛠️ 1. Regular Lubrication
- Apply instrument-grade lubricant to the joint every few uses to maintain smooth movement.
🧪 2. Avoid Harsh Chemicals
- Do not expose to bleach, saline, or acidic solutions, as they corrode stainless steel.
🪛 3. Sharpening
- If cutting becomes rough or dull, have the scissors professionally sharpened.
- Do not attempt to sharpen at home unless trained.
🚫 4. Dedicated Use Only
- Use only for cutting soft medical materials – never for hard items like metal, plastics, or fingernails.
✔️ Safe tip design makes them ideal for patient safety
✔️ Autoclavable and reusable with proper care
✔️ Store clean, dry, and separately from other sharp tools
✔️ Essential in nursing kits, surgical trays, and wound care settings
🔹 Mayo Needle Holder
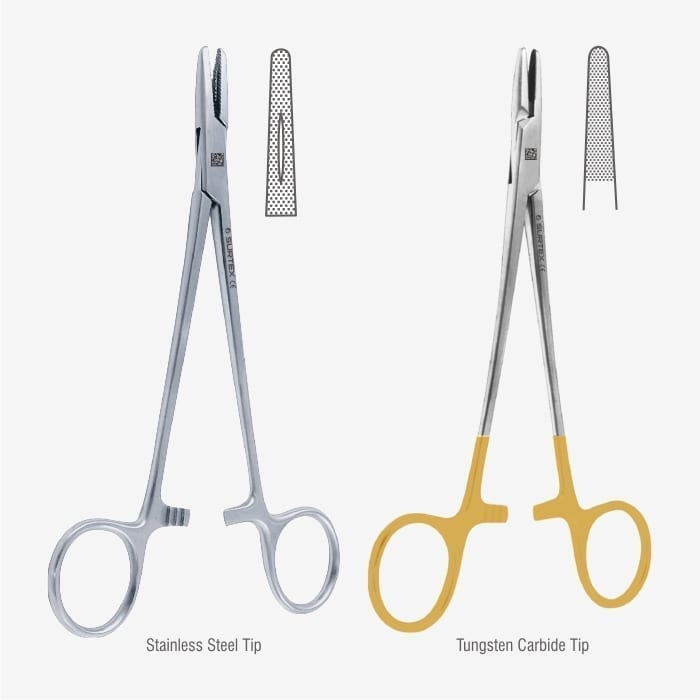
The Mayo-Hegar Needle Holder is a surgical instrument used to hold and guide surgical needles during suturing procedures. It is designed to provide firm grip and control without damaging the needle. This tool is widely used in general surgery, obstetrics, gynecology, orthopedics, and many other specialties.
🛠️ It is often confused with artery forceps due to its similar appearance, but the inner jaws of a needle holder are grooved and sturdier, and it lacks the sharp tip of hemostats.
🔸 Parts of Mayo Needle Holder
🔗 1. Jaws (Tips)
- These are short, serrated (cross-hatched) with inner grooves designed to grasp the suture needle securely.
- Often tungsten carbide inserts are added for better grip and durability.
🧰 2. Box Lock (Joint)
- The hinge mechanism that allows smooth opening and closing.
- Located close to the jaws for better control during suturing.
🦿 3. Shanks
- The long portion between the joint and the handle, allowing leverage and distance.
- Balanced to apply even pressure on the needle.
🔐 4. Ratchet Lock
- A click-lock mechanism near the handle to lock the instrument in place while holding the needle.
- Enables the surgeon or nurse to work hands-free.
🔁 5. Finger Rings
- Circular loops at the end of the handles for thumb and ring finger placement.
- Provide precision and control during delicate suturing.
🔸 Uses of Mayo Needle Holder
🪡 1. Holding Suturing Needles
- Primary function is to firmly hold the needle while suturing soft tissues, skin, or organs.
🧵 2. Guiding Sutures
- Assists in inserting, guiding, and tying sutures in deep or superficial areas.
🧬 3. Used in Various Surgical Specialties
- Commonly used in general surgery, C-sections, wound closure, orthopedic procedures, and abdominal surgeries.
🧠 4. Precision Control
- Ensures controlled and accurate placement of the suture needle, even in tight or deep spaces.
🔸 Sterilization of Mayo Needle Holder
Proper sterilization is crucial because this instrument directly comes into contact with blood, tissues, and body fluids, posing a risk for infection transmission.
🧼 1. Pre-cleaning (Immediately After Use)
- Rinse under lukewarm running water to remove blood and debris.
- Do not allow blood to dry on the instrument.
🧽 2. Manual Cleaning
- Use a soft brush and enzymatic cleaner to clean all surfaces, especially:
- Serrated jaws
- Box lock joint
- Ratchet mechanism
- Open the ratchet lock during cleaning to allow full access.
💧 3. Rinsing and Drying
- Rinse with distilled or deionized water to prevent spotting.
- Dry thoroughly with a lint-free cloth or air dry to prevent corrosion.
🔍 4. Inspection Before Sterilizing
Check for:
- Proper jaw alignment
- Smooth ratchet function
- No signs of rust, cracks, or jaw wear
📦 5. Packaging
- Place the instrument in an open (unlocked) position inside a sterile autoclave pouch or wrapped set.
- This allows steam to reach all internal parts.
🔥 6. Steam Sterilization (Autoclaving)
- Temperature: 121°C to 134°C
- Pressure: 15–30 psi
- Time: 15–30 minutes
- Safe for repeated autoclaving if properly maintained
🔸 Aftercare and Maintenance
🧊 1. Cooling
- Allow the needle holder to cool naturally after autoclaving before handling or storing.
📦 2. Storage
- Store in a dry, sterile tray or cabinet.
- Keep separate from sharp instruments to avoid damage to the jaw serrations.
🛠️ 3. Regular Lubrication
- Use instrument-grade lubricant at the box lock and ratchet to prevent stiffness and prolong lifespan.
🪛 4. Sharpening & Repairs
- The jaw tips may need realignment or replacement (e.g., tungsten carbide tips) after extended use.
- Do not force the ratchet — it may cause permanent misalignment.
🧪 5. Avoid Harsh Chemicals
- Do not use bleach or corrosive agents, as these damage stainless steel and the joint mechanism.
🔹Sponge Holding Forceps
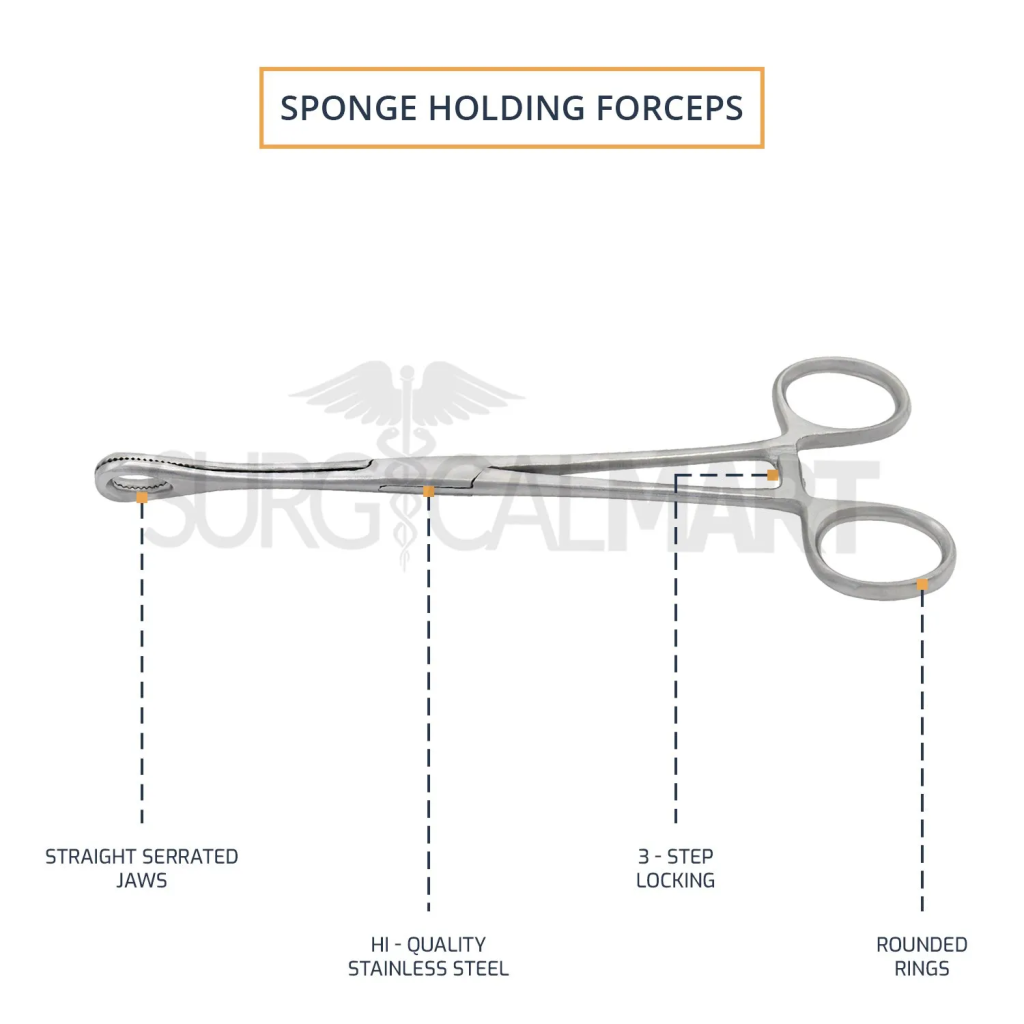
Sponge holding forceps (also called sponge forceps or ring forceps) are long, scissor-like instruments used in medical and surgical settings to hold gauze, sponges, or swabs for cleansing, applying antiseptics, or absorbing fluids. They are also used during surgical procedures to handle sterile items without direct contact.
🛠️ These are non-traumatic forceps, typically ring-tipped, making them ideal for safe use on skin, mucosa, or deep surgical areas.
🔸 Parts of Sponge Holding Forceps
🔘 1. Ring-Shaped Tips
- The ends are oval or circular with cross-serrations on the inside to grip sponges or gauze securely without slipping.
- Some versions have fenestrated (open) rings for enhanced holding.
🔗 2. Box Lock (Joint)
- The hinge mechanism that enables smooth opening and closing of the arms.
- Located near the tip for precision control.
🦿 3. Shanks
- The long stems between the box lock and the handles that provide length and leverage.
- Enables access to deep body cavities without contamination.
🔐 4. Ratchet Lock
- A locking mechanism near the finger rings to hold the forceps in a closed or semi-closed position.
- Allows the user to maintain grip without continuous pressure.
🔁 5. Finger Rings
- Circular loops for thumb and ring/middle finger, giving the user a firm and controlled grip.
🔸 Uses of Sponge Holding Forceps
🧽 1. Holding Sterile Sponges/Gauze
- Primarily used to hold and apply sterile gauze soaked in antiseptic solution for prepping the surgical field.
🧴 2. Vaginal Swabbing and Perineal Cleaning
- Used in obstetric and gynecological procedures for swabbing the cervix or cleaning the perineum.
🩺 3. Absorbing Blood or Fluids
- Used during surgeries to place sponges inside body cavities to absorb blood or fluids.
👃 4. Foreign Body Removal
- May be used to hold cotton swabs for removing nasal, oral, or ear foreign bodies.
🩹 5. Dressing Changes
- To apply or remove dressings without touching the wound directly — maintaining aseptic technique.
🔸 Sterilization of Sponge Holding Forceps
Since these forceps are used in sterile and invasive procedures, proper sterilization is essential to prevent infection.
🧼 1. Pre-cleaning (Immediately After Use)
- Rinse the forceps under lukewarm water to remove visible blood, fluid, or antiseptic.
- Avoid using hot water directly to prevent protein coagulation.
🧽 2. Manual Cleaning
- Use a soft brush and enzymatic or pH-neutral detergent to clean:
- The ring tips (serrations)
- The box lock
- The ratchet area
- Keep the forceps open during cleaning for better access.
💧 3. Rinsing and Drying
- Rinse with distilled or deionized water to avoid mineral deposits.
- Dry thoroughly with a lint-free cloth or air-drying equipment.
🔍 4. Inspection
- Check for:
- Serration wear or damage
- Smooth function of the joint and ratchet
- Corrosion or rust, especially in joints and inner rings
📦 5. Packaging
- Place the forceps in the open position inside a sterile autoclave pouch or wrap to allow steam penetration.
🔥 6. Autoclaving (Steam Sterilization)
- Temperature: 121°C to 134°C
- Pressure: 15–30 psi
- Time: 15–30 minutes, depending on the load
- Suitable for repeated sterilization cycles
🧊 1. Cooling Down
- Let the forceps cool naturally after autoclaving before storing or handling.
🔸 Aftercare and Maintenance
📦 2. Safe Storage
- Store in a dry, sterile, dust-free environment.
- Use instrument trays or pouches to prevent scratching or bending of the ring tips.
🛠️ 3. Lubrication
- Apply instrument lubricant to the box lock and ratchet mechanism weekly or after every few uses to keep movement smooth.
🪛 4. Functional Checkups
- Periodically check the grip strength and locking ability.
- Replace the instrument if there’s loss of grip, loose ratchet, or damage to the ring tips.
🧪 5. Avoid Corrosive Cleaners
- Never use bleach, iodine-based agents, or saline, as they may corrode the stainless steel.
🔹 Plain Dressing Forceps
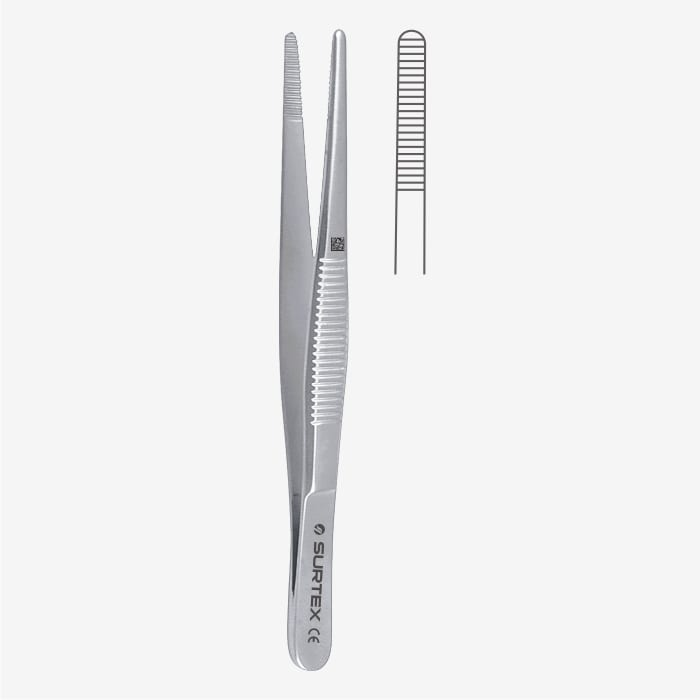
Plain dressing forceps (also known simply as dressing forceps) are non-toothed, tweezer-like instruments used in medical and surgical settings to hold, pack, or remove dressings, gauze, or foreign objects. Their non-traumatic tip makes them safe for handling delicate tissues without injury, and they are essential tools in wound care, surgery, and general practice.
🔸 Parts of Plain Dressing Forceps
🔹 1. Tips (Jaws)
- The non-toothed, flat, serrated inner surfaces of the tips provide gentle grip on dressings or tissues.
- Designed to avoid trauma and slippage during handling.
🔗 2. Shaft / Arms
- Long, narrow handles that allow the user to reach deeper wounds or body cavities.
- Provide leverage and precise control.
⚙️ 3. Spring Joint
- Acts as a hinge mechanism — the forceps open and close by applying pressure at the middle or base.
- Located near the base, allowing flexible, one-handed use.
🔁 4. Finger Grip Surface
- The outer flat surface is often ridged or knurled for a non-slip grip between fingers.
- Ensures firm handling, even with gloved or wet hands.
🔸 Uses of Plain Dressing Forceps
🩺 1. Applying or Removing Dressings
- Used to place sterile gauze or pads over wounds without touching them directly — maintains aseptic technique.
🧽 2. Cleaning Wounds
- Used to hold cotton swabs or gauze while cleansing surgical or chronic wounds.
🧤 3. Handling Sterile Items
- Helps in transferring sterile items like gauze, cotton balls, or instruments during procedures.
🔬 4. Assisting in Minor Procedures
- Used to remove foreign bodies from superficial wounds, especially in ENT or minor surgical settings.
🧠 5. Non-Traumatic Tissue Handling
- Can be used to gently hold or retract soft tissue during basic surgical procedures, especially in sensitive areas like the eye, ear, or oral cavity.
🔸 Sterilization of Plain Dressing Forceps
As this instrument comes into contact with open wounds or sterile items, thorough sterilization is mandatory to prevent cross-contamination and infection.
🧼 1. Pre-cleaning (Immediately After Use)
- Rinse under lukewarm running water to remove any visible blood, exudate, or dressing residue.
- Open the tips fully to rinse inside surfaces.
🧽 2. Manual Cleaning
- Use a soft-bristled brush and neutral pH enzymatic detergent.
- Clean the tips, shaft, and finger grip areas thoroughly.
- Avoid using abrasives or steel wool that could damage the surface.
💧 3. Rinsing & Drying
- Rinse with distilled or deionized water to remove chemical residues.
- Dry completely with a lint-free cloth or use a medical-grade dryer to avoid corrosion.
🔍 4. Inspection
Before sterilization, check for:
- Tip alignment
- Smooth spring action
- Clean, rust-free surface
📦 5. Packaging for Sterilization
- Place in open position inside a sterile autoclave pouch or surgical wrap.
- Ensure forceps are not compressed to maintain proper alignment.
🔥 6. Autoclaving (Steam Sterilization)
- Temperature: 121°C–134°C
- Pressure: 15–30 psi
- Duration: 15–30 minutes depending on equipment and load
- Suitable for repeated sterilization
🔸 Aftercare & Maintenance
🧊 1. Post-Sterilization Cooling
- Allow the forceps to cool naturally before storage or use to prevent damage from thermal shock.
📦 2. Storage
- Store in sterile, dry, and dust-free instrument trays or closed cabinets.
- Avoid stacking with heavy instruments to prevent bending.
🛠️ 3. Maintenance
- Apply medical-grade lubricant to the spring joint occasionally to maintain smooth action.
- Avoid prolonged exposure to saline or antiseptics (like betadine), which can corrode the metal.
🧪 4. Avoid Corrosives
- Never use bleach or strong acids. Use only instrument-safe cleaning agents.
🪛 5. Inspection Schedule
- Regularly inspect for:
- Bend or misalignment
- Dull or deformed tip edges
- Loss of spring tension
If damaged or non-functional, replace immediately to maintain safety and hygiene
🔹 Adson Plain Forceps
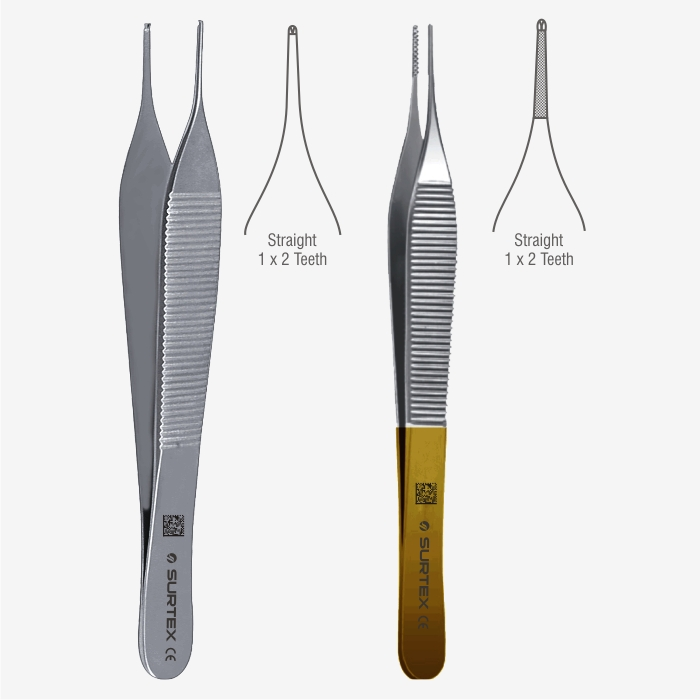
Adson plain forceps are small, delicate, non-toothed surgical forceps used for holding fine tissues during surgeries. Unlike toothed Adson forceps, plain Adson forceps have smooth or finely serrated tips, making them ideal for use on fragile tissues like skin and subcutaneous layers.
They are commonly used in plastic surgery, dermatology, minor surgical procedures, and wound closure.
🔸 Parts of Adson Plain Forceps
🔹 1. Tips (Jaws)
- The working ends of the forceps.
- Flat, blunt, and finely serrated on the inside to gently grip delicate tissues without trauma.
- No teeth, unlike Adson toothed forceps.
🔗 2. Shafts (Arms)
- Narrow, flattened body of the instrument.
- Designed for precision and control in small surgical areas.
🔁 3. Finger-Grip Area (Handles)
- The outer surface of the shafts is textured or ridged, providing a non-slip grip.
- Allows precise one-hand operation.
⚙️ 4. Spring Mechanism
- The flexible tension created by the design allows the forceps to open when released and close when pinched — no joint or box lock.
🔸 Uses of Adson Plain Forceps
🧬 1. Handling Delicate Tissues
- Ideal for grasping skin edges, subcutaneous tissues, or mucosa during suturing or dissection.
💉 2. Wound Closure
- Helps in aligning tissue edges during suturing without causing trauma.
🩺 3. Plastic and Reconstructive Surgery
- Preferred in facial or cosmetic procedures where precision and minimal tissue damage are essential.
🧽 4. Assisting with Dressing
- Occasionally used to place or remove small dressing pieces from delicate areas.
🧤 5. Minor Surgical Procedures
- Used in ENT, ophthalmology, dermatology, and outpatient wound care.
🔸 Sterilization of Adson Plain Forceps
Because these forceps are used in sterile fields and on open tissues, thorough sterilization is essential before and after every use.
🧼 1. Pre-Cleaning (Immediately After Use)
- Rinse under lukewarm running water to remove blood, tissue, or fluid.
- Do not soak in hot water to avoid protein coagulation.
🧽 2. Manual Cleaning
- Use a soft brush and enzymatic solution to scrub the tips, serrations, and finger grip areas.
- Keep the forceps in a slightly open position during cleaning.
💧 3. Rinsing & Drying
- Rinse with distilled water to prevent spotting and mineral deposits.
- Dry with a lint-free cloth or medical-grade air-drying system.
🔍 4. Inspection
- Examine the forceps for:
- Rust, corrosion, or pitting
- Tip alignment
- Smooth closing and spring tension
- Worn-out serrations
📦 5. Packaging
- Place in a sterile wrap or pouch, keeping the tips slightly open.
- Use a tip protector if storing with other instruments.
🔥 6. Steam Sterilization (Autoclaving)
- Temperature: 121–134°C
- Pressure: 15–30 psi
- Time: 15–30 minutes depending on load
- Safe for repeated cycles if properly maintained
🔸 Aftercare & Maintenance
🧊 1. Cooling Down
- Allow instruments to cool naturally after autoclaving. Do not immerse in cold water.
📦 2. Storage
- Store in sterile trays or cabinets, dry and dust-free.
- Use instrument organizers to prevent tip damage.
🛠️ 3. Lubrication
- Although plain Adson forceps have no joint, occasional use of instrument-safe lubricant on the spring area ensures smooth function.
🪛 4. Tip Protection & Handling
- Do not drop or mix with heavy instruments — tips may bend or lose alignment.
🧪 5. Avoid Corrosive Agents
- Do not use bleach, iodine, or saline soaks. Use only instrument-grade detergents.
🧰 6. Regular Checks
- Inspect regularly for:
- Spring tension
- Smooth closure
- Clean serrations
- No signs of fatigue or rust
🔹 Kidney Stone Forceps
Kidney stone forceps, also known as stone retrieval forceps, are specialized surgical instruments used in urological procedures to grasp, fragment, or retrieve stones from the urinary tract, particularly from the bladder, ureters, or renal pelvis. These forceps are used during procedures like ureteroscopy, cystoscopy, or open kidney stone surgeries.
They are usually long, narrow instruments designed to reach deep urinary structures without damaging delicate tissues.
🔸 Parts of Kidney Stone Forceps
🔗 1. Tips (Jaws)
- The distal ends designed to grasp or hold kidney stones.
- May be serrated, fenestrated, or basket-style depending on the type (e.g., Randall, Storz, or Percutaneous stone forceps).
- Tips may vary in curvature, size, and grip strength.
🦿 2. Shafts
- Long and slender to access the deep urinary tract (e.g., bladder or kidney).
- Usually straight or curved depending on the anatomical need.
🔧 3. Joint or Pivot Mechanism
- Located closer to the handle end; enables smooth opening and closing of the jaws.
🔐 4. Ratchet Lock (Optional)
- In some designs, there’s a locking mechanism to maintain grip on the stone without continuous hand pressure.
🔁 5. Finger Rings or Handle Grips
- Handles for the thumb and ring/middle finger.
- Provide control, precision, and allow one-handed operation.
🔸 Uses of Kidney Stone Forceps
🪨 1. Stone Removal
- Used to retrieve calculi (stones) from the kidney, ureter, or bladder during endoscopic or open urological procedures.
🔍 2. Grasping Stone Fragments
- During lithotripsy (stone fragmentation), the forceps help remove leftover pieces to prevent recurrence.
🧤 3. Used in Endoscopic Urology
- Compatible with cystoscopes and ureteroscopes for minimally invasive stone retrieval.
🧪 4. Foreign Body Removal
- Can also be used to remove foreign bodies accidentally introduced into the bladder or urethra.
🛠️ 5. Assisting in Biopsies
- Some specialized versions are used to hold tissues or perform small biopsies in the urinary tract.
🔸 Sterilization of Kidney Stone Forceps
As they enter sterile body cavities (urinary tract), these instruments must be thoroughly cleaned and sterilized to avoid urosepsis or infection.
🧼 1. Pre-cleaning (Immediately After Use)
- Rinse under lukewarm water to remove blood, urine, tissue, or stone debris.
- Flush through the entire shaft and tip if the instrument is hollow or cannulated.
🧽 2. Manual Cleaning
- Use a soft brush and enzymatic or neutral pH detergent.
- Focus on:
- Tip serrations or baskets
- Shaft (inner and outer)
- Hinges and joints
- If instrument is articulated, ensure moving parts are open during cleaning.
💧 3. Rinsing and Drying
- Rinse with distilled water.
- Dry thoroughly with a lint-free cloth or air-drying unit, including inside channels if applicable.
🔍 4. Inspection
Before sterilizing:
- Check for cracks, misalignment, or loss of tension in jaws
- Ensure the ratchet lock (if present) works properly
- Make sure the tips open and close smoothly
📦 5. Packaging
- Place the forceps in the open position inside a sterile pouch or wrap.
- Use tip protectors if applicable to avoid trauma to tips and to maintain alignment.
🔥 6. Steam Sterilization (Autoclaving)
- Temperature: 121°C to 134°C
- Pressure: 15–30 psi
- Cycle Duration: 15–30 minutes depending on autoclave and load
- For delicate or flexible models, consult manufacturer’s instructions
🔸 Aftercare & Maintenance
🧊 1. Cooling Down
- Allow instruments to cool down naturally after autoclaving before storage.
📦 2. Storage
- Store in dry, sterile trays or containers.
- Use instrument racks or padded holders to avoid bending or damaging the shafts.
🛠️ 3. Lubrication
- Use instrument-grade lubricants for joints and moving parts to maintain smooth action.
- Never use oil-based or industrial lubricants.
🧪 4. Avoid Harsh Chemicals
- Do not use bleach, saline, or iodine-based solutions — they corrode the steel.
- Use only approved medical-grade detergents and disinfectants.
🔁 5. Functional Testing
- Routinely test:
- Jaw grip strength and alignment
- Joint movement
- Ratchet lock mechanism (if applicable)
🚫 6. Do Not Use If Damaged
- A faulty or damaged forceps tip can cause tissue trauma or fail to retrieve stones properly. Replace when necessary.
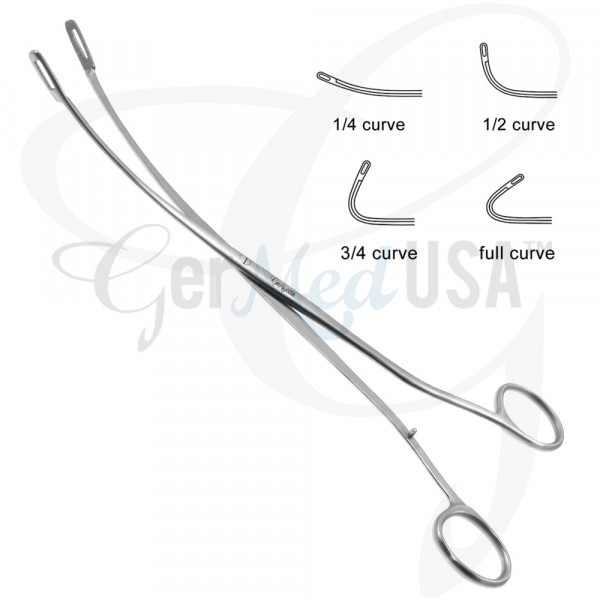
🔹 Desjardins Choledocholithotomy Forceps
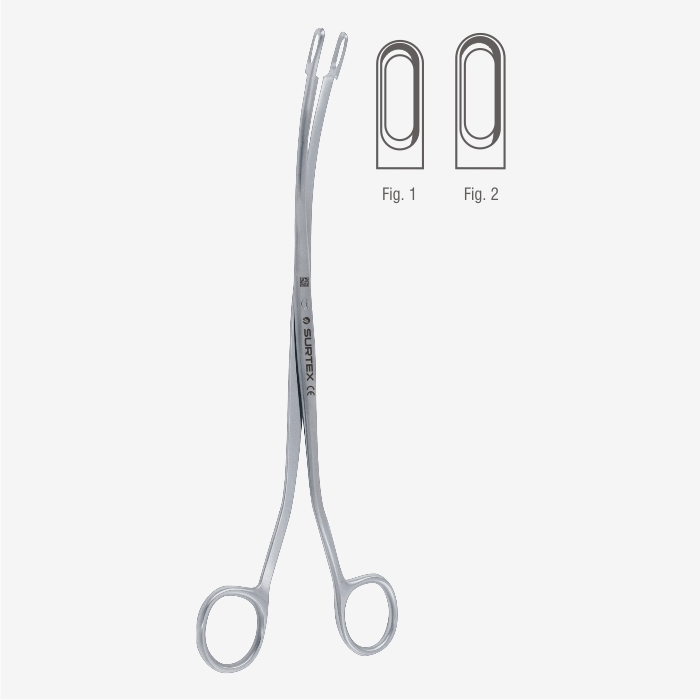
The Desjardins Choledocholithotomy Forceps is a specialized surgical instrument used in biliary surgery to grasp and remove gallstones (calculi) from the common bile duct (CBD) during an open choledocholithotomy (surgical removal of stones from the CBD).
Its unique long, curved design allows it to safely reach deep into the bile duct and securely extract stones without damaging delicate ductal tissue.
🔸 Parts of Desjardins Forceps
🔹 1. Tips (Jaws)
- The working ends are spoon- or cup-shaped, fenestrated, and slightly serrated to firmly grip stones without slippage.
- Some models have springy jaws for added tension.
🔗 2. Shaft
- Long and slightly curved to allow deep access into the common bile duct.
- The curvature aids maneuverability around surrounding structures.
⚙️ 3. Box Lock or Joint
- The pivot mechanism allowing the forceps to open and close smoothly.
- Located closer to the handle for better precision.
🔁 4. Handles / Finger Rings
- Standard scissor-like loops for thumb and ring/middle finger, ensuring secure and stable grip during delicate procedures.
🔸 Uses of Desjardins Forceps
🪨 1. Stone Extraction
- Used to grasp and remove gallstones from the common bile duct during open choledocholithotomy.
🧤 2. Delicate Exploration
- Can be used to probe the bile duct and dislodge or mobilize stones during surgery.
🩺 3. Assisting with T-tube Placement
- May be used to position or clear space for a T-tube in bile duct surgeries.
🧪 4. Stone Removal from Other Ducts
- Occasionally used in cystic duct or hepatic duct to remove retained or migrating calculi.
🔸 Sterilization Process
Due to contact with sterile internal structures (bile duct, liver, duodenum), proper sterilization is critical to prevent bile contamination or postoperative infections.
🧼 1. Pre-cleaning (Immediately After Use)
- Rinse thoroughly under lukewarm water to remove bile, blood, and debris.
- Use syringes or lumen brushes to flush the jaws if fenestrated.
🧽 2. Manual Cleaning
- Scrub with a soft brush and neutral pH enzymatic detergent.
- Focus on:
- Fenestrated or serrated tips
- Box joint
- Curved shaft and grooves
💧 3. Rinsing & Drying
- Rinse thoroughly with distilled water.
- Dry completely using a lint-free cloth or medical-grade dryer.
🔍 4. Inspection
- Examine the forceps for:
- Cracks, bent tips, or rust
- Smooth jaw closure and alignment
- Spring function (if present)
- Cleanliness of fenestrations
📦 5. Packaging for Sterilization
- Place in open position inside an autoclave pouch or wrap.
- Protect the tips using silicone caps if storing with other instruments.
🔥 6. Steam Sterilization (Autoclaving)
- Temperature: 121°C to 134°C
- Pressure: 15–30 psi
- Duration: 15–30 minutes
- Follow specific guidelines for delicate or coated instruments
🔸 Aftercare
🧊 1. Cooling
- Let the forceps cool naturally after autoclaving to avoid metal fatigue.
📦 2. Storage
- Store in a dry, sterile, padded tray to prevent bending or tip damage.
- Avoid stacking with heavy or sharp instruments.
🔸 Maintenance
🛠️ 1. Lubrication
- Use instrument-safe lubricant on the joint and moving parts to maintain smooth function.
🧪 2. Avoid Corrosives
- Do not use bleach, saline, or iodine-based agents, as they corrode surgical steel.
🪛 3. Routine Checks
Inspect regularly for:
- Proper jaw tension and alignment
- Tip integrity (no chips or cracks)
- Smooth action of the joint and lock
- Any wear in the fenestrations or serrations
🚫 4. Immediate Replacement if Damaged
- Any malfunction or misalignment can lead to duct injury during surgery. Replace as needed.
🔹 Morris Retractor
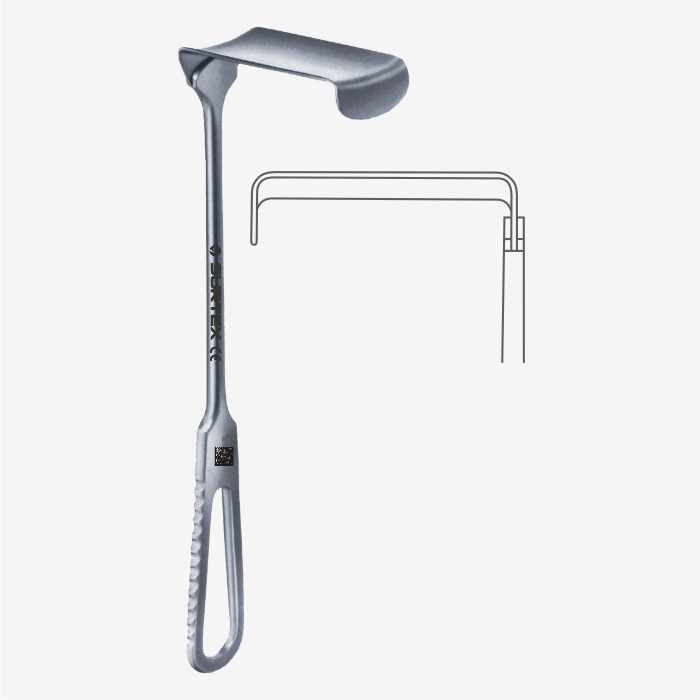
The Morris Retractor is a hand-held surgical instrument used to retract (pull back) soft tissues, muscles, or organs to provide better visibility and access to deeper anatomical structures during surgery. It is commonly used in abdominal and pelvic surgeries.
This retractor is characterized by a flat, wide blade with a slightly curved design and a solid handle, giving the surgeon or assistant the ability to hold tissues aside without causing trauma.
🔸 Parts of Morris Retractor
🔹 1. Blade (Working End)
- The flat, broad, and slightly curved end inserted into the wound or incision.
- Designed to lift or hold back tissue like the abdominal wall or muscles.
🔗 2. Neck
- A narrow connection between the blade and the handle, often slightly angled.
- Provides leverage and control when retracting tissues.
🖐️ 3. Handle (Grip Area)
- Sturdy and solid, usually with a grip-friendly contour.
- May have a knurled or grooved surface to prevent slipping.
🔸 Uses of Morris Retractor
🔍 1. Tissue Retraction
- Retracts muscle layers, fascia, or peritoneum during deep abdominal surgeries.
🧠 2. Exposure of Operative Site
- Widely used in abdominal, gynecological, and pelvic surgeries to expose internal organs.
🦴 3. Orthopedic Use
- Sometimes used in spine or hip surgery to retract muscles or soft tissues.
🩺 4. Hernia and GI Surgeries
- Assists in herniorrhaphy, colectomy, and other lower abdominal surgeries by holding back the wound edges.
🔸 Sterilization of Morris Retractor
Being a reusable metal surgical instrument, it must be thoroughly sterilized before and after each procedure to maintain aseptic conditions.
🧼 1. Pre-Cleaning (Immediately After Use)
- Rinse under lukewarm running water to remove blood, tissue, and fluids.
- Avoid hot water initially (to prevent protein coagulation).
🧽 2. Manual Cleaning
- Use a soft-bristled brush and enzymatic detergent to clean:
- The blade surface
- The grooves of the handle
- The neck region
💧 3. Rinsing and Drying
- Rinse with distilled water to remove chemical residues.
- Dry completely with a lint-free cloth or air dryer to prevent rust.
🔍 4. Inspection Before Sterilization
Check for:
- Scratches, dents, or bending of the blade
- Rough spots or residue in grooves
- Cracks or rust, especially at the neck
📦 5. Packaging
- Wrap in a sterile surgical pouch or cloth wrap.
- Place with other retractors or large instruments in appropriate trays.
🔥 6. Steam Sterilization (Autoclaving)
- Temperature: 121–134°C
- Pressure: 15–30 psi
- Cycle Time: 15–30 minutes
- Can be autoclaved repeatedly if cleaned properly
🔸 Aftercare and Maintenance
🧊 1. Cooling
- Allow the retractor to cool naturally after autoclaving — avoid sudden cooling with water.
📦 2. Storage
- Store in dry, sterile, padded trays or closed surgical cabinets.
- Avoid stacking with fine or delicate instruments to prevent scratches.
🛠️ 3. Maintenance Routine
- Clean immediately after each use to prevent staining or corrosion.
- Use instrument-safe lubricant if joints (in retractors with moving parts) are present — Morris is typically joint-free.
🧪 4. Avoid Harsh Chemicals
- Never soak in bleach, iodine, or saline. These cause pitting and corrosion.
- Use only approved enzymatic cleaners and neutral pH solutions.
🪛 5. Routine Checks
- Inspect for:
- Blade edge deformation
- Handle cracks or looseness
- Surface rust or pitting
- Replace if the retractor shows wear, poor retraction efficiency, or safety concerns.
🔹 Czerny Retractor
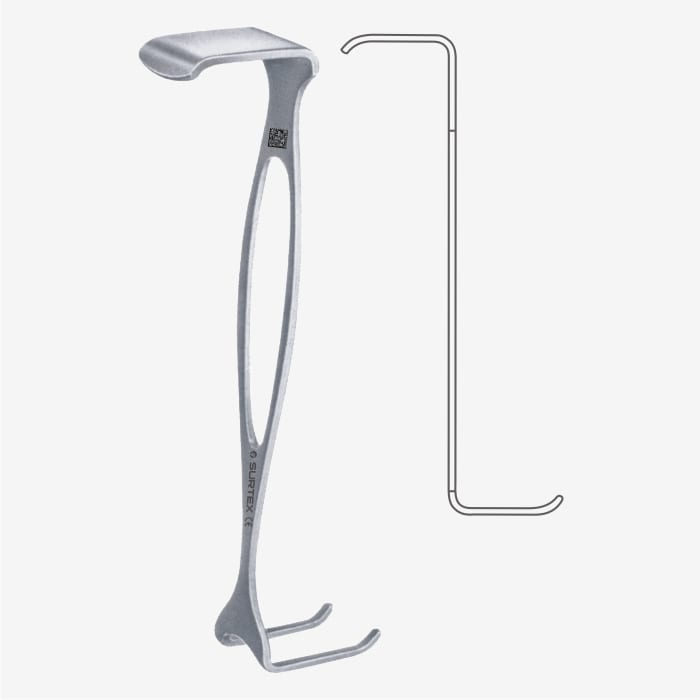
The Czerny Retractor is a double-ended, hand-held surgical retractor used to hold back soft tissues or wound edges during surgery. It is widely used in general, orthopedic, gynecologic, and plastic surgeries to improve visibility and access to the surgical field.
Its double-ended design features:
- One end with two sharp or blunt prongs
- The other with a flat, wide blade
This makes it versatile and easy to use without requiring additional assistants or self-retaining mechanisms.
🔸 Parts of Czerny Retractor
🔹 1. Pronged End
- One end has two prongs (either sharp or blunt).
- Used to retract skin, fascia, or muscles by hooking under the tissue.
🔧 2. Flat Blade End
- The other end has a broad, flat blade designed to push tissue aside gently.
- Useful for superficial or shallow retraction.
🔗 3. Central Shaft
- The solid metal bar connecting the two ends.
- Provides strength, leverage, and acts as the handle.
🖐️ 4. Grip Surface (Handle Area)
- The central part often has a textured or grooved surface for a better grip.
- Allows the user to hold the instrument steadily with minimal hand fatigue.
🔸 Uses of Czerny Retractor
🔍 1. Wound Edge Retraction
- Commonly used to retract the edges of surgical incisions or shallow wounds during abdominal or orthopedic procedures.
🧠 2. Soft Tissue Retraction
- Ideal for retracting skin, subcutaneous tissue, or superficial muscle layers.
🩺 3. Exposure of Surgical Field
- Frequently used in hernia repairs, appendectomy, C-sections, and minor orthopedic surgeries.
🧤 4. Dual-End Versatility
- Surgeons can quickly switch between prongs for deeper retraction and the flat blade for superficial structures without changing instruments.
🔸 Sterilization of Czerny Retractor
As a reusable surgical instrument, it must be properly cleaned and sterilized to maintain aseptic technique and prevent infection.
🧼 1. Pre-cleaning (Immediately After Use)
- Rinse under lukewarm water to remove blood, tissues, and debris.
- Avoid hot water before cleaning, which may cause protein coagulation.
🧽 2. Manual Cleaning
- Use a soft brush and enzymatic or neutral pH detergent.
- Pay attention to:
- Pronged end (between the prongs)
- Grooved or serrated grip areas
- Flat blade surface
💧 3. Rinsing and Drying
- Rinse with distilled or deionized water.
- Dry thoroughly with a lint-free cloth or compressed air.
🔍 4. Inspection Before Sterilization
Check for:
- Tip sharpness or deformation
- Cracks, rust, or wear on both ends
- Smooth finish for patient safety
📦 5. Packaging
- Wrap the retractor in a sterile wrap or pouch.
- Place it in a designated tray with other retractors, ensuring tips are protected.
🔥 6. Autoclave Sterilization (Steam)
- Temperature: 121–134°C
- Pressure: 15–30 psi
- Time: 15–30 minutes
- Autoclave-safe and highly durable for repeated cycles
🔸 Aftercare
🧊 1. Cooling Down
- Allow to cool naturally after autoclaving — avoid quenching in water.
📦 2. Safe Storage
- Store in a dry, sterile tray or instrument cabinet.
- Avoid contact with heavier instruments that may bend prongs or blade.
🔸 Maintenance
🛠️ 1. Routine Cleaning
- Clean immediately after each use to avoid staining or corrosion.
🧪 2. Avoid Corrosives
- Do not use bleach, iodine, or saline solutions.
- Stick to approved enzymatic detergents.
🪛 3. Regular Inspections
Check for:
- Bent or broken prongs
- Surface scratches or rust
- Looseness or damage at the junctions
✔️ Replace immediately if any damage is noted — especially sharp prongs which may harm the patient if compromised.
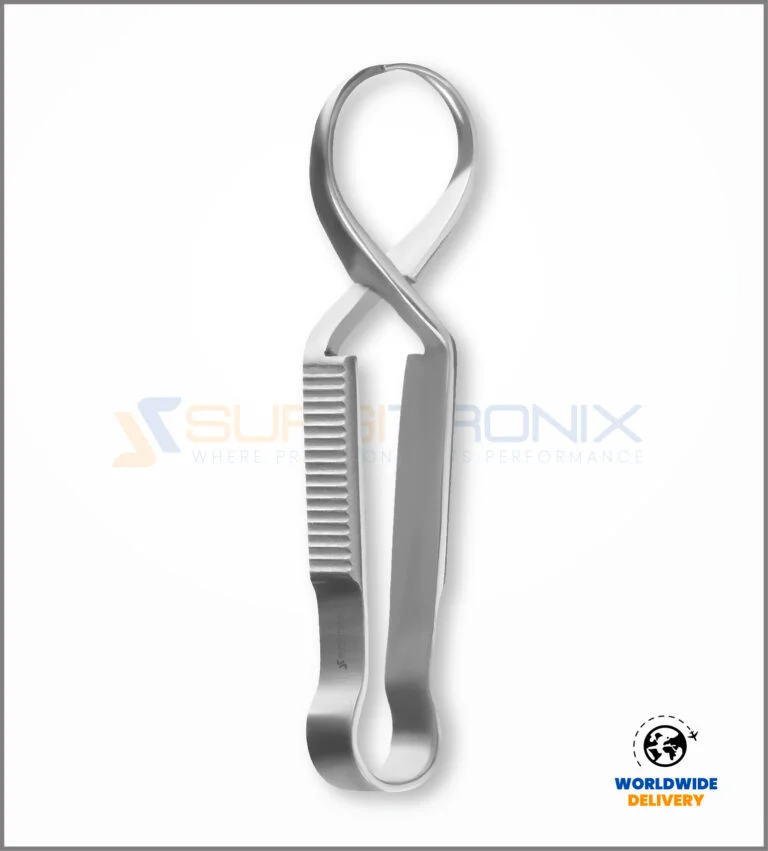
🔹 Mayo Towel Clip
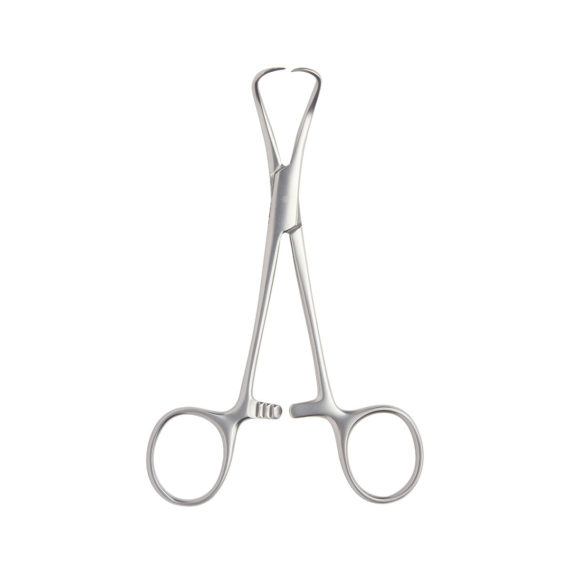
The Mayo towel clip is a small, sharp-tipped clamping instrument used primarily to secure surgical drapes and towels to the patient’s skin or to each other during sterile procedures. It ensures the sterile field stays in place throughout surgery.
Also known as a Mayo Towel Clamp, it is a penetrating clamp, meaning it pierces through the drape material for a firm hold.
🔸 Parts of a Mayo Towel Clip
🔩 1. Tips (Jaws)
- Sharp, curved or pointed tips designed to pierce drapes or skin (depending on use).
- Made to interlock tightly to prevent movement.
🔗 2. Box Lock (Joint)
- The hinge mechanism where the two arms pivot.
- Allows smooth opening and closing of the instrument.
🦿 3. Shanks
- Long, straight arms that connect the joint to the handle.
- Provide leverage and reach.
🔐 4. Ratchet Lock
- Interlocking teeth near the handle that secure the clip in a closed position without constant hand pressure.
🔁 5. Finger Rings
- Circular loops for thumb and finger placement, enabling controlled use.
🔸 Uses of Mayo Towel Clip
🩺 1. Securing Sterile Drapes/Towels
- Most commonly used to fix surgical towels or drapes to the patient or to each other, maintaining a stable sterile field.
🧷 2. Holding Equipment or Tubing
- Sometimes used to temporarily secure suction tubes, cautery wires, or surgical covers during a procedure.
💉 3. Temporary Tissue Clamping
- In emergencies, may be used to grasp tissue, although not its primary function.
🧤 4. Veterinary or Emergency Field Use
- May be used to pierce and fix skin in field surgeries or minor procedures (less common in human surgery due to trauma risk).
🔸 Sterilization of Mayo Towel Clip
Because the clip comes into contact with sterile drapes and may contact skin, proper cleaning and sterilization are essential to prevent cross-contamination.
🧼 1. Pre-cleaning (Immediately After Use)
- Rinse under lukewarm water to remove visible contamination (e.g., blood, drape lint).
- Keep the clip open to allow full cleaning access.
🧽 2. Manual Cleaning
- Scrub with a soft brush and enzymatic detergent, especially:
- Around the sharp tips
- Inside the ratchet lock and joint
- Ensure the interlocking teeth are debris-free.
💧 3. Rinsing and Drying
- Rinse thoroughly with distilled water.
- Dry completely using a lint-free cloth or compressed air to prevent rust.
🔍 4. Inspection
Check for:
- Sharpness of tips
- Proper locking function
- Rust, bending, or tip damage
- Smooth hinge action
📦 5. Packaging for Sterilization
- Place the clip in a slightly open position inside a sterile wrap or autoclave pouch.
- Use tip protectors if sharp ends may pierce the pouch or injure others.
🔥 6. Autoclaving (Steam Sterilization)
- Temperature: 121°C to 134°C
- Pressure: 15–30 psi
- Cycle Time: 15–30 minutes depending on equipment and load
🔸 Aftercare & Storage
🧊 1. Cooling Down
- Allow to cool naturally after autoclaving before storage.
📦 2. Proper Storage
- Store in a dry, sterile instrument tray or case.
- Separate from delicate instruments to avoid accidental damage.
🔸 Maintenance Tips
🛠️ 1. Lubrication
- Use instrument-grade lubricants at the box lock and ratchet weekly or as needed to maintain smooth movement.
🧪 2. Avoid Corrosive Agents
- Never clean with bleach, saline, or acidic disinfectants, as they corrode surgical steel.
🪛 3. Regular Inspection
- Before and after use, check for:
- Sharpness and tip alignment
- Functioning of the ratchet
- Signs of wear, pitting, or rust
🧰 4. Replace if Damaged
- A damaged towel clip may tear sterile drapes or injure skin. Always replace faulty instruments.
🔹 Cross-Action Towel Clip
A Cross-Action Towel Clip (also known as a Spring Towel Clamp) is a non-penetrating surgical instrument used to secure drapes and towels without piercing the material or skin. It uses spring tension and a cross-action mechanism rather than a ratchet lock. These clips are commonly used during surgeries to maintain drape integrity and are considered atraumatic.
Unlike penetrating clips like the Mayo towel clip, the cross-action clip is safer on skin and preferred in delicate procedures or for holding lightweight items.
🔸 Parts of a Cross-Action Towel Clip
🔩 1. Blunt Tips (Jaws)
- The ends are flat or slightly serrated, blunt and designed to grip drapes or materials without piercing.
- Safer for use around patients’ skin or soft materials.
🔁 2. Cross-Action Mechanism
- Instead of a ratchet, these clips have a crossing lever mechanism that creates a spring-loaded clamping force.
- This enables the clip to close automatically when released and open when pressed.
🦿 3. Shanks / Arms
- The two curved metal arms that cross each other to form the spring tension.
- Provides the clamping strength without locking teeth.
🖐️ 4. Finger Pads or Flat Grip Ends
- The ends are slightly widened or flattened to allow for easy pressing and release.
- Some models include knurled textures for better grip.
🔸 Uses of Cross-Action Towel Clip
🩺 1. Securing Surgical Drapes or Towels
- Used to hold drapes in place during sterile procedures without tearing or puncturing the material.
🧼 2. Draping Around Delicate Areas
- Ideal for securing around the face, eyes, or pediatric skin where sharp clips could cause trauma.
📦 3. Holding Lightweight Tubing or Instruments
- Can hold suction tubing, cautery wires, or lightweight instruments to the drape.
🧪 4. Cosmetic or Minor Surgical Procedures
- Frequently used in ophthalmic, ENT, and dermatologic surgeries.
🚫 Note: Not used for deep tissue clamping or heavy loads, as it’s non-penetrating and spring-tensioned.
🔸 Sterilization of Cross-Action Towel Clip
As a reusable surgical instrument that comes into contact with the sterile field, proper cleaning and sterilization are essential.
🧼 1. Pre-cleaning (Immediately After Use)
- Rinse under lukewarm running water to remove any visible contaminants.
- Press the arms to open the jaws fully during rinsing.
🧽 2. Manual Cleaning
- Clean using a soft brush and enzymatic detergent.
- Focus on:
- Jaws and contact surfaces
- Cross-action joint area
💧 3. Rinsing & Drying
- Rinse with distilled water to remove detergent residues.
- Dry thoroughly using a lint-free cloth or medical-grade air dryer.
🔍 4. Inspection
Check for:
- Spring tension (it should snap shut quickly)
- No rust or cracks at the cross-joint
- Smooth function of opening and closing
📦 5. Packaging for Sterilization
- Package in a sterile wrap or pouch, keeping the clip slightly open to ensure proper steam penetration.
🔥 6. Steam Sterilization (Autoclaving)
- Temperature: 121–134°C
- Pressure: 15–30 psi
- Time: 15–30 minutes
- Suitable for repeated use with proper care
🔸 Aftercare & Storage
🧊 1. Cooling Down
- Allow the instrument to cool naturally after autoclaving. Avoid sudden temperature changes.
📦 2. Storage
- Store in a sterile, dry tray or container, preferably with dedicated slots to prevent crushing the spring arms.
🔸 Maintenance
🛠️ 1. Lubrication
- Apply instrument-grade lubricant to the crossing hinge to maintain spring action and prevent stiffness.
🧪 2. Avoid Corrosive Agents
- Do not use bleach, iodine, or saline — these degrade stainless steel.
- Always use neutral-pH cleaning solutions.
🪛 3. Regular Functional Checks
Inspect for:
- Spring action (should snap closed when released)
- Tip alignment
- Any rust, cracks, or bending of the arms
🚫 Replace if:
- The clip loses its clamping force
- Arms are bent or misaligned
- Rust or permanent staining appears
🔹 B.P. Scalpel Handle
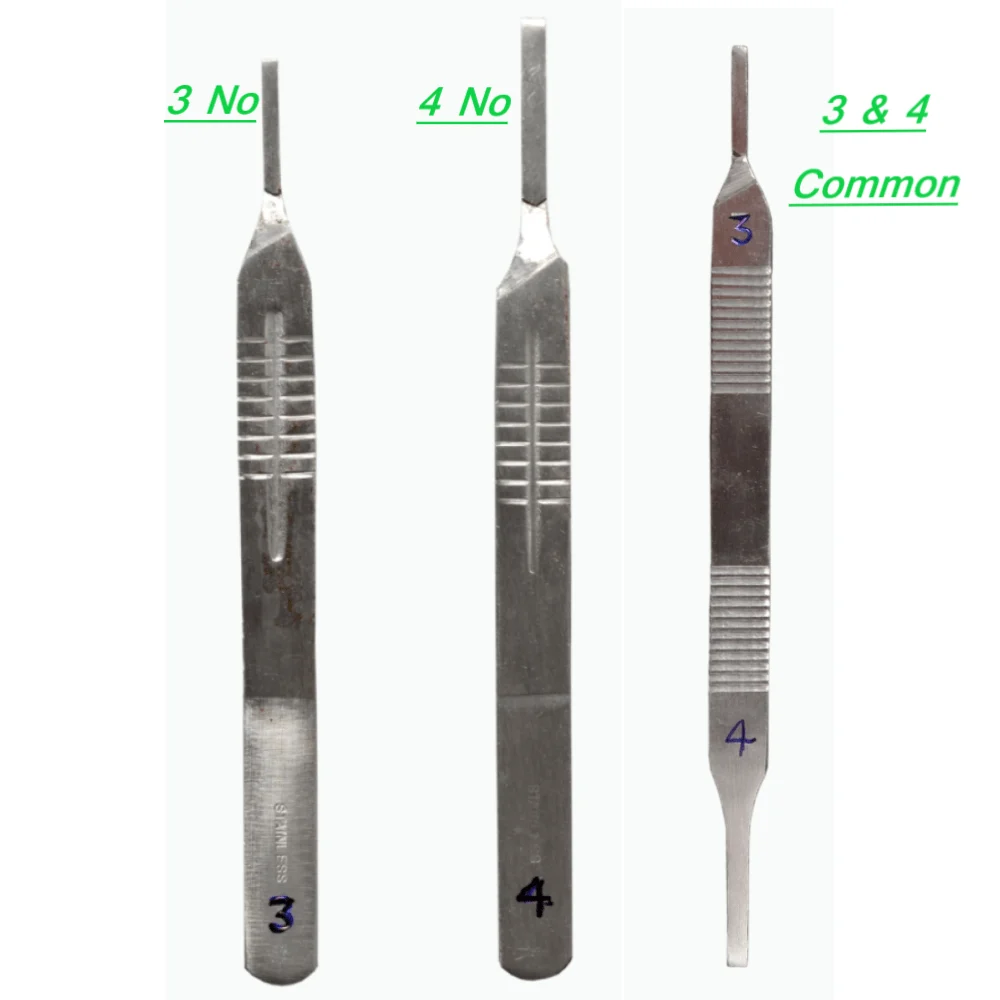
The B.P. (Bard-Parker) scalpel handle is a reusable stainless-steel surgical instrument designed to hold interchangeable disposable blades. It is widely used for incising skin, tissue, and organs in nearly all surgical fields.
🔁 It is versatile, and compatible with various blade sizes (e.g., No. 10, 11, 15), depending on the surgical requirement.
🔸 Parts of a B.P. Scalpel Handle
🔹 1. Blade Fitting Slot (Distal End)
- The notched area where the disposable blade is mounted.
- Designed to securely hold the blade in place without movement.
- Often includes a groove or ridge to fit specific blade numbers (No. 3 handle fits blades 10, 11, 12, 15; No. 4 fits 20, 21, etc.).
🪛 2. Shaft / Body
- Long, flat, and usually knurled or textured for a non-slip grip.
- Provides balance and precision during delicate incisions.
🖐️ 3. Handle Grip
- The proximal part where the surgeon or nurse holds the instrument.
- Ergonomically shaped for comfort and control during extended use.
📏 Handle Sizes
- No. 3 (common for small surgeries)
- No. 4 (larger, used for deep or major procedures)
- No. 7 (longer, pencil-shaped for precise work)
🔸 Uses of B.P. Scalpel Handle
🔪 1. Making Surgical Incisions
- Used to cut skin, subcutaneous tissue, muscles, or organs in any surgical procedure.
🩺 2. Mounting Surgical Blades
- Acts as a blade holder — allowing controlled movement of disposable surgical blades.
🧬 3. Dissection and Sharp Cutting
- Used in anatomical dissections, biopsies, and precise incisions.
🧤 4. Versatility in All Specialties
- Employed in general surgery, plastic surgery, ENT, OB/GYN, orthopedics, and minor procedures.
🔸 Sterilization of B.P. Scalpel Handle
Being a reusable instrument, the scalpel handle must be thoroughly cleaned and sterilized before each use
🧼 1. Pre-Cleaning (After Blade Removal)
- Always remove the blade using artery forceps or blade remover to avoid injury.
- Rinse the handle under lukewarm running water to remove blood and debris.
🧽 2. Manual Cleaning
- Use a soft brush and enzymatic detergent to clean:
- Blade groove and slot
- Knurled or textured areas
- Any blood stains or hidden crevices
💧 3. Rinsing and Drying
- Rinse thoroughly with distilled water.
- Dry with a lint-free cloth or compressed air to prevent rust.
🔍 4. Inspection Before Sterilization
Check for:
- Cracks or bends at the blade fitting slot
- Surface rust, pitting, or residue
- Smoothness of grip and cleanliness of grooves
📦 5. Packaging
- Wrap the handle in a sterile pouch or autoclave wrap.
- Ensure it is blade-free and ready for safe handling.
🔥 6. Autoclave Sterilization
- Temperature: 121–134°C
- Pressure: 15–30 psi
- Time: 15–30 minutes depending on the load
- Safe for multiple cycles with proper care
🔸 Aftercare
🧊 1. Allow Cooling
- Let the handle cool naturally after autoclaving. Avoid quenching in water.
📦 2. Safe Storage
- Store in a dry, sterile tray or instrument cabinet.
- Always keep it separate from blades and ready for blade attachment.
🔸 Maintenance Tips
🛠️ 1. Routine Cleaning
- Clean immediately after each use, especially the blade slot, to avoid buildup.
🧪 2. Avoid Harsh Chemicals
- Do not use bleach, iodine, or saline. These can cause corrosion.
- Stick to neutral pH or enzymatic solutions.
🪛 3. Check Blade Fit
- Ensure the handle still fits blades snugly.
- If blades slip or don’t fit properly, the handle may be worn or bent — replace it.
🧰 4. Inspect Regularly
- Look for:
- Dull edges at the slot
- Rust in the knurled area
- Bending or distortion from frequent blade changes