micro unit -6
AS PER INC SYLLABUS
Practical Microbiology
a) Microscope – handling & care of Parts, uses, handling
microscopes Identify and care of microscope
common microbes b) Observation of staining procedure, Specimens Slides
under the microscope preparation and examination of
slides and smears
c) Identification of common
microbes under the microscope for
morphology of different microbes
INTRODUCTION TO LABORATORY TECHNIQUES
- MICRSCOPE Microbe’s નો અભ્યાસ કરવા માટેનું આ સાધન છે.
- જેમા ચોક્કસાઇ પુર્વકની રચનાથી મેગ્નીફીકેશન શક્ય બને છે,આમા શક્તિશાળી lense ગોઠવવામાં આવેલા હોવાથી micro-organism નો આકાર, પ્રકાર, હલન ચલન તથા સમુહ જાણી શકાય છે.
- Micro = Small,
- Scope = View
- Antony van leeuwen hock એ 1975 માં શોધ કરી, ત્યાર બાદ પછીથી સુધારા-વધારા થતા હાલનું અધતન Microscope બની શકયુ. Simple Microscope માં object 4 to 40 ગણો magnify થઇ શકે છે.
- Electrone Microscope માં 1,00,000 ગણું magnification શક્ય છે.
- Compound Microscope માં 100 to 430 ગણું magnification થઇ શકે છે જે બહોળા પ્રમાણમાં ઉપયોગમાં લેવાતું Microscope છે (હલ માં ઉપયોગ મા લેવાતુ)
Part of Microscope – માઈક્રો સ્કોપ ના ભાગો
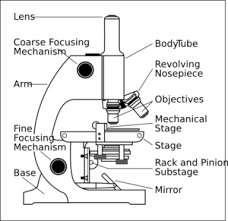
ત્રણ મુખ્ય parts છે,
- (1) stand
- (2) body અને
- (3) optical system.
- (1) Stand :-ઘોડાની નાળ જેવા Solid Iron થી બનેલો ભાગ છે. તે સપોર્ટીંગ ભાગ છે તેની બનાવટ એવી રીતે કરવામાં આવી છે. કે જેથી Optical system ના alignment ને support મળી રહે.
- (૨) Body :-“C“ આકારના Part ને body કહે છે. જેના દ્વારા Microscope ઉંચકી શકાય છે. તેની રચના માં
- (a) Stage :- Specimen ને પ્લેટફોર્મ પૂરૂ પાડે છે. તેને central operator જે specimen mounted કરવા માટે હોય છે. તે slide માંથી light rays pass કરવા શક્ય બનાવે છે. Slide ને position માં રાખવા stage પર clip રાખવામાં આવેલી હોય છે. Slide ના horizontal અને vertical planes ની મુવમેન્ટ માટે screws આપવામાં આવે છે.
- (b) Sub stage :- તે stage નીચે આવેલ છે. અને screw દ્વારા ઉપર નીચે કરવાનું કાર્ય કરે છે,
- (c) Mirror :- Specimen ઉપર light reflect કરે તેને કોઇપણ direction માં turned કરી શકાય છે. તેને બે surfaces હોય છે.
- (i) Plain – Sunlight માટે ઉપયોગમાં લેવામાં આવે છે,
- (ii) Concave Artificial light માટે ઉપયોગમાં લેવામાં આવે છે.
(3) Optical System
- :- Eye piece, object glass a condensor optical system બનાવે છે.
- (a) Body tube :- Wide tube objective lens ocular piece connect કરે છે. તે બે જુદા-જુદા arrangements દ્વારા up-down કરે છે. Body ના “ C “ આકારના ઉપરના ભાગે જોડાયેલી હોય
- (b) Coarse adjustment :- body tube ને નીચેની તરફ સરકાવી specimen ને Focus કરવા માટે છે.
- (c) Fine adjustment :- Delicate focussing movement માટે છે. Picture ચોક્કસ તથા સ્પષ્ટ કરવા માટે draw tube ને સરકાવવા મદદ કરે છે.
- (d) Nose piece :- Draw tube ના નીચેના છેડે આવેલ છે. તેના sockets માં જુદા-જુદા magnifiying power ના object lenses fit કરી શકાય છે.
- (e) Objactive lenses :- Objact ની તાત્કાલિક ઉપર હોય છે. તે magnified image આપે છે. તેની સંખ્યા ૩ હોય છે. જે વધતા ઓછા પ્રમાણમાં magnifying power ના હોય છે. (10× 45×, 100×)
- (f) Eye pieces :- Draw tube ના ઉપરના છેડે હોય છે, જેના મારફતે examiner slide નું picture (magnified થયેલુ) જોઇ શકે છે.
- (g) Limb or Arm :- Illuminating apparetus, stage અનેobservation tube હોય છે.
- (h) Draw tube :- body tube ની અંદર આવેલ હોય છે, કે જે ઉપર નીચે સરકાવી શકાય છે.
Mechanical stage :- “c“ shape ની body ના નીચેના છેડે જોડાયેલ હોય છે, જેની ઉપર slide ને ગોઠવી શકાય છે. Slide adjustment screw દ્વારા ડાબે – જમણે slide move કરી શકાય છે.
Glass slide:-
Mechanical stage પર ગોઠવવામાં આવે છે.
Condenser :-
Mechanical stage ની નીચે તેની રચના થયેલી હોય છે. જે lenses ની મદદથી microbes ને magnified કરવામાં મદદ કરે છે.
- Diaphragm :-Condenser ના નીચેના ભાગે આવેલો હોય છે. જેના મારફતે light rays slide માંથી pass થાય છે.
- Mirror :-પ્રકાશને પરાવર્તીત કરી condenser મારફતે object પર ફેંકે છે.
Care of Micro Scope-માઈક્રોસ્કોપ ની સંભાળ
- કીમતી સાધન હોવાથી સંભાળી રાખવું તથા વાપરવું.
- બે હાથની મદદથી જ ઉંચકવું જોઈએ.
- ડાબા હાથની હથેળીથી base ની નીચે આધાર આપવો. જમણા હાથની મદદથી body ના “ C” આકારના ભાગને પકડવો.
- બંને તેટલુ ઓછુ હેર ફેર કરવું.
- પુરતો પ્રકાશ મળી રહે તેવી જગ્યાએ ગોઠવણ કરવી જોઈએ.
- Draw tube ને નીચે સરકાવતી વખતે તે mechanical stage સાથે જોડાઇ ન જાય તે જોવુ જોઈએ.
- Micro Scope અને તેના stage ને હમેશા dry રાખવું તેના માટે ફલાલીન duster રાખવું જોઈએ.
- Lenses ને lanse paper થી clean કરવા.
- Lenses immersion oil થી બગડે ત્યારે પહેલા dry lensepaper ત્યાર બાદ xylol માં પલાળેલુ lense paper થી સાફ કરી ફરીથી dry lense paper થી clean કરી dry કરવા.
- ઉપયોગ બાદ સૌથી ઓછા શક્તિશાળી lense ને stage થોડુ ઉપર સરકાવવું, અને condenser ને થોડુ નીચુ સરકાવવુ જોઈએ.
- Mirror હંમેશા clean અને dry રાખવા જોઈએ.
- Plastic cover સાથે તેના cabinate મા જ રાખવું.
Micro Scope ના વપરાશ (ઉપયોગ) ની રીત
- → Microscope ને ટેબલની કીનારી તરફ એ રીતે ગોઠવવું કે તેના body નો “ C “ shape આપણી chest તરફ આવે. અને Mirror વિરૂદ્ધ દિશામાં આવે.આપણી સામેની બાજુથી સુર્યપ્રકાશ કે lamp નો પ્રકાશ એવી રીતે આવવોજોઈએ કે તે lans પર સીધો પડે
- .→ Condenser ને એવી રીતે ગોઠવવું કે તેમા દાખલ થયેલા પ્રકાશના કીરણો mechanical stage માં દાખલ થઇ slide ના જરૂરી ભાગને પ્રકાશીત કરે.
- → Stained slides ને તપાસવા વધુ શક્તિશાળી lenses ની જરૂર પડે છે
- .→ સૌ પ્રથમ ઓછા શક્તિશાળી lenses slide પર focus કરવો, આમ કરતી વખતે coarse adjustment ની મદદથી body tube ને નીચે લાવવી. તે slide ને touch ન થાય તેની કાળજી રાખવી.ત્યાર બાદ જરૂરી magnification કરતા lenses ને ગોઠવો. Eye pieces દ્વારા slide માં જોવું અને જરૂર મુજબનું tube ઉપર નીચે કરી adjustment કરવું.
- → ત્યારબાદ fine adjustment કરવું.
Stainning of micro-organisms – માઈક્રો ઓર્ગેનીઝમ ના સ્ટેઇનીંગ
- Microbes ના biological study માટે procedure (staining of slide) air drying, chemical fixation અને aniline dye વડે staining થી કરવામાં આવે છે.
- Bacteria ને surrounds થી અલગ દેખાવવાળા કરવામાં આવે છે. જેથી examiner સહેલાઇ થી જોઈ શકે અને slide ને લાંબા સમય સુધી અભ્યાસ માટે રાખી શકાય.
Smear
- એક Inoculating loop દ્વારા growth culture media માથી micro- organisms ની એક પાતળી ફીલ્મની જેમ slide પર ફેલાવવામાં આવે છે.
- Insulated handal વાળા nichrom ના wire ની loop વાપરવામાં આવે છે. loop ને વપરાશમાં લેતા પહેલા heating કે flaming થી stearile કરવામાં આવે છે.
- ત્યાર બાદ loop ઠંડુ પડે ત્યારે તેનો ઉપયોગ કરવામાં આવે છે. smear લેવાય ગયા બાદ loop ને ફરીથી sterile કરવામાં આવે છે.
- Bacterial suspension ને clean slide પર ફેલાવી smear બનાવ્યા બાદ તેને air / dry માટે રાખવામાં આવે છે.
- Dry smear ને ત્યાર બાદ Bunsen burner flare માંથી ઘણી વખત પસાર કરવામાં આવે છે જેને Heat fix કહેવાય છે. Heat fixing થી bacteria ના enzymes ના ગુણધર્મો બદલાય છે. અને cell નો નાશ થતો અટકે છે. Heat થી bacteria slide પર adherent (ચોટી) થાય છે.
Simple stain
- મોટા ભાગના ઉપયોગમાં લેવાતા Stain benzene માથી ઉતરી આવેલા coaltar derivative ની બનેલી dye (aniline) synthetic હોય છે. Dyes સામાન્ય રીતે salts હોય છે. ક્યારેક acid કે bases ના ions ધરાવતી હોય છે.
- positive ion ધરાવતી stain dye ને basic stain અને negative ion ધરાવતી dye acidic stain કહે છે.
- મોટા ભાગના bacteria basic stain માં stain થાય છે. જે staining procedure માં એક જ stain વાપરવામાં આવતુ હોય તેને simple stain કહે છે.
- જે simple stain bacteria ને stain કરતુ હોય તે direct stain કહેવાય છે.
- જ્યારે જે simple stain back ground ને stain કરતું હોય અને bacteria ને નહીં તેને negative stains કહે છે.
- . Simple stain નો ઉપયોગ bacteria ની morphology અને arrangement નો અભ્યાસ કરવા માટે થાય છે.
Gram stain technique
- Hans Christian gram દ્વારા 1884 માં આપવામાં આવી bacteria identify અને classify કરવા માટે આ ખુબ ઉપયોગી stain છે આ stain થી bacteria a gram positive gram negative group મા અલગ તારવી શકાય છે.
- Staining technique
- Apply primary stain (crystal violet) બધા bacteria purple stain થઈજશે.
- Apply mordent (grains iodine) આનાથી bacteria અને primary નું bonding intensified થશે.
- Apply decolorizing (ethyl alcohol, or ethyl alcohol acetone) તેનાથી bacteria નુ primary stain washed out થશે. જ્યારે અમુક unaffected થશે.
- Apply secondary stain or counter stain (sofranin) – આનાથી bacteria red colour ના થશે. આ procedure પછી slide examin કરતા bacteria easily decolorized થાય છે. તેને gram negative અને જે bacteria primary stain retain કરે છે. તેમને positive ગણાય છે
Acid fast stainnig
- Ziehl – Ncolson procedure સામાન્ય રીતે સર્વત્ર વાપરવામાં આવતી technique છે. આમાં smear કરવામાં આવે છે.
- Carbolfuchsin વડે flooded કરવામાં આવે છે(ડુબાડવું – જે bacteria ની chemical corpound સાથે જોડાય છે.
- Ziehl એ aniline ની જગ્યાએ 5% phenol ધરાવતા carbolfuchisi ને dry તરીકે દાખલ કર્યું.
- Bacteria માં dry ના penetration માટે slide ને smear સાથે ગરમ કરવામાં આવે છે. ત્યાર બાદ smear ને acid-alcohol ના mixture થી wash કરતા મોટા ભાગના bacteria stain નો colour ગુમાવે છે. પરંતુ acid fast organisms તે colour ગુમાવતા નથી.
Hanging drop method
- → હેગીંગ ડ્રોપ slide લો. જો હેંગીગ ડ્રોપ slide ન હોય તો plain Slide લો અને Slide પર વચ્ચે plasticin ની મદદથી dipression જેવો ભાગ બનાવો. નાના amount માં પેટ્રોલિયમ જેલી 50 પૈસાના સિક્કાના આકાર જેટલી તમારી હથેળી માં લો, તેને slide પર તેવડા જ આકારના smear જેટલી ફેલાવો.
- ->કવર સ્લીપને તેની ધારથી પકડો અને પેટ્રોલિયમ જેલીને કવર સ્લીપ પર સ્ક્રબ કરો. બાકીની ત્રણેય સ્લાઇડોને પણ કાળજી પુર્વક પેટ્રોલિયમ જેલી પર સ્ક્રબ કરો. દરેક વખતે પેટ્રોલિયમ જેલી કવર સ્લિપની એક જ બાજુએ લાગે તેની કાળજી રાખો.
- → કવર સ્લીપને પેપર ટોવેલ પર મુકો જેમા પેટ્રોલિયમ જેલી ઉપરની સાઇડ આવે તેની કાળજી રાખો.
- Slide Organic infusion કે suspension નુ એક drops slip પર મુકો